Saturday 20 April 2019

Day of Battle


I’ve already written quite a few words about he day of Salute on the 6th April, but not yet actually written much about the Lutzen 1632 refight played out by the Friends of General Haig on the day.  This post therefore aims to correct this omission, and is the official battle report.

The order of battle has already been covered in a previous post here.

The troop rosters, set out for Warlord Games’ Pike and Shote, are also shared on Google drive here.

We followed the historical deployment as described in this picture.


We had divided each army into three commands.  We had six players and an umpire and so to start with we divided the commands among the six players.  As the day went on we allowed the players to have time off to go and see the rest of the show and so other commanders in the same army would take temporary control of their command.  The Imperial army had a fourth command (Pappenheim) which would arrive later and we decided to allow Wallenstein to command that in addition to his own command.


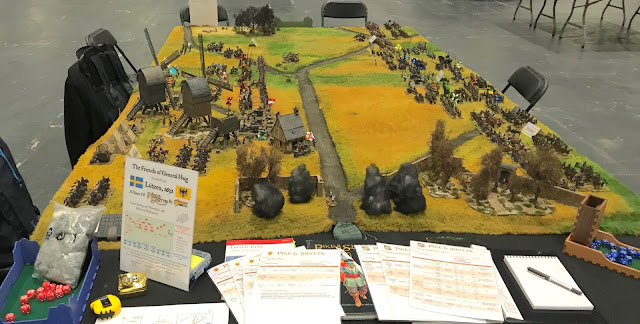
You can see it is a fairly cramped battle field, without much room for manoeuvre.  This was intentional, as the cramped conditions were all part of Wallenstein’s defence.  He knew that Gustav would try to outflank him and so he used the terrain to mitigate against this.  He also refused both flanks in an echelon formation, with some skirmishing Croats thrown forward to further protect each flank.


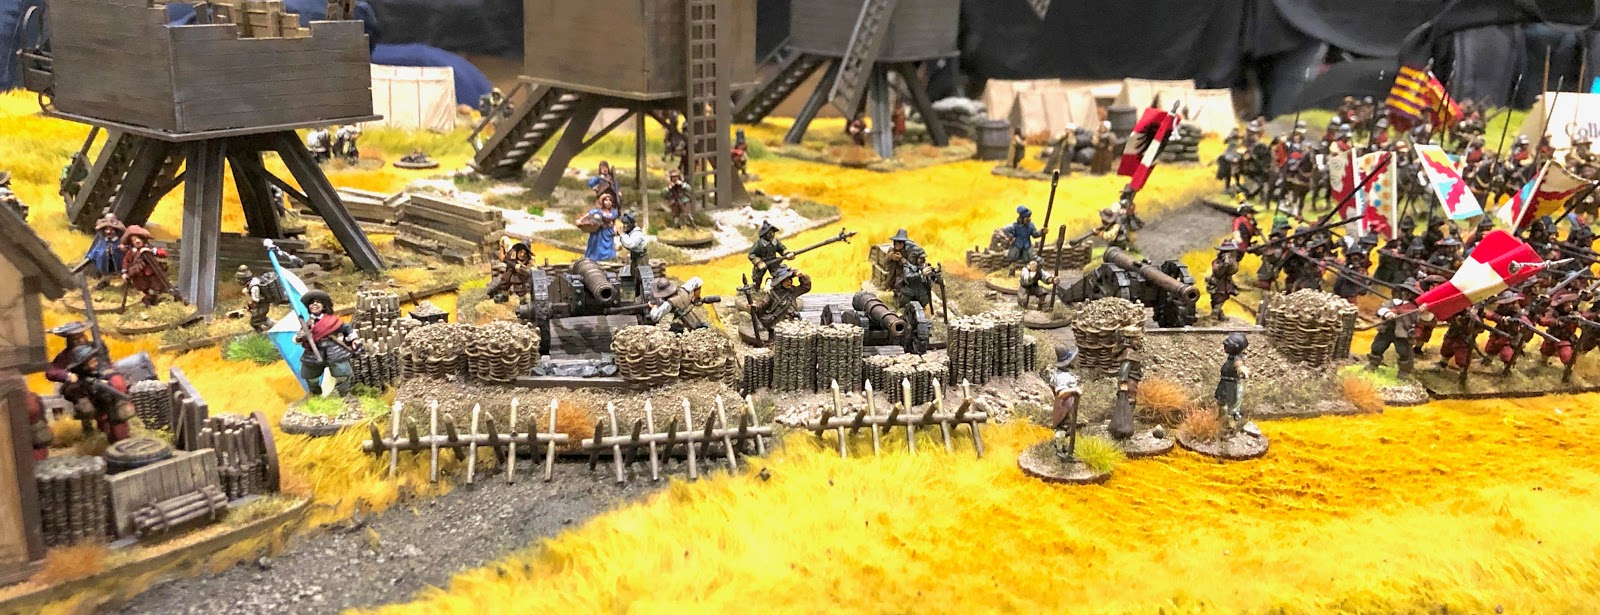
Wallenstein had the town of Lutzen burned to prevent the Swedes taking it and attacking through it.  He also used commanded shot to hold the gardens that surrounded the walls of the town.  The Imperial army also had two artillery redoubts, and had fortified the Miller’s house next to the Windmill battery.  The final Wallenstein touch was arming a group of camp followers to look like an infantry reserve on the left flank.


On the Imperial right we see the Windmill battery, the Miller’s House and the town of Lutzen.  There is little room for the Swedes to exploit their advantage in cavalry numbers here.  


They will need to take the gardens and the Miller’s house to allow they cavalry to move through the gap.  Wallenstein’s command here looks secure.


In the Imperial Centre we can see Colloredo has strength in depth, with cavalry units also mixed in the second line of the foot regiments.


The Imperial left under Holk looks the weakest position.  There is plenty of skirmishing light horse to try and slow down the Swedes.  Also some camp followers cowering at the back!


On the Swedish right we see Gustav Adolf II ready to attack the Imperial position. (In fact he is still waiting for his commanded shot and some more horse to deploy in this picture.)


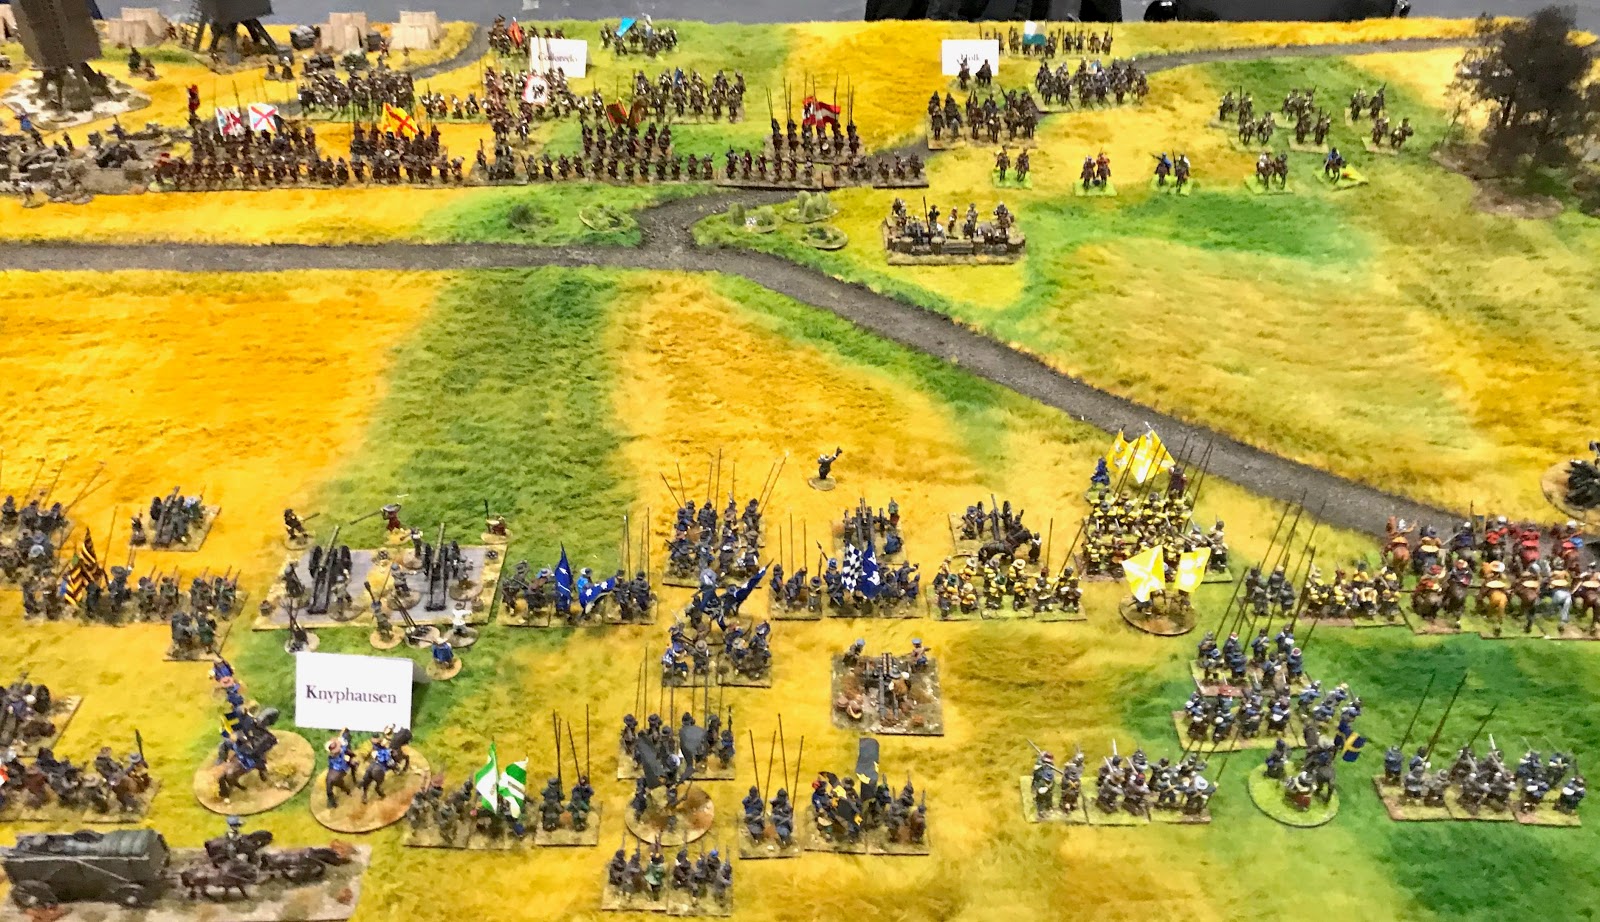
In the centre Knyphausen has six infantry brigades, all in their 3 squadron formation with light guns attached.  The front three brigades are the elite Yellow, Old Blue and Green brigades.  There is also the Swedish heavy artillery position. 


On the Swedish left Bernhard of Saxe-Weimar has little room to manoeuvre and has the defended gardens of Lutzen to deal with.


The game started with the Swedes taking the first turn.  Gustav had no doubt what was required and immediately charged forward with his cavalry.  In fact, so keen was he to get to grips with the Imperial cavalry opposite that he decided to leave behind his slower moving commanded shot while he chased away the skirmishing light horse defending the Imperial left.  The Croats were dealt with in fairly short order but they had done their job and delayed the Swedes for a little while.  

The Imperial commanders knew they were out numbered on their left and they decided to move the reserve cavalry from the centre over to bolster the left flank.  This had a decisive effect and Gustav’s attack was quickly bogged down.  All of the Imperial horse had been made Caracole troops which in Pike and Shotte means they can not countercharge enemy horse.  This allowed the Swedes to have a slight edge in initiative to reflect their aggressive cavalry tactics.  However, the Imperial cuirassiers were still very tough nuts to crack.  Units were lost on both sides. 


Meanwhile the Swedes ground forward in the centre.  There were moving in to a storm of fire from Imperial Muskets and artillery.  But they managed to give back pretty much as good as they got.  The command dice were not kind though and it was hard work for Knyphausen getting his brigades forward.  

The player taking the role of Gustav was well aware of the historical fate of the Swedish king at this battle.  Despite this he did risk Gustav in a melee in an attempt to break the Imperial line.  There was a collective sharp intake of breath as the dice were rolled for risk to the general in combat.  He survived, and won the melee.  After this Gustav was kept out of the fighting.


On the Imperial fourth turn they could roll to see if Pappenheim arrived.  A 5 or a 6 on a D6 was required and a 5 was duly rolled.  Pappenheim’s troops arrived and charged straight in to the fray on the Imperial left.  Just at this moment, Holk, who had been commanding the Imperial left, was killed in a melee.  Pappenheim had arrived in the nick of time.  


In the centre the Old Blue brigade were up to the Imperial line but the rest of the Swedish Brigades were still struggling to come up.  Both sides were losing units due to the concentrated firepower of close range muskets and guns.  (The grey smoke indicates units disordered by enemy fire.)  Frustrated by the Imperial defences Bernhard decided to demonstrate with his cavalry against the Imperial windmill battery. 


Bernhard also sent his cavalry to attack Wallenstein’s flank, but to no avail.  A storm of musket and carbine fire prevented his Saxon horse from making any impression.  Perhaps their hearts were not in it!  No such qualms for Bernhard’s lifeguards who continued to threaten the heavy guns, and suffered accordingly.  


The tide had now turned against Gustav and it was only the Swedish Commanded shot and support from the Yellow brigade that halted Pappenheim’s rampaging cavalry.  It seemed that a stalemate was being reached on the Swedish right, Imperial left.  The Imperial forces couldn’t break through the combined arms of the Swedes, and the Swedes had lost too many cavalry to push forward.  


Could the Swedish centre save the day?  The Swedish infantry brigades had finally made it to the Imperial battle line.  You can see here only a few reserves and the Swedish heavy guns left on the Swedish side. 


The Imperial commander in the centre, Colloredo, was not going to let the Swedes dictate this final phase of the battle, and as the Swedes approached, Colloredo marshalled his reserves and counter attacked.  Imperial pike blocks stormed forward in to the Swedish formations.  The Imperial troops had the best of the ensuing melees, but the couldn’t break the Swedes.  


With stalemates along the whole line of battle , and darkness falling, the two sides had to withdraw.  The Swedish attack had been stopped, so a marginal victory to the Imperial troops.  But Gustav had survived (as the god like finger points to in this picture!).  It would have been fascinating to fight a second day, but sadly the Excel centre wanted the hall back, and so we had to end it there.

This was the Friends of General Haig’s first Thirty Years War game, and so I was very pleased that all of the commanders had really enjoyed the game, and all were eager to play it again.  Both sides were sure they could pull it off next time.  I think this is a good sign that we have a well balanced game.  The rules worked well, and all the players felt we had the factors about right.  I am certainly really looking forward to getting these troops on the table again!

Until next time!

Thursday 11 April 2019

Hobby Heroes' Salute

This blog post is my tribute to the heroes of the hobby who I managed to meet at Salute 2019.

For me there are three critical elements that make up a wargames show: great games, great products, and great people.  Now, if you're interested in what happened at Salute, I'm sure you will have already seen picture of the games on show, and the fabulous hauls of loot that people acquired.   Instead of these I am going to focus on some of the people I met.  These people are all wargame heroes who keep me inspired through the long lonely evenings at the paint table.

Why selfies?  As I first discovered many of these people on social media it just seemed appropriate to join the mobile phone generation.  Also, as you'll see, I've taken very few of these before and I like a challenge :-).

Kicking off is Phil from the South London Warlords.  A massive thanks to all of the South London Warlords who help organise the show.  A super efficient set-up, as well as friendly and helpful bunch.  All working away behind the scenes to keep the whole thing running smoothly.  You may notice in the background my fellow FOGH, Paul (aka Smiley), who did his best to photo bomb every selfie!   Paul also deserves a big thank-you for being my co-pilot and chief navigator to and from ExCel, as well as all round top bloke.

Any Beasts of War / On TableTop fans out there are sure to recognise the following threesome: Justin, Gerry and Ben.  I must have spent hundreds of hours watching these guys on YouTube.  It was great to bump in to them and have a quick chat about our game.  I have lost count of the games I have learned about watching their play-throughs, or the products and kick starters I have been introduced to.  I'm sure I must have seemed a complete wally as all I could say when I saw them was "you're off the telly!".  If you don't know who they are then rush to their site here: https://www.beastsofwar.com/ .  Thanks BoW crew!


If you have collected figures to play English Civil War games then you will have seen figures from Bicorne Miniatures.  James is the convivial boss at Bicorne, and we both served, many years ago, as pikemen in Sir Gilbert Hoghton's Regiment, a Sealed Knot Royalist outfit.  It is always great to catch up at shows, but a bit scary that James' has kids the age we were when we first met!  Where did all of that time go?  Check out Bircorne at: https://www.bicorne.net/ .  We had a lot of Bicorne figures on the table at Salute.

Now,  in the shining galaxy that is the Too Fat Lardies team, Sir Sidney Roundwood must be the brightest star!  I am a huge fan of the Lardies Oddcast, hosted by Sir Sid, as well as the Too Fat Lardies clever rules systems.  It was a real honour to catch this selfie, and also to chat about Lutzen to Sir Sid.  As well as hanging about with Big Rich and Nick, Sir Sidney also has a great blog here: http://sidneyroundwood.blogspot.com/ .  A constant source of inspiration for painting and playing with toy soldiers. You can catch all things Lardy here: https://toofatlardies.co.uk/

More old pikemen from Sir Gilbert Hoghtons.  Funny how so many of them now work in the wargames industry!  If you have marveled at a beautifully sculpted artillery piece, or wondered at an amazing tank model, then you have probably beheld the amazing work of Tim (aka Aardvark), on the left.  Just don't ask him about the Queen!  There are not many wargamers who will not have seen Big Ben from 4Ground in the centre here.  To the FOGH he will always be Mungo, the one man pike block.  I am still dazzled by the products that 4Ground release, and I can't quite believe that the mdf is pre-painted - such wizardry.   They also make my favourite trees on the market!  See them here https://www.4ground.co.uk/deciduous-woodland

I am a complete newb to this Blogging business, but I have followed Ray's blog for years.  As well as having a great blog himself, he is also massively supportive to others in the Bloggosphere, including me.  Thanks for keeping me going, Ray!   It was great to meet Ray in person and discuss the finer points of garden sheds :-) .  Long may your blogging continue.

Please be upstanding for the boss!  The man who has led me in to more pike pushes, and pubs, than anyone else.  The terror of Parliament pike-blocks, John is also the joint owner of Warlord Games.  A card carrying FOGH, John is the man responsible for plastic ECW figures!  Who would have thought such a thing would ever happen?   Warlord are not only a powerhouse in the industry, but willing to share their passions with the world.  I can't imagine many companies investing in a 1/300 ship game.  Warlord are also "keeping it real" by stocking Humbrol paints at last.  Check out Warlord's Thirty Years War Range here: https://store.warlordgames.com/collections/thirty-years-war-1618-1648  .  I will be re-stocking up the lead mountain soon ;-)

If you like games with hordes of beautiful 28mm figures then you must have seen Simon's games.  If you have been to any shows in the UK then you will also have seen his signature Hawaiian shirts!  I have followed Simon's Big Red Bat site for ages, and his ECW armies are a continuing inspiration. How does he get so many flags in his units?  If you haven't already, then you should check out his To the Strongest / For King and Parliament rules, along with his innovative basing system, here: https://bigredbatshop.co.uk/

If Sweden has wargaming royalty then Michael must be one of them.  Co-author of Pikeman's Lament and the new Rebels and Patriot rules from Osprey.  Michael has a fabulous blog at https://dalauppror.blogspot.com/ and his multi-national team put on another fabulous game at Salute this year, Danholm 1807 (winner of the Salute best historical game!).  Micheal's blog is a great resource, especially for anyone interested in 17th Century European conflicts.  It was a real pleasure to meet Michael and some of his team at Salute and to get the Swedish perspective on Gustav Adolf and Lutzen.  Anyone for a Gustaf Adolfsbakelse? ;-)

The Warlord Pike and Shotte rules are definitely my favourite for this period, and so I am always delighted when I can tempt the rules author, Steve, over to our game.  Steve is part of the Warlord Games powerhouse-team, and so therefore a key ally in persuading boss John to get more 17th century toy soldiers in to production.  Did anyone say "more Poles"?  Steve is also a dab hand with the paint brush and the cabinets at Warlord HQ usually have some of his lovely toys on display.

Author, blogger, pod-caster, editor and general wargames bon viveur, Mr. Henry Hyde!  A real  honour to spot Henry at our table.  Henry was also the person who gave me the best tips on how to take Selfies :-) .  Thanks, Henry, for reducing my double chins in this picture!   Looking forward to his new book, apparently finished the night before Salute.  I can't believe anyone doesn't already know his site, but just in case, check out Battlegames here: https://henrys-wargaming.co.uk/ .

When people were looking at our game one of the most frequent comments was "great flags".  All of our TYW flags were from Flags of War, and so it was a very pleasant surprise when Iain, who runs Flags of War, turned up at out table.  Not only do his flags really pop on the table, but his service is super fast.  I also picked up some Highanders from his recent Kickstarter campaign.  Very nice!  See them and the amazing flags of all periods here:  http://www.flagsofwar.com

At the time of posting the Terrain Tutor is absolutely storming his Kickstarter for the Terrain Essentials book.  It funded in the first seven hours!  There are lots of great terrain tutorials out there, but what sets Mel part for me is the effort he puts in to explain the materials used.  Understanding paint, PVA, foam etc. makes all of the difference.  He also puts his heart and soul in to his channel.  An incredibly dedicated teacher.  I can't wait for his book.  I am sure it will quickly become the terrain makers bible.  Go sign up here:  https://www.kickstarter.com/projects/1560579763/terrain-essentials .  It was great to grab a picture with Mel on his Salute tour.  All of the FOGH are Mel fans ;-) .   Big thanks to Jase for taking the picture!

Of course, I also need to say thank you to all of my fellow FOGHers! The whole team here were happy to give up their time to come and help with the game.  Having a big crew of us really helped us  share the work around.  We were able to have some people play the game, some people chat, and some people take a turn to look around the show.

From left to right: Charles, Clive, Andy mk1 (me!), Steve (aka Bruce), Andy mk2, Tony, Paul (aka Smiley).  The end of the day and still smiling; I salute you all!
If you admired our fine new club shirts then you need to contact Debs at Saddle Goose Designs.  She provided a fabulous service and coped with all of our strange requests.  Without doubt the best shirts we have ever had - highly recommended!  https://www.saddle-goose-designs.co.uk

So a final big thank you to all of these hobby heroes who keep me entertained, inspired and playing wargames.

Until next time.

Sunday 7 April 2019

Long Live the King!

What a day!  Back home safely after an epic day at the South London Warlord's Salute 2019 show at ExCel in London Docklands.

Eight of the Friends of General Haig 'club' finally made it Salute and we all had a brilliant day demo'ing the Lützen 1632 game.  We had lots of positive feedback on the game and we met lots, and lots of fab people.

The game in full swing.  'Colloredo' in the foreground, and 'Knyphausen' on the other side of the table, both deep in thought as they ponder their next moves. 
I will do a proper battle report of the game in a few days; spoiler alert Gustav Adolf survived!  So this blog post will be more of a 'show report'.  I also gave myself a personal project of joining the 'Selfie Generation' and tried to grab a quick selfie with the various Wargaming glitterati that I could track down.

First of all the venue and organisation.  This was only my second Salute, but I think the organisation for Salute is great.  The South London Warlords (SLW) provided lots of info for Salute newbies like ourselves.  The ExCel centre's traffic system seems a bit Byzantine, but it is such a luxury to drive to your table location to unload!  Once inside, the SLW team were very helpful, and encouraging.
Selfie #1 - Me with Phil, The South London Warlords Games Organiser.   Thanks, Phil!
The venue lighting seemed very dim early in the day, and once the big loading bay doors were closed, as start-time approached, even dimmer.  It did seem that the lights were turned up before the public entered, which was a great improvement.

The whole day seemed very busy people wise.  I've no idea what the official numbers were, but numbers seemed to reach a crescendo around 1230.  Despite this it was never difficult to move around the show.  There was a certain amount of polite English jostle/queuing required to get to the merchandise at the popular traders.  I picked up a few bits in the break I had from the game.  (Loot covered later).  All of the big names seemed to be there, plus a fabulous myriad of small traders.

There always seems to be a big debate about the Fantasy/Sci-Fi v. Historical games at Salute.  To me it seemed pretty 50/50, and I think this is what SLW aim for.  There was a huge array of games and I probably didn't see a quarter of them.   Here are just a few of my highlights:

Gringos 40s were putting on a lovely 28mm game using their Tonkin 1885 range, The Black River Debacle.  The figures were lovely and the terrain amazing - truly inspirational.   No picture from me, but you see this and many other games on Big Lee's Miniatures Adventures (BLMA) here.

This Lego Built Flash Gordon game looked amazing and seemed mobbed all day.
All built with standard Lego, apparently.
Michael Leck of Dalauppror put on the fabulous Dänholm 1807 game.  I didn't get a picture of the game, but Michael's blog is here, and I did grab a selfie with him!   I've been a fan of Michael's output for some years and so it was really nice to meet him, and his colleagues, who were of course also very knowledgeable about the history surrounding our Lützen game.  It was interesting to get some Swedish perspectives on Gustav and the Thirty Years War.  One of the team (Andreas Olsson) works in the Royal Armoury Museum in Stockholm and so I was very interested to talk to him about their artefacts concerning Gustav and that period.  Dänholm was another lovely game with water as a centre piece of the game.  A great star fort too.  (See the BLMA blog again for pictures.)
Selfie #2 - Me with Michael Leck from the Dalauppror Blog.  (I have only just started this Selfie thing so you'll have to forgive the odd pictures!)
Simon Miller put on an epic Romans vs. Boudicca game, "Mancetter 61 CE".  I have also followed Simon on his blog (here) for sometime, as well as being a fan of his 28mm armies, and so it was great to catch a quick chat with him.   Simon's game looked great.  I really liked the dense woods on either flank as well as the innovative slopping board to represent the slope.  Immediately eye catching, and very effective.  Of course the vast array of figures was brilliant!
Mancetter 61 CE in full swing.  Go on you noble Britons!  
Selfie #3 - Me with Simon Miller from the Big Red Bat Blog / Shop.  
So, what did I pick up as my Salute loot?   Quite a tidy haul, and still focused on Europe in the mid 17th century.

First of all, more Warbases mdf bases.  Rectangular bases for horse (60 x 50 mm) and foot (40 x 40 mm), round command bases, artillery bases , and some small round bases that I can't remember why I bought them.  (Perhaps scatter terrain?)  Also from Warbases a water wagon, some 28mm foxes, and a sheet of roof tiles.

Then there is a heap of Foundry SYW Cossacks.  These are planned to be converted in to Croat types for the TYW.   Very nice sculpts, and nice small ponies for the mounted figures.

More Perry Miniature ECW figures.  Armoured pike, musketeers with rests, and cuirassiers.

Finally, a new book from Helion.  Only had a flick through, but looks very interesting.


Finally, finally, a small hint of where the Via Regia may be leading me in the future :-D .

More show info to come shortly - including more selfie madness.

Until next time.


Friday 5 April 2019

The Imperial Eagle Has Landed!

Arrived safely at Excel just after lunch time.   The Salute hall at ExCel was already busy with people setting up. I have to say the South London Warlords were very welcoming and helpful. Thanks you chaps!

The game is 90% set up. Just some garnishing to happen tomorrow morning. Here are some pictures of the day so far.

The car packed this morning. Full to the gunnels!

Great to be able to unload right next to the table!

Lots of busy activity as everyone sets up.  Lots of celebrities about. Warlord Game supremo, Mr. Stallard, came to review our progress.

Time now for a few beers to relax. Well, for some of us.  Bruce is in his hotel room flocking bases!  If you’re at Salute tomorrow then do pop by and say “hi”.

Roll on Saturday!


Thursday 4 April 2019

Here We Go!


The fateful day has almost arrived.  The boxes are packed!  It all just about fits in to the car.  (Need to find a way to squeeze people in too.)  The advance guard of the FOGH will be setting off in the morning to the far side of that London town.  Hoping to get to the ExCel centre just after lunch to start the set up.

I will try and post some pictures at the end of Friday after a successful set-up.

Hope to see you there!

Order, order!

An Imperial unit of Cuirassiers thunder in to action.
Once we had decided on the battle we were going to recreate, one of the the first things we had to do was to sort out the order of battle so we knew what figures and units we needed.  We used the Osprey Campaign book on Lutzen , as well as Dr. Schürger’s thesis, as the main sources of information (see the Blog link sections for more details).

There are many ways to turn the actual order of battle (OOB) in to wargames forces, so this is just this our approach for this battle.  First of all each army was broken down in to broad divisions, left wing, centre and right wing.  Then the number of actual men and the number of units was worked out, separating infantry from cavalry.  This gave us a breakdown of the actual numbers involved in the battle.

Next we analysed the infantry in more detail. Both sides infantry were organised into a number of main battalia or brigades. This was done to amalgamate or split regiments of varying sizes into more standardised sized units for this major battle. For the Swedish force this organisation was into eight infantry brigades, and for the Imperials this was intoseven major bodies or battalia.  For both forces these were roughly a 1000-1200 men each.

We already had an idea on what unit sizes in terms of figures we wanted to aim for based on existing collections.  Our regular pike and shot units are about 40 figures. A ratio of wargames figures to actual men of 1:30 would therefore give us a starting point to work with.  So this would mean that we’d have something like 8 x 40 figure blocks for the Swedes and 7 x 40 figure blocks for the Imperial forces as the main infantry forces in the centre.

The cavalry was a bit trickier. For the actual battle these were formed from regiments and troops in to battlefield squadrons of around 200 men. Using our infantry ratio of 1:30 this would give 6 figure squadrons. This would be a bit fiddly. We therefore decided, based purely on aesthetics, to adjust to our normal 12 figure cavalry units by halving the number of squadrons.  Using the actual orders of battle we calculated the number of wargame cavalry units required.

With this initial rough plan of figures required we sat down to consider our plan.  Two issues. We needed to prepare an awful lot of figures in a smallish time frame, and the forces would need a giant table. We decided to ‘cut our coat to fit our cloth’.  We took the number of wargames units we had worked out and applied a scaling factor of 75%, e.g. 8 Swedish brigades become 6.  A quick bit of recalculation and we decided we had an achievable lead mountain to climb, and could squeeze the game on to 10’ by 6’ table.

These were the resulting wargame orders of battle.  These are set out for Warlord Games’ Pike and Shotte, but easily converted in to other games systems.

If this sounds complicated then these two PDFs will show ourworking, so to speak.

Swedish OOB PDF

Imperial OOB PDF

Here is a simpler breakdown of the two armies.

Imperial Army

Imperial Right Wing


  • Commander - Generalissimo Albrecht Wallenstein (also Commander in Chief)
  • 1 Croat Light  Cavalry
  • 1 Cuirassier
  • 3 Arquebusier (1 is Large)
  • 1 Commanded Shot (defending the town)

Imperial Centre


  • Commander - Generalwachtmeister Rudolf Colloredo
  • 4 Pike and Shot battalia (1 is Large)
  • 1 Cuirassier
  • 2 Arquebusier
  • 3 Heavy and 2 Medium guns split in to 2 batteries
  • 1 Light Gun

     Reserve


  • 1 Pike and Shot battalia
  • 2 Commanded Shot

Imperial Left Wing


  • Commander - Feldmarschall-Leutnant Heinrich Holk 
  • 2 Croat Light Cavalry 
  • 1 Cuirassier 
  • 2 Arquebusier 
  • (1 Pike and Shot battalia - this is a ‘dummy’ unit made up of camp followers)

Imperial Reinforcements (marching to the sound of the guns)


  • Commander - Feldmarschall Gottfried Pappenheim 
  • 1 Croat Light Cavalry
  • 1 Cuirassier 
  • 2 Arquebusier 

Swedish Army with Protestant German Allies

Swedish Right Wing


  • Commander - Gustav II Adolf (also commander in chief)
  • 2 ‘Swedish’ Harquebusier
  • 1 Finnish Harquebusier
  • 2 Commanded Shot with Light Guns

    Reserve 


  • 2 German Harquebusier 
  • 1 Finnish Harquebusier

Swedish Centre


  • Commander -  Generalmajor Dodo  Knyphausen
  • 3 ‘Swedish’ Pike and Shot Brigades
  • 2 Heavy Guns in a single battery

    Reserve


  • 3 German Pike and Shot Brigades
  • 1 ‘Swedish’ Harquebusier

Swedish Left Wing


  • Commander - General-leutnant Bernhard von Weimar
  • 3 German Harquebusier
  • 2 Commanded Shot with Light Guns

    Reserve 


  • 3 German Harquebusier 

Notes on the OOB.

The command structures of both armies have been simplified.  In the actual battle the Swedish army was split into three commands: left, centre and right.   Each of these was also divided in to a forward command and a reserve.  How the higher command functioned in the actual battle is not clear.   We simply broke the Swedish army in to three commands: left, centre and right.

In the actual battle the Imperial Army was also split into three commands: left, centre and right.  Pappenheim was probably expected to take command of the left wing when he arrived.  The Command structure within the centre is not clear.  We broke the Imperial army in to four commands: left, centre, right and Pappenheim's reinforcements.

The cavalry unit classifications of Cuirassier, Harquebusier, Arquebusiers and Croat are used to differentiate the various types of cavalry in the battle.  These are broad categories and the actual units probably varied a great deal and probably wouldn’t have fitted in to such neat wargamer’s troop types, but this was a compromise we decide to make in terms of easy playability.

Cuirassiers are well armoured and mounted troops armed with sword and pistols.  These are the heaviest cavalry.

Arquebusiers are less well armoured and mounted armed with carbines, some pistols and swords.  They favour firepower over combat.

Harquebusiers fall in between Curaissiers and Arquebusiers.  They are less well armoured than cuirassiers, but more prepared to fight in hand to hand than Arquebusiers.   They represent Cuirassiers that have lessened their armour, and Arquebusiers who have increased their armour and altered their tactics to become more melee focused.

This split may be a bit of a Swedes v. Imperial stereo-type, but having this asymmetry between forces does provide an interesting game challenge.

Finnish Harquebusiers are lighter, and faster cavalry, but still melee focused.

Croats are skirmishing light horse who are an annoyance rather than a real threat to formed and order troops.

The ‘Swedish’ designated pike and shot units represent Gustav’s veteran infantry units (actually a mixture of Swedes and Germans) and have suitably improved factors.

There are restrictions on the use of the reserve forces in both armies.

Unless specified units are regular sized units in Pike and Shotte.  The ‘battalia’ are units of mixed pike and shot (2 muskets to 1 pike is the assumed ratio).  In the Imperial army these comprise a single pike block and two units of shot.

In the Swedish army the brigades are made up to represent the Swedish ‘three squadron’ formation.  They each have a forward squadron of a pike block and a forward shot unit.  There are two flank squadrons left and right.  These can each be made up of pike and shot units, or combined units.  It would have been easy to come up with a standard formation for the Swedish brigades, but the sources we had broke each brigade in to regiments and provided a precise breakdown of pikemen and musketeers.  This was too tempting!  It was possible to therefore form the Swedish brigades in to their squadrons, and using separate pike and shot units, form the famous Swedish (infantry) squadrons.  This provided another nice asymmetry between the Swedish and Imperial forces.

In future posts I will share the Pike and Shotte factors we will be using for the various units, and also the Swedish brigade squadron breakdown we have constructed.

Until next time!