Saturday 27 March 2021

Avanpost - a mini review

This blog post covers my experience with the Thirty Years Wars (TYW) figures from Avanpost Historical Miniatures.

28mm figures from Avanpost Miniatures - more details below.

I first became aware of this company a couple of years ago from posts on the Lead Adventure Forum (link), and I was instantly blown away by the quality of their figures. They are superbly detailed and lifelike.  I immediately ordered a few figures to see what they were like in the hand, and I wasn’t disappointed.

Avanpost are a Russian manufacturer and don’t have a traditional website/shop. They use a Facebook group to advertise their ranges (link).  You can also buy them through Mezzer’s Miniatures (link), a UK distributor. They have two main 28mm ranges; Napoleonic (French & Russian) and Thirty Years War (TYW). They also produce a range of really lovely 75mm models for collectors and painters. Their full ranges are available in cast resin, and most of the 28mm ranges are also available in metal. They are on the small side of 28mm and fit perfectly with Perry Miniatures ECW range. I have mixed them in happily with TAG and Warlord as well. However they might seem a bit incongruous in the same unit with Bicorne or Renegade which are at the bigger end of 28mm.

Most of the figures require some assembly, such as adding arms and sword scabbards.  I assume they are designed like this to make the casting process easier. The figures I received have needed little cleanup and fitted together very easily, whether metal or resin, with small dabs of super-glue. 

I have only purchased figures from their TYW range so far.  Unusually nowadays, the figures are sold individually which is a real boon when you are trying to find that extra drummer figure, or officer, for example. They cover pike and musket armed troops in a wide variety of classic poses. They also cover artillery (guns and crew), dragoons, harquebusiers, and cuirassiers, with command figures for all types.  The TYW range is pitched at the first half of the 17th century and would work equally well for the Wars of the Three Kingdoms (ECW). 

Avanpost figures straight form the packet - resin on the left and metal on the right.

Here are a couple of figures as they arrived from Mezzer’s Minis.  On the left is a resin wounded horse and dismounted cavalryman (an unusual and perhaps unique to Avanpost set!), and on the right a metal sergeant with halberd.  The separate pieces were easy to snip from the sprues, and to tidy up with craft knife and file before assembling with superglue. 

Avanpost wounded horse on a Charlie Foxtrot - dial / counter base

Here is the wounded horse after construction.  This is on a Charlie Foxtrot ‘dial counter’ base and will be used. as stamina / wound counter in Pike & Shotte games.

Avanpost sergeant in metal

Here is the sergeant after construction.  I intend to swap his halberd for a standard and he’ll join some of his colleagues on a foot command base.

Avanpost resin and metal figures - front view

rear view

Here are a group of resin and metal foot figures after construction. Hopefully the picture shows the fabulous level of detail in these figures, both resin and metal.


Here is a completed command base using figures from the previous picture. The figures were a joy to paint.  (One caution would be that the figures, both metal and resin, could do with a quick wash in warm soapy water before priming. )

The flags are from another supplier new to me, Adolfo Ramos (link), who is based in Spain. These are really nice flags, and there is a lot of flexibility available when ordering to choose the size of flag you want, and also to have them mounted with cords etc. I chose this ‘full service’ option for these two and was very pleased with the result.


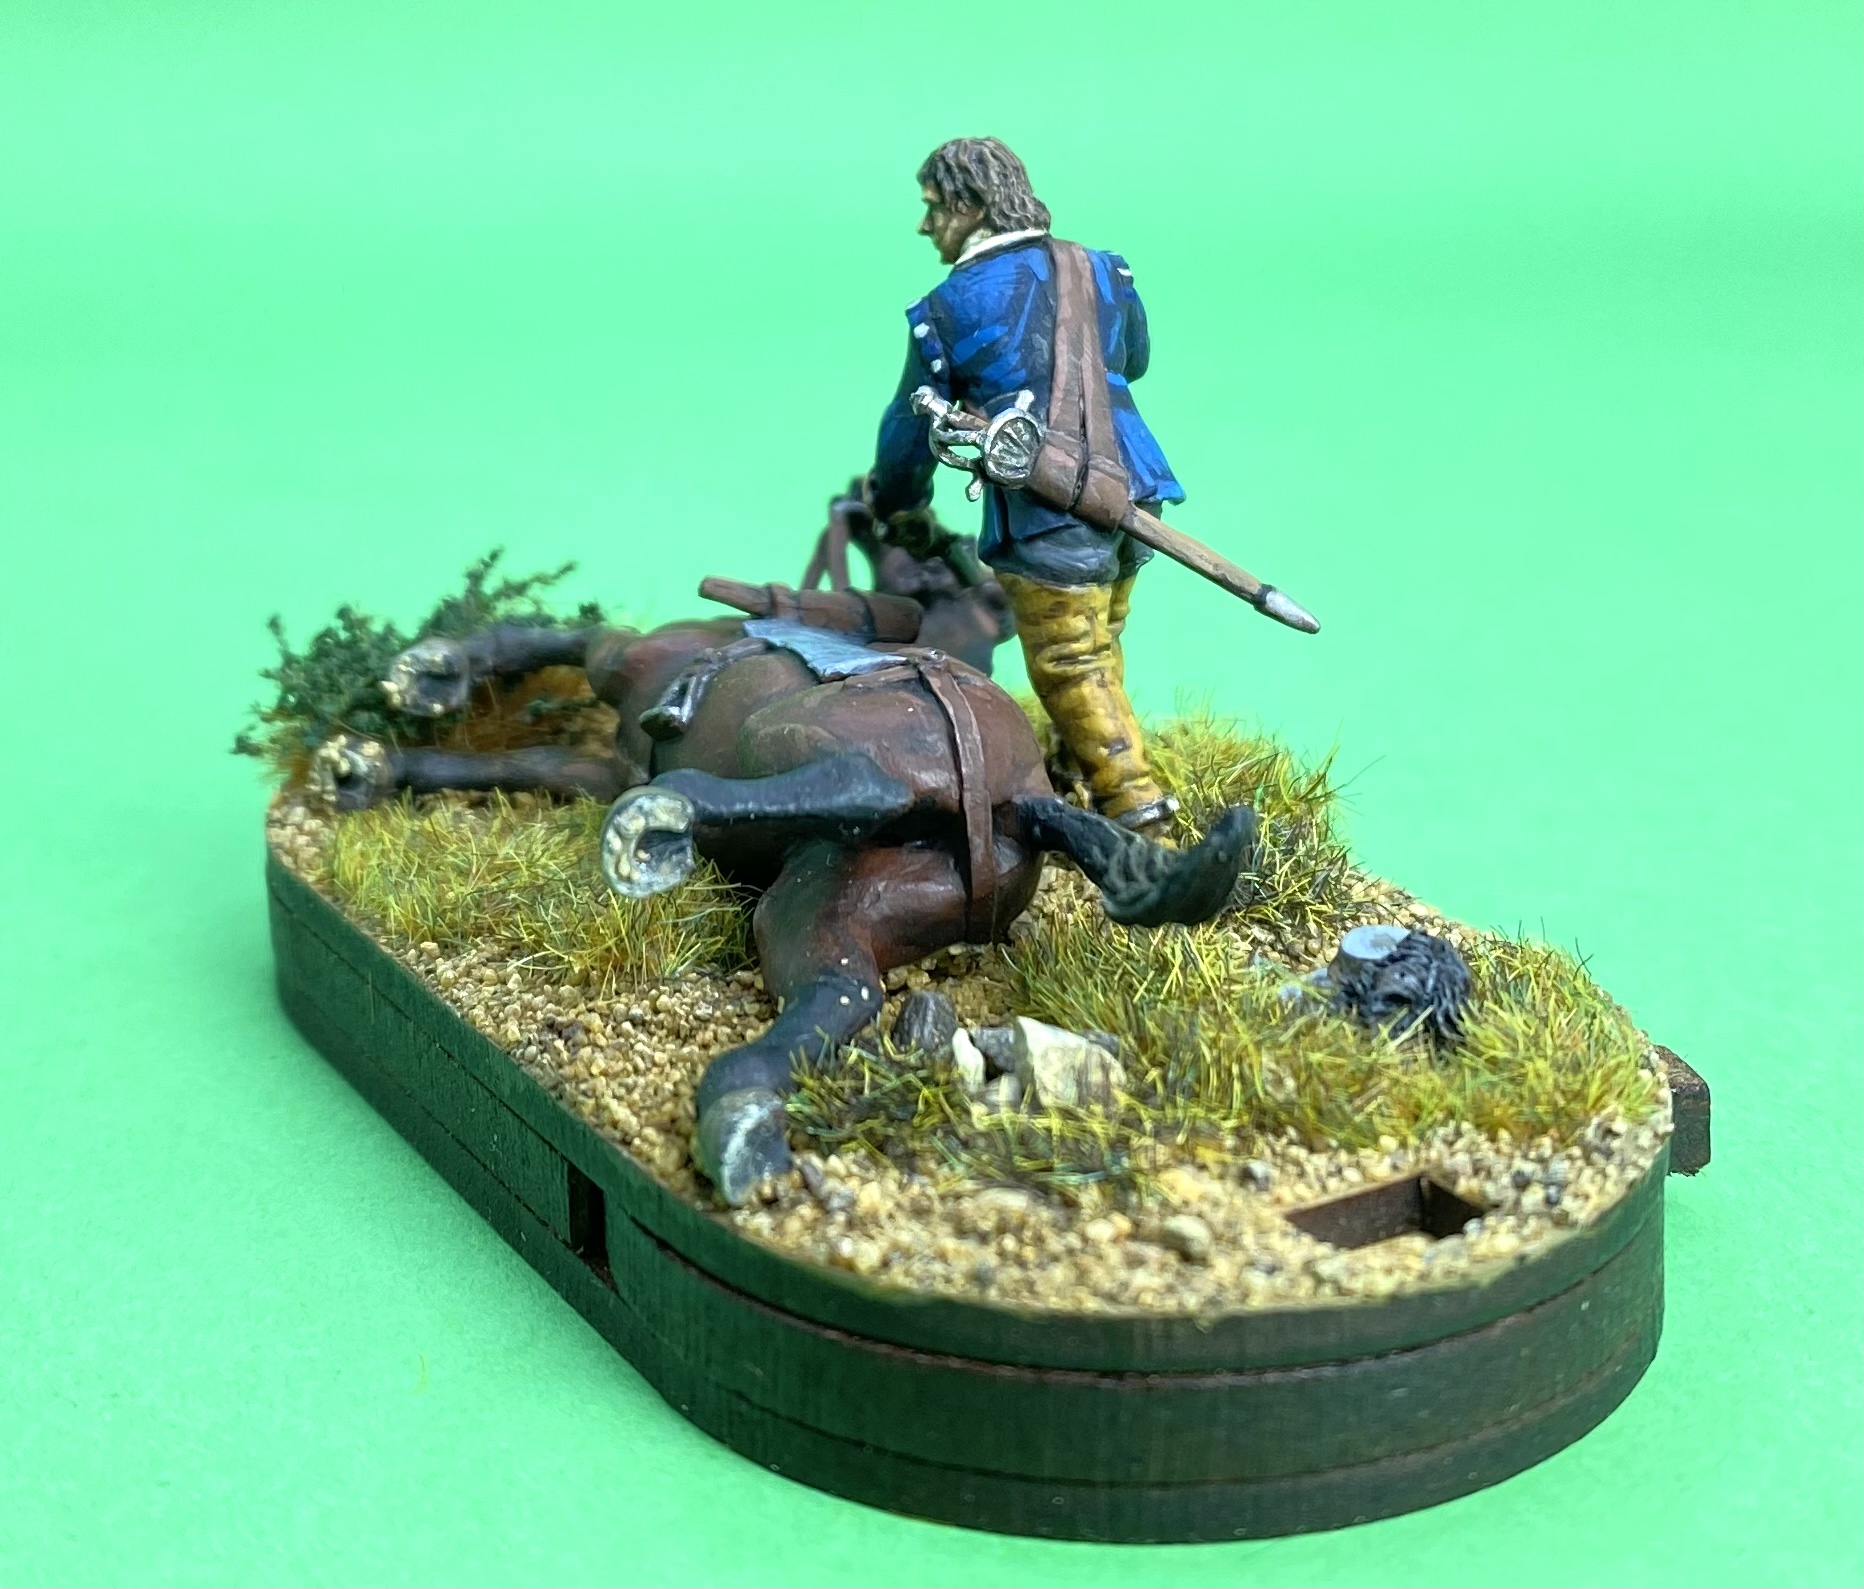
Above is the completed mini diorama for the stamina counter base.  I realise this is perhaps a rather morbid scene, but it’s a good reminder of how horses suffered in this period of warfare. I’m glad that Avanpost chose to include this in their collection so we don’t forget this point.

I have also purchased an artillery piece from Avanpost.  The gun carriage is in resin and you can choose to have the gun barrel in either resin, or beautifully turned brass! These brass gun barrels are little works of art.  I will probably paint over this, but it does provide the option of just weathering the bare metal for you finished model.

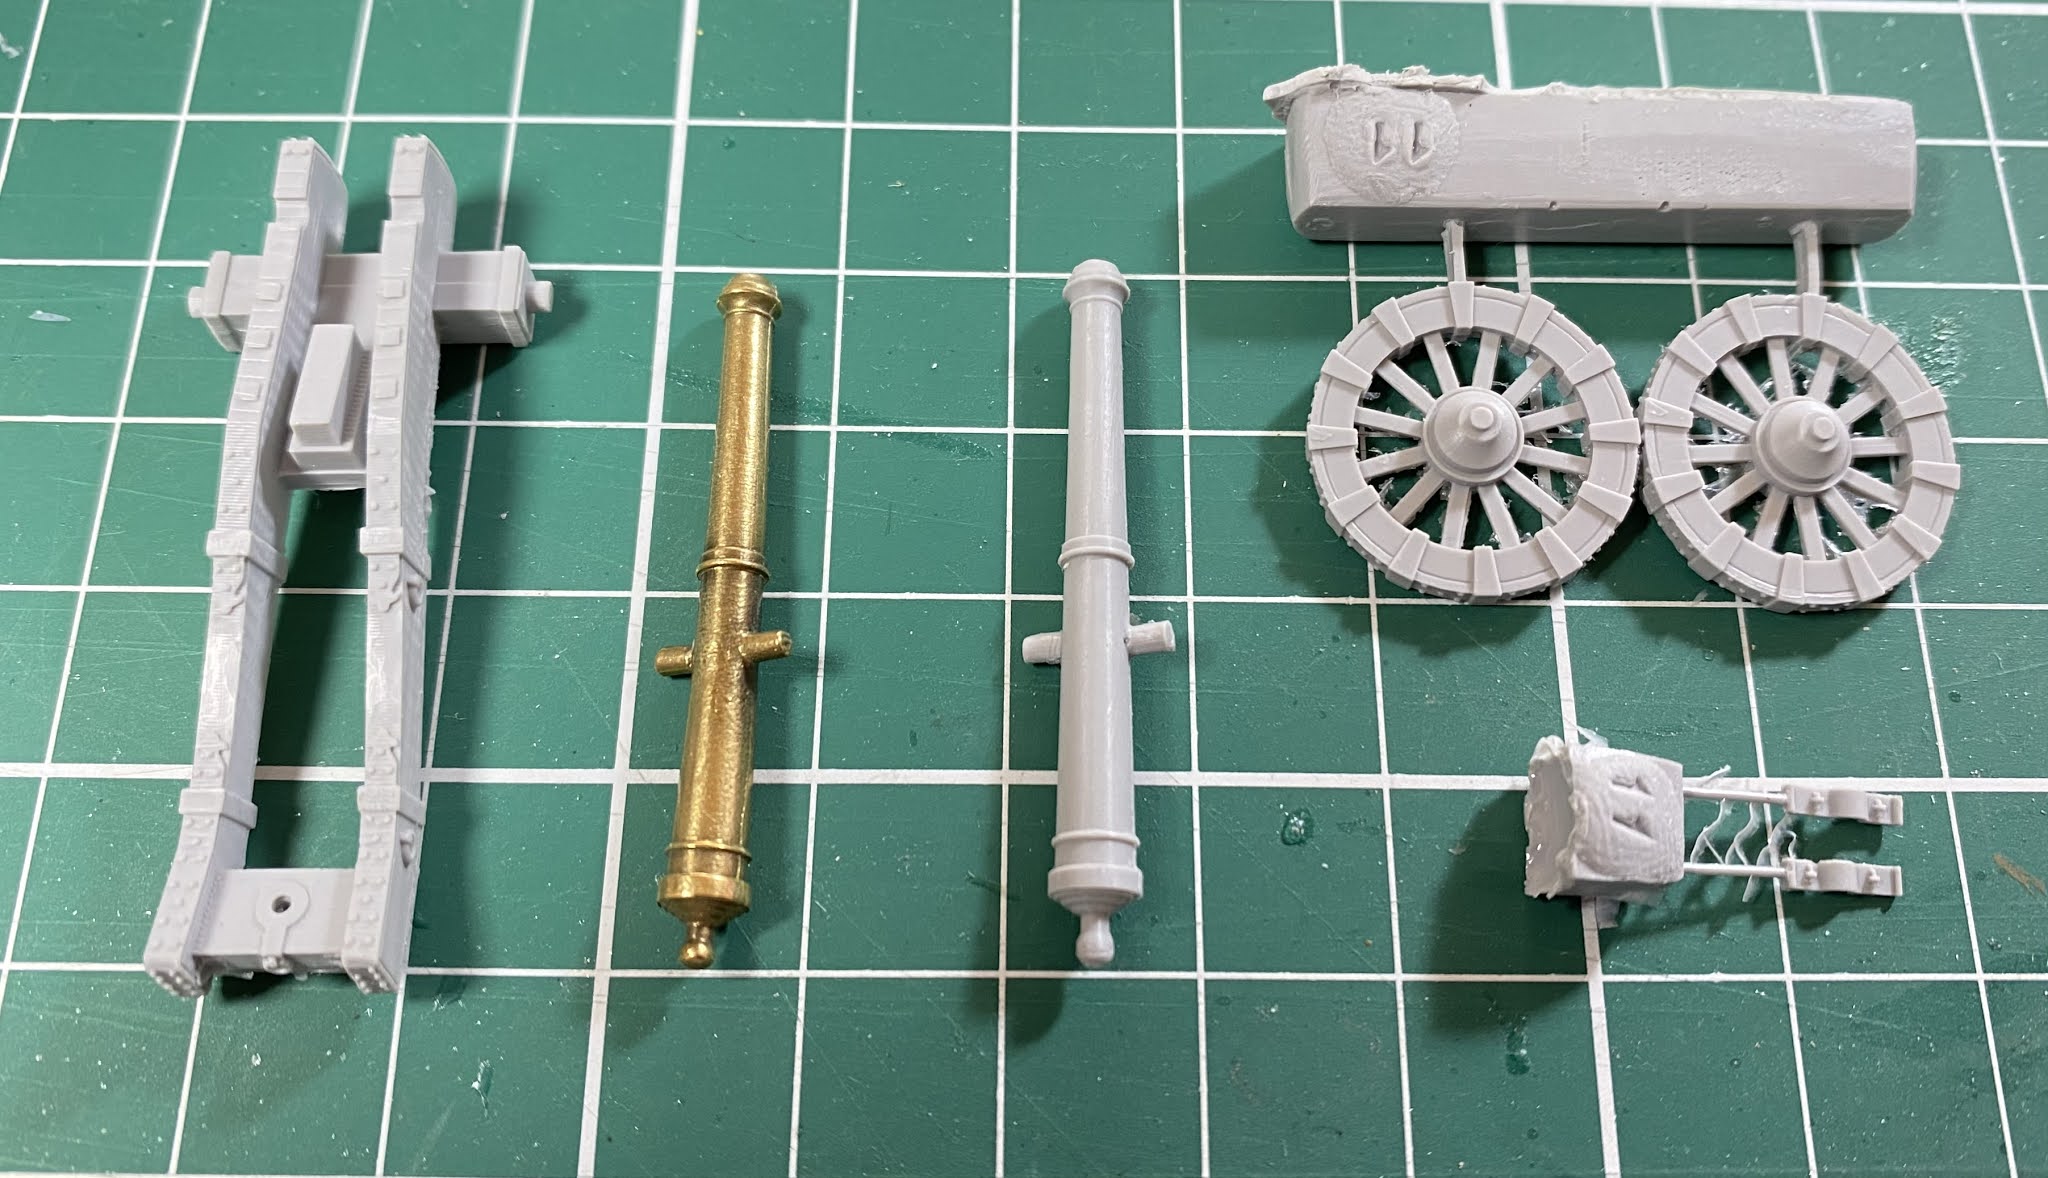
Avanpost artillery piece, with optional brass barrel included. I will use this as a light, regimental gun.

I have just two cautions that you should consider with the Avanpost figures. Firstly is that the resin is reasonably delicate and so when there are small parts that stick out on the resin figures I have found them prone to breaking when not carefully handled.  For example, the scabbards are very fine items, and a couple of times, when I have carelessly picked up a resin figure, I have broken their scabbards.  These are fairly easy to repair, but if you expect to be rough with your figures you should beware of this.  

The second item is, I suppose, both a plus and a minus.  Wargames figures from other manufacturers have traditionally been sculpted with parts of the figure slightly exaggerated; for example heads, hands and weapons.  This has been partly to do with what we think looks good, and partly to do with traditional sculpting and casting methods.   The Avanpost figures, on the other hand, seem to be very accurately sculpted from a scale model point of view, and this is apart of their appeal.  This scale accuracy includes their equipment and this means that when you compare an Avanpost figure to say, a Perry or Warlord figure, the Avanpost figures’ muskets appear to be much finer and smaller than those on other manufacturers’ figures.  Variety in figure height is ok by me (real people are different heights) but differences in equipment scale can be incongruous. For example, I would be nervous of fielding Avanpost musketeers with musketeers from other manufacturers in the same unit because of the different musket sizes.  I know that actual 17th century muskets did vary in size, but there is only so much difference my eye will accept. I would suggest you get a sample of two to compare with other figures to check for yourself. 

In summary, Avanpost offer a range of beautifully sculpted miniatures, some of which are unique to this period.  If you are interesting in playing games in the first half of the 17th century then I’m sure there is a space in your forces for some of these miniatures!  The range is still expanding with the recent release (in resin) of sword and buckler armed infantry. 

The final pictures show the command base with an also newly completed 1898 unit of musketeers.

An Avanpost command group leading a unit of 1898 Miniatures musketeers.

A “wargamer’s” eye view!

Until next time! 

Andy @ The Friends of General Haig (FoGH)

Wednesday 17 March 2021

Foot Command Bases

This post covers a new approach I am taking in my 17th century armies to how I represent my infantry units, and in particular the command figures for these units.

28mm Figures from 1898 Miniatures (command stand), then a mixture of Warlord metal and plastic musketeers.

First of all, it is probably worth saying, that this has nothing to do with the requirements of one particular ruleset, nor is it about making anything ‘more historical looking’. It is about making the miniatures look good, to me, on the table top, and also about making units flexible to use in different formations.

Background 

Up to now my foot units have typically had one base within the unit that includes the ensigns or standard bearers. In a period with either no uniforms, or what uniforms there were being vaguely understood now, it is often the unit’s flags that gives the strongest indication of what the unit is trying to represent. Also, I think flags look really good and so try to have two of them in most units. Along with the two standard bearers I typically include an officer and musician (most often a drummer) on the base. The officer’s sash can also suggest a particular historical force (although not as often as we’d hope).  Therefore you can see that by changing this single command base you can swap the unit for use in a different army. 

A regular Pike and Shot unit. Note the command base in the middle.

My basing system for foot figures is to use four 28mm figures on a 40mm square base.  This system, with my approach to command bases, means that three bases makes a nice central pike block; two bases of pikemen either side of a central command base. The full regiment or battalion therefore looks like this.

New Requirements 

More recently I have been looking at representing formations that don’t fit this approach, such as the Swedish brigade formation that Gustav Adolph used for his Swedish infantry. I’ve also been looking to experiment with other rule systems, some of which use the whole unit frontage as a measure in the game, that means this 360mm (9 bases each of 40mm width) wide formation isn’t very convenient. If I was able to have the command base outside the regular rank and file bases then it would make it easier to change units about.

Half-hex, 2mm thick, MDF from Warbases.

A solution to this was suggested when I looked at some of Barry Hilton’s units on the League of Augsburg site (link). Barry sometimes uses a base that sits in front of the rank and file bases.  I have seen he has used half hex shaped bases in some cases, and I think this looks quite neat. So, a brief email exchange with the ever helpful Warbases resulted in me receiving some half-hex 2mm thick MDF bases. These are 80mm point to point.

Here is my first new style command base.  These figures are from 1898 Miniatures ‘Tercio’ range (see previous blog post here for more details on 1898). The flags are slightly modified from Flags of War.


Command base - 28mm from 1898 Miniatures, ‘Tercio’ range.

This base can be placed at the front of a unit.  The idea is that it doesn’t count as part of the actual unit for the purposes of the game - it is just there for show.  

New system command base leading the unit.

It can also be placed behind units such as when the unit is in combat. 

Command base at the back of the unit - smaller unit with 6 bases.
Here are some more pictures of formations showing how the new command base will fit in.  I think it provides a flexible way having different formations and still have the command base ‘look right’.

Command base with a 3 base unit.

Command base with a two base unit.

Leading column of march.

Interesting option for ‘Charge For Horse’.

I am pleased that this experiment seems to have worked out.  I will build my command bases like this going forward.  I want to try it in some games (when we can do those again!) and if it still seems like a good idea then I will consider going back and rebasing some of my old units.

As well as 1898, I have also been painting up some figures from another smaller TYW manufacturer. These will have to wait for the next blog post.

Until next time!

Andy @ Friends of General Haig.

Wednesday 10 March 2021

Polish-Lithuanian ‘Foreign Infantry’

 This blog post covers a new set of units for my Polish-Lithuanian Commonwealth army of the 1620s; the so called ‘Foreign Infantry’. To represent these I have used figures from 1898 Miniatures.  Read on to find out more about the Foreign Infantry and 1898 Miniatures.

28mm figures from 1898 Miniatures ‘Tercios’ range

Although cavalry were the most important part of the Commonwealth armies in this period there was an increasing focus on infantry.  Any campaign involving sieges, as well as the need to hold settlements and river crossings, needed foot troops.  In the campaigns against the Swedes in the 1620s, Polish forces found that they were involved in many sieges, as the Swedes would often avoid pitch battles in the open where the Polish cavalry could dominate.

A contemporary picture of infantry fighting in the first part of the 17th century.

The native Polish infantry, drawn from the peasant population, were effective but few in numbers, and the Polish nobility were reluctant to further reduce their work force by allowing more recruitment from the peasants in to the army.  The Commonwealth therefore turned to hiring infantry from other sources, typically abroad.  This ‘Foreign Infantry’ was recruited from across Europe but mainly from the German states to the West of the Commonwealth borders, and also from German speaking parts of the Commonwealth. (For this reason they were sometimes referred to as ‘German Infantry’.)

Recruitment of the Foreign Infantry worked in a  similar way to the rest of Europe at this time.  A colonel was commissioned to raise a certain number of troops and it was then the colonel’s responsibility to find suitable candidates.  There were no uniforms as such, and so the recruits would be dressed in their regular ‘western’ clothes looking very much like the typical foot troops in the rest of Europe. 

One difference may well have been the composition of the troops recruited. It was typical in this period to recruit infantry as one third pike armed troops, and two thirds shot, armed with a musket.  One of the primary roles of pikemen was to protect the shot from cavalry. In the Commonwealth forces, with their superior cavalry, pikes were considered less necessary. In the 1620s campaign there is no evidence that the Foreign Infantry were armed with pikes, so it is possible that they were just musket armed troops. 

A detail from a contemporary picture showing the typical rag-tag appearance of troops in the TYW

For my Commonwealth army, based on the force at the Battle of Dirschau in 1627,  I need some units of Foreign Infantry.  I could just re-use some of my existing Thirty Years War Imperial foot to represent the foreign infantry, but I have plenty of potential candidates in the lead pile.  I decided to paint up some figures from the 1898 Miniatures ‘Tercio range’ that have been accumulating in my lead pile since their release in 2019.  These figures are a great representation of the typical foot from across Europe in the 1620s, 30s and 40s. 

Here is link to the 1898 Miniatures site link, and also to a review of the figures I wrote for Wargames Illustrated link.  In summary, I really like them! They are really characterful figures, and give a great impression of the typical non-uniformed troops from the TYW, wearing a mixture of styles and types of clothing. If you are interested in getting some of the 1898 figures then you can buy directly from them in Spain, or go to Empress Miniatures who are a UK stockist (here).

(Although I’m planning to use only musketeers for the Commonwealth army I have the pikemen to make these units up to regular pike and shot units later.) 

The metal figures were fairly straightforward to prep.  One slight pain was having to glue on the troops sidearms, a sword hung on the left hip from a baldric or belt. These look really nice on the figure, but I’m a bit worried about robustness in the long term as the swords are very thin and stick out in a realistic, but easy to bend way.  If you expect to be heavy handed with your figure then you should consider leaving the swords off.  

I gave the figures my normal, black spray primer undercoat.  I then painted up a test figure to try out how I wanted to paint the figures.  I combined a couple of approaches to try and speed up my normal snail’s pace painting speed. 

Primed figure with heavy dry brush of Flat Brown

After the primer was cured I gave the figures a very heavy dry brush in Vallejo Flat Brown (70.984).  This helps show up the details on a matt black figure, and, as so much of a 17th century soldier ends up brown, this can provide a base coat for things like shoes, belts, bandolier, scabbard, musket, etc. 

Base coats slapped on, waiting for the ‘magic’ to happen

I painted up a base coat across the other, non-brown items, not being too precious about neatness as minor errors would be corrected by the next stage. Next I gave the figure a generous wash of GW’s Agrax Earthshade (the ‘magic part’).  This provides a shade and also neatens up the figure overall. When this wash was dry I highlighted the original base coats again. 


This gave a nice impression of what I think a 17th century soldier on campaign might have looked like. (This approach combines techniques I’ve learnt from Matt at Glenbrook Games and also Sonic Sledgehammer.)

With the test figure done, I moved on to the rest of the unit.  I used a fairly muted set of natural colours for the rest of the unit. Here they are, all based up.  Front rank giving fire, and rear rank loading. A sergeant, with halberd, commands the unit.

Give fire!
Rear rank loading.


Since starting this post I have completed a second unit

I really enjoyed painting these 1898 figures, and I’m pleased with how they came out.  I have another 2 x 12 figures to do, before moving back to the mounted part of the force.  I am also working on some command stands for the Foreign Infantry, and should have some figures from another smaller manufacturer to showcase.

Until next time!

Andy @ Friends of General Haig