Showing posts with label Warlord. Show all posts

Sunday, 26 September 2021

Auldearn 1645 - The Game

Mac Colla, with his vanguard, trying to hold off the Covenanter’s surprise attack.

This blog post is a battle report for the Auldearn 1645 game that the Friends of General Haig played at the Warlord Games Open Day on the 25th September.  

You can see the previous Auldearn blog posts on:

Despite a cloudy start to the day the weather brightened up as we arrived at Warlord Games new HQ in Nottingham.  The Warlorders were as busy as bees getting everything ready for the start of the Open Day, and we were soon directed to our pitch.  We were allocated a space for the Auldearn game in a marquee in front of the building.  For this game we would be playing on a set of terrain boards that belongs to Warlord supremo, John Stallard.  John had it crafted by the talented Ernie Baker some years ago with the Auldearn battlefield in mind.

The board set up and ready to go!

On top of the board we added my terrain and two armies, as described in the previous blog posts (see links above), and before you could say “Irn Bru; brewed in Scotland from girders!” we were ready to go.

As a quick re-cap, the battle starts with Major General Hurry and his Covenanter force springing a surprise dawn attack on Montrose’s Royalists, who are camped in and around Auldearn; a small village less than 20 miles from Inverness in NE Scotland. 

The Covenanters form up ready to attack Auldearn, with only a scant few Royalists to hold them off.

Our game started with the Covenant force shaking itself out from column of march in to battalia formation for the attack.   To oppose them there is just a small Royalist vanguard, led by Montrose’s right-hand man, Alasdair MacDonald, better known as Mac Colla ‘The Devastator’.

The Covenanters had a brisk start and they made good progress over Garlic hill towards Auldearn.  The Covenanters knew that time was a critical factor, and that if they could break in to Auldearn, then they could hinder the rest of the Royalists from forming up to fight them. The Covenanters therefore threw themselves forward, with speed being of the essence.

Mac Colla knew that he had to hold up the Covenanters for as long as possible, to give Montrose enough time to rally the rest of the army, and reinforce him. Not wanting to engage in a firefight with the Covenanters superior numbers, Mac Colla decided that attack was the best form of defence, and led an immediate charge with his lifeguard in to the leading Covenanter regiment. The lead Covenant regiment reeled back from this onslaught, and Mac Colla also pulled back to rally his men for another charge.  

Mac Colla leads in his lifeguard again, while behind him, Gordon clansmen try to fend off Covenant horsemen

There was some confusion while the Covenanters tried to bring up supporting troops.  Hurry managed to bring up Drummond’s Horse on the Covenant right to threaten Mac Colla’s beleaguered troops.  Mac Colla then took a gamble; he charged again in to the Covenant foot with his lifeguard, and trusted to luck that his Gordon clansmen would hold off Drummond’s horse.

Some well timed shots from the Gordons slowed the attacking horsemen enough that their charge was held, and then, despite the fear with which the newly raised Gordons faced their first mounted attack, the horsemen were thrown back. 

To the rescue! The Irish Brigade marching out of Auldearn to join the battle.

Mac Colla’s charge was even more successful and some of the Covenanters were scattered by the impact of his lifeguard. However Mac Colla’s forces were tiring fast, and had to continue to fall back against the overwhelming numbers of the Covenanters.  It was with much relief that Mac Colla saw the first of the Royalist reinforcements marching out of the village, the doughty Irish Brigade.  

Covenant pikemen trying to develop another attack while Hurry tries to rally the Covenant horse.

The next Covenant regiment finally managed to push forward towards Mac Colla.  Their fresh musket fire tore in to the rallying Royalist vanguard. This was too much for the Gordon clansmen who ran for the shelter of the village. Despite Hurry’s pleas, Drummond’s horse would not rally to charge again, and finish off the remainder of Mac Colla’s force. 

The arrival of the Irish brigade, and the Covenanter’s continuing difficulty in bringing forward more troops, stabilised the position for the Royalists.  If only their own Royalist horse could arrive.  Suddenly the urgent sound of trumpets sounded from the Royalist left flank.  Could this be the Gordon Horse arriving in the nick of time?    

Well maybe it should have been, but something had gone awry.  Maybe it was patch of unexpected boggy ground, or may be some confusion in orders, but the Gordon Horse were delayed.  

The Earl of Seaforth’s levies moving forward against the Irish Brigade.

This gave the Covenanters a chance to recover their lines and prepare for the Royalists who were trying to flank their position. It also seems to have encouraged the Earl of Seaforth, on the Covenanter’s left wing, to push forward with his levies.  The Irish Brigade now had their hands full facing off a horde of Clansmen from the far North Western parts of Scotland, including the dread Lewis bowmen. Seaforth’s levies were supported by Halkett’s regular horsemen. 

Finally, the Royalist cavalry arrive.

The Gordon Horse finally galloped on to the field and found that the Covenanters had started to pull back from their approach.  Despite having lost some of the element of surprise, the Gordon Horse still put in a well timed charge and put Drummond’s Horse to flight.  Lord Gordon managed to rally his horsemen, and regrouped as the Strahbogie regiment, arrived from the village, marching up in support of their kinsmen. 

The wall of firepower waiting for Mac Colla’s last, desperate charge. 

Mac Colla’s lifeguard were worn out from their earlier heroics and so Mac Colla instead lead forward his remaining Gordon foot to try and keep up the pressure on the Covenanters.  This proved to be one charge too many.  The Gordon foot faltered in front of well timed volleys from the Covenant musketeers, and were finally routed. A wounded Mac Colla was last seen being dragged back to the village by the Gordons while he protested that “Just one more charge will see them off!”. 

Hurry, seeing Montrose in the front line, tries to lead his cavalry in a charge. 

On the Covenant left a fierce firefight now developed between the Irish Brigade and Seaforth’s troops. Montrose had to intervene personally to rally some of the Irish.  Hurry thought he saw an opportunity to catch the Marquis while he was rallying these troops in the frontline, but Halket’s horsemen refused to follow him in a charge on the Irishmen around Montrose. 

Covenant pikemen lead a charge into the Royalist line.

A lull in the fighting along the whole front line allowed the Covenanter to regroup and bring forward the last of their regular troops for another attack. Some well time volleys from the Covenant musketeers unsteadied the Royalists, and Hurry threw in his men at charge of pike to try and break the Royalist line. 

Lord Gordon leads his regiment of horse in to the flank of the Covenanters, supported by the Strathbogie foot.

The Covenant pike went in hard.  The Royalist foot bent, but didn’t break.  A fierce melee ensued and the Covenant officers urged on their pikemen sensing they were near to breaking through.  At this moment Lord Gordon put himself at the head of his regiment of horse, and bellowing “A Gordon! A Gordon!”, charged past the Strathbogie foot, and into the flank of the Covenanter’s attacking troops.  Some of the Strathbogie foot, perhaps being carried forward holding on to the stirrups of the Gordon horse, followed suit.

The Gordon Horse sweep though the Covenent flank.

The Covenant foot had no reply to this, and beset to their front, and now charged to their flank, started to fall back.  This last setback proved too much, and the Covenant army finally turned on their heals, broke, and ran for Inverness.

A Royalist victory; in the final turn of the game, just as we timed out at the end of the day!  It had been a hard fought, and exciting game all of the way through, with many twists and turns of fate.   Mac Colla’s early aggression was effective in holding up the Covenanters, but his troops were worn down very quickly and only the early arrival of the Irish Brigade saved them.  With the Irish Brigade and the Gordon Horse in the battle line for the Royalists, the Covenanters had a much harder battle on their hands. The Covenanters did manage to organise a final attack which was very close to being successful, but the final charge by the Gordon Horse, neatly recreating events in the real battle, finally broke the Covenant army.

The Pike & Shotte rules worked very well for us. The only issue we had was that we were reminded to not have too many special rules for your troops, as they are very easy to forget in the middle of a game!  One of the things that we really liked about rules was that they provided lulls in the battle, as well as reversals of fortunes, which are often found in actual battle accounts, but can be rare under some other rules.  

Many thanks to the Warlord crew for inviting us to the Open Day, and for looking after us during the day.  Also many thanks to John Stallard for lending us his beautiful terrain boards for the game, they set the game off very nicely.

Our pitch for the day.

A big thank you as well to all of those that came and talked to us during the day and said very nice things about how the game looked.  We had some help from a few people during the day who helped us play the game, but James gets the prize for having the worst dice throws; almost as bad as mine ;-) .


I hope that we were able to show people a little bit about how a game of Pike & Shotte works, and perhaps also inspired a few to try this period for their own games. 

Finally a big “cheers” to ‘Friends of General Haig’ Paul for playing the part of Montrose so well.


Alba gu bràth!

Andy @ Friends of General Haig


Sunday, 12 September 2021

Auldearn 1645 & Boath Doocot


“Health and joy to the valiant Alasdair who won the battle of Auldearn with his army,

With his fine soldiers, who at the outset of their march loved to sing his marching song.”

From ‘A Song To Alasdair Mac Cholla, after the battle of Auldearn’ by Iain Lom, translated from Gaelic by Annie M. Mackenzie

The Battle of Auldearn, 1645, starting with the Covenanter dawn attack

In this blog post I am taking a short break from the Polish-Swedish war and switching to Scotland in the War of the Three Kingdoms (or ECW in old money!).  The lovely folks at Warlord have asked The Friends of General Haig to come to the Warlord Games Open Day on 25th September (https://store.warlordgames.com/products/warlord-open-day-ticket-2021) to put on a game of Pike & Shotte.

Warlord’s Open Day has become a bit of a tradition for us and we’re always happy to make the pilgrimage to the Nottingham ‘Lead Belt’, the heart of wargaming in the UK!


Grab your tickets, while available, here - https://store.warlordgames.com/products/warlord-open-day-ticket-2021

Intro to the Open Day 2021 on YouTube here https://youtu.be/n1-tHvMQ1z4

We’ve decided to put on the Battle of Auldearn 1645, in a replay of the game we did in 2018. (You can read about it, including my brief historical introduction to the battle, on the Warlord site here https://www.warlordgames.com/warlord-games-open-day-auldearn-1645/.)  This is a nice compact game, with lots of nice scenery, and two tartan-tastic armies.  In the next couple of weeks I’ll share on the blog some of the things built or painted for Auldearn, as well as the orders of battle etc.

To start things off, here is how I re-created one of the iconic parts of the Auldearn battlefield; Boath Doocot.  This still stands today on Castle Hill, itself the remains of a 12th century motte and bailey castle. This hill was probably Montrose’s command position during the battle and also where the Royal Standard was flown. Archeology has also suggested that the Royalists may have had some artillery firing from this position.  

Boath Doocot - Auldearn

The Doocot, a Scottish version of Dovecot, was a traditional building to breed doves for their eggs, meat and droppings!  The current building held over 500 nest boxes. Recent archeology suggests that the current building was built later in the 17th century, after the battle, but it may have been built on a previous structure in the same position. Taking this information as the inspiration for the terrain piece I set about to model a similar round building.


I suppose that I could have just scratch built a round tower but I decided to use a plastic round tower as a base. This used to be available from Warlord, but is now sold by North Star https://www.northstarfigures.com/prod.php?prod=14747 .

I used just two levels to get the height I wanted for the Doocot.  The kit goes together fairly easily and is very solid.  It is definitely worth dry fitting pieces as a test when building as, although logical, there were no instructions in my copy.  

This most tricky bit was making the conical roof.  Now, I’d love to say that I fell back on my school geometry to work out the size of the circle required to cut to make the size of conical roof, but I have to admit that I ended up using trial and error and some card from packaging to get the right result. 16cm with a quarter of the circle cut out seemed to work.  The conical roof was bent in to shape and then held together with sellotape. The cone was then glued on a floor section, and the floor section attached to the tower. 

One distinct feature of the tower was a line of running around the building, about half way up the walls. A bit of research suggested this was a feature designed to discourage rodents etc. from scaling the walls to get inside.  Apparently this course of projecting brick work makes it difficult for rats etc. to scale the sheer walls, and then gain entry, to raid the nests inside. This line was replicated on the model with a thin strip of mounting board, glued around the tower.


The roof was tiled with strips of tiling available from Warbases in handy A4 sheets. This was a bit fiddly and I’m sure it would be possible to get a better finish if more care / time was taken.  The result here is ok, if you don’t look too closely!  The roof was finished off with a small cap of card. 


Next a doorway and windows were added using small pieces of card, balsa and a laser cut door, again from warbases. These were modelled on those of the current building there being nothing better to go on regarding the possible original building.

The building was also rendered over the plastic stonework using a mix of PVA and filler, coated in builders’ sharp sand.  The whole building was spayed in Humbrol Dark Earth before being painted. 


Some weathering with inks, and a dry brush finished off the model.  All that remained was to add some doves, found on eBay.

The finished model on top of Castle Hill

The final model makes a useful accent to Castle Hill, and for me really marks out the miniature battlefield as Auldearn, even if it is perhaps anachronistic! 

The village of Auldearn, with the Doocot on top of Castle Hill behind.

Next time I will cover the battlefield and orders of battle.

Alba gu bràth!

Andy @ The Friends of General Haig.


Tuesday, 29 October 2019

Limbering Up


“Victory is the beautiful bright-coloured flower.  Transport is the stem without which it could never have blossomed.”  Winston S. Churchill 

In this blog post I discuss the latest figures that I have completed.  Perhaps not the most glamorous of units, but I think a great addition to any 17th century wargames table; artillery limbers.

These limbers, with their teams of horses and drivers, having been sitting in the paining queue for a very long time.  They have always taken sending priority to the flashy horse and foot units.  With no desperate gaming deadlines looming I have finally got around to giving them the attention they deserve.

Limbers are something that I think many of us justifiably ignore for the Pike and Shot period.  Bigger guns tended to be set in fixed positions before the start of a battle, and stayed there for the duration.  They might be assaulted and change hands, even changing hands multiple times, but they were not typically moved from place to place during a battle.  The light guns, such as the 3 and 4 pounders, were sometimes moved with the infantry formations, but this was usually a case of man handling them.


So, what is the point of investing in limbers?  Well, there were a few reasons for me.  Probably the first reason is that they make nice dioramas for the artillery position which I think is sometimes at risk of looking a bit bare.  There was a huge amount of paraphernalia involved in running 17th century artillery batteries, and a few limbers help it look a bit busier, along with other carts, equipment, train guards, etc.

Secondly there are a few battles where one army still needed to pull their heavy guns in to position at the start of the battle. Lützen 1632 is a great example of this.  Wallenstein had set up a position for his army, and Gustav Adolf had to manoeuvre his army to meet it.  As part of this, the Swedish heavy 24 pounders were towed on to the battle field and set up just as battle was starting.  If you want to game deployment activity like this then it looks a lot better to have some proper tows for your guns.

Finally, it gives you some great options for smaller actions.  Now, as well as the baggage carts and pack mules being involved in an ambush, I can add a limbered gun or two.  Perhaps a tasty prize for the ambushers, or perhaps a nasty surprise if the gunners are on top of their game and can get the gun in to action in double quick time.


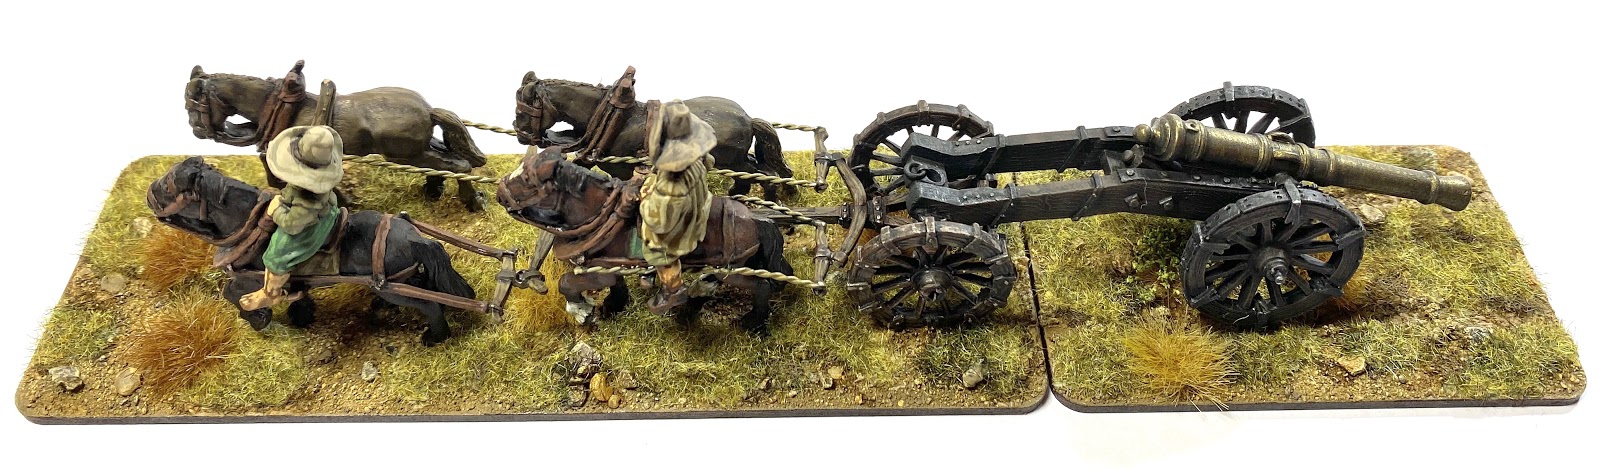
There are two different manufacturers limbers in this set-up.  I have two three horse limbers which are relatively new out from Warlord Games (link), and a four horse limber from Wargames Foundry (link).

Wargames Foundry's Four Horse Limber towing a Warfare Miniatures Field Piece

The Foundry limber is in actual fact a bit of a Frankenstein’s monster.  If I look back at my black and white Foundry English Civil War catalogue from the early 90s with its hand drawn figure illustrations by the famous Twins (a now treasured possession!)   I can see that originally there was a three horse limber with a rider and a figure on foot.  What Foundry sell now is a four horse limber, with two riders, and the limber it self looks like it has a separate origin.  The traces etc. included also need a bit of imaginative modelling to work out what to use and what to put where.


I spent some time studying Wagner’s Weapons and Warfare, with its lovely examples of cart and limber team hitching, to work out possible ways to hitch up this particular limber.  In the end I had to make some of the traces myself and I used some wound fuse wire for this job.  The eagle eyed will see the two front horses are hitched with slightly different traces, but I think this works as I’m sure there was a lot of ‘make do and mend’ in a typical artillery train.


Warlord Games Three Horse Pike and Shotte Limber, towing a Warlord Games Saker.

The Warlord limbers were more straight forward to work out.  They have a nicely completed example on their website which I used as a guide, and they seem to have used one of the Wagner illustrations as a pattern for their set-up which is also very nice to see.  I couldn’t resist a head swap for the one of the Warlord riders using a spare head from the bits box.  (I find it very difficult to accept duplicate figures in units!)


For all of the limbers I dry fitted everything together but, although I glued the riders to the horses, and the wheels to the limbers, I left everything else separate for painting.

After my earlier experiments with white undercoats and GW Contrast paint it was very nice to be back with black undercoat and my regular Vallejos.  I did use  a technique, new to me, copied from Matt at Glenbrook Games (link).  After their black undercoat was dry and set, I gave the horse and riders a heavy dry brush of Vallejo Flat Brown.  Just as Matt promised, this highlighted the details and also provided a first coat for a lot of the dingy brown accoutrements so common on 17th century figures.

With everything painted and varnished it them came to the part I was probably looking forward to least.  Glueing the things together.  Although I grew up with Airfix kits, I am not a great modeller.  I found this process very fiddly.  Much supergluing of tiny metal parts to fingers, followed by bad language, ensued.  Eventually I got the blasted things together and then had to work out the basing.  


At first I was intent on making the bases long enough so I could add a towed artillery piece behind the limber and it would sit on the same base.  Much discussion with long term gaming buddies followed.  If the limbers are going to spend most of their time ‘unhitched’ then the portion of empty base could look a bit ‘weird’ was the group-think decision.  However, when being towed it also looked odd to me if the artillery piece was not on a base.  I went for a good old compromise.  A separate small base that could be added when a gun was being towed, and taken away when the gun is unlimbered.  I’m sure this will seems like madness to many, but I like the look of it, and it works for different situations.

It wasn’t until I had the nearly finished painting that I realised I had nothing of a suitable base size in my Warbases ‘collection’ (a RUB 4L box brimming with mdf goodness).  I made a guess-timate of a length that would work for all three limbers at 150mm, and went for 50mm width which matches by cavalry bases and would therefore work for my roads etc.  Most of my baggage type things are on round or oval bases to differentiate them from the fighting units.  I thought these round cornered bases offered by Warbases (link) were a good look for the limbers.  (They were kind enough to make a special order for me as 150x50mm is not one of their standard sizes.)  The additional bits are 80x50mm.


There you have it.  A long term wargaming itch finally scratched, and I have some nice limbers for my artillery train.  Now I want some limbers pulled by oxen for a different look - there is always something else!  :-)

Until next time!

Andy @ FOGH.

Thursday, 11 April 2019

Hobby Heroes' Salute

This blog post is my tribute to the heroes of the hobby who I managed to meet at Salute 2019.

For me there are three critical elements that make up a wargames show: great games, great products, and great people.  Now, if you're interested in what happened at Salute, I'm sure you will have already seen picture of the games on show, and the fabulous hauls of loot that people acquired.   Instead of these I am going to focus on some of the people I met.  These people are all wargame heroes who keep me inspired through the long lonely evenings at the paint table.

Why selfies?  As I first discovered many of these people on social media it just seemed appropriate to join the mobile phone generation.  Also, as you'll see, I've taken very few of these before and I like a challenge :-).

Kicking off is Phil from the South London Warlords.  A massive thanks to all of the South London Warlords who help organise the show.  A super efficient set-up, as well as friendly and helpful bunch.  All working away behind the scenes to keep the whole thing running smoothly.  You may notice in the background my fellow FOGH, Paul (aka Smiley), who did his best to photo bomb every selfie!   Paul also deserves a big thank-you for being my co-pilot and chief navigator to and from ExCel, as well as all round top bloke.

Any Beasts of War / On TableTop fans out there are sure to recognise the following threesome: Justin, Gerry and Ben.  I must have spent hundreds of hours watching these guys on YouTube.  It was great to bump in to them and have a quick chat about our game.  I have lost count of the games I have learned about watching their play-throughs, or the products and kick starters I have been introduced to.  I'm sure I must have seemed a complete wally as all I could say when I saw them was "you're off the telly!".  If you don't know who they are then rush to their site here: https://www.beastsofwar.com/ .  Thanks BoW crew!


If you have collected figures to play English Civil War games then you will have seen figures from Bicorne Miniatures.  James is the convivial boss at Bicorne, and we both served, many years ago, as pikemen in Sir Gilbert Hoghton's Regiment, a Sealed Knot Royalist outfit.  It is always great to catch up at shows, but a bit scary that James' has kids the age we were when we first met!  Where did all of that time go?  Check out Bircorne at: https://www.bicorne.net/ .  We had a lot of Bicorne figures on the table at Salute.

Now,  in the shining galaxy that is the Too Fat Lardies team, Sir Sidney Roundwood must be the brightest star!  I am a huge fan of the Lardies Oddcast, hosted by Sir Sid, as well as the Too Fat Lardies clever rules systems.  It was a real honour to catch this selfie, and also to chat about Lutzen to Sir Sid.  As well as hanging about with Big Rich and Nick, Sir Sidney also has a great blog here: http://sidneyroundwood.blogspot.com/ .  A constant source of inspiration for painting and playing with toy soldiers. You can catch all things Lardy here: https://toofatlardies.co.uk/

More old pikemen from Sir Gilbert Hoghtons.  Funny how so many of them now work in the wargames industry!  If you have marveled at a beautifully sculpted artillery piece, or wondered at an amazing tank model, then you have probably beheld the amazing work of Tim (aka Aardvark), on the left.  Just don't ask him about the Queen!  There are not many wargamers who will not have seen Big Ben from 4Ground in the centre here.  To the FOGH he will always be Mungo, the one man pike block.  I am still dazzled by the products that 4Ground release, and I can't quite believe that the mdf is pre-painted - such wizardry.   They also make my favourite trees on the market!  See them here https://www.4ground.co.uk/deciduous-woodland

I am a complete newb to this Blogging business, but I have followed Ray's blog for years.  As well as having a great blog himself, he is also massively supportive to others in the Bloggosphere, including me.  Thanks for keeping me going, Ray!   It was great to meet Ray in person and discuss the finer points of garden sheds :-) .  Long may your blogging continue.

Please be upstanding for the boss!  The man who has led me in to more pike pushes, and pubs, than anyone else.  The terror of Parliament pike-blocks, John is also the joint owner of Warlord Games.  A card carrying FOGH, John is the man responsible for plastic ECW figures!  Who would have thought such a thing would ever happen?   Warlord are not only a powerhouse in the industry, but willing to share their passions with the world.  I can't imagine many companies investing in a 1/300 ship game.  Warlord are also "keeping it real" by stocking Humbrol paints at last.  Check out Warlord's Thirty Years War Range here: https://store.warlordgames.com/collections/thirty-years-war-1618-1648  .  I will be re-stocking up the lead mountain soon ;-)

If you like games with hordes of beautiful 28mm figures then you must have seen Simon's games.  If you have been to any shows in the UK then you will also have seen his signature Hawaiian shirts!  I have followed Simon's Big Red Bat site for ages, and his ECW armies are a continuing inspiration. How does he get so many flags in his units?  If you haven't already, then you should check out his To the Strongest / For King and Parliament rules, along with his innovative basing system, here: https://bigredbatshop.co.uk/

If Sweden has wargaming royalty then Michael must be one of them.  Co-author of Pikeman's Lament and the new Rebels and Patriot rules from Osprey.  Michael has a fabulous blog at https://dalauppror.blogspot.com/ and his multi-national team put on another fabulous game at Salute this year, Danholm 1807 (winner of the Salute best historical game!).  Micheal's blog is a great resource, especially for anyone interested in 17th Century European conflicts.  It was a real pleasure to meet Michael and some of his team at Salute and to get the Swedish perspective on Gustav Adolf and Lutzen.  Anyone for a Gustaf Adolfsbakelse? ;-)

The Warlord Pike and Shotte rules are definitely my favourite for this period, and so I am always delighted when I can tempt the rules author, Steve, over to our game.  Steve is part of the Warlord Games powerhouse-team, and so therefore a key ally in persuading boss John to get more 17th century toy soldiers in to production.  Did anyone say "more Poles"?  Steve is also a dab hand with the paint brush and the cabinets at Warlord HQ usually have some of his lovely toys on display.

Author, blogger, pod-caster, editor and general wargames bon viveur, Mr. Henry Hyde!  A real  honour to spot Henry at our table.  Henry was also the person who gave me the best tips on how to take Selfies :-) .  Thanks, Henry, for reducing my double chins in this picture!   Looking forward to his new book, apparently finished the night before Salute.  I can't believe anyone doesn't already know his site, but just in case, check out Battlegames here: https://henrys-wargaming.co.uk/ .

When people were looking at our game one of the most frequent comments was "great flags".  All of our TYW flags were from Flags of War, and so it was a very pleasant surprise when Iain, who runs Flags of War, turned up at out table.  Not only do his flags really pop on the table, but his service is super fast.  I also picked up some Highanders from his recent Kickstarter campaign.  Very nice!  See them and the amazing flags of all periods here:  http://www.flagsofwar.com

At the time of posting the Terrain Tutor is absolutely storming his Kickstarter for the Terrain Essentials book.  It funded in the first seven hours!  There are lots of great terrain tutorials out there, but what sets Mel part for me is the effort he puts in to explain the materials used.  Understanding paint, PVA, foam etc. makes all of the difference.  He also puts his heart and soul in to his channel.  An incredibly dedicated teacher.  I can't wait for his book.  I am sure it will quickly become the terrain makers bible.  Go sign up here:  https://www.kickstarter.com/projects/1560579763/terrain-essentials .  It was great to grab a picture with Mel on his Salute tour.  All of the FOGH are Mel fans ;-) .   Big thanks to Jase for taking the picture!

Of course, I also need to say thank you to all of my fellow FOGHers! The whole team here were happy to give up their time to come and help with the game.  Having a big crew of us really helped us  share the work around.  We were able to have some people play the game, some people chat, and some people take a turn to look around the show.

From left to right: Charles, Clive, Andy mk1 (me!), Steve (aka Bruce), Andy mk2, Tony, Paul (aka Smiley).  The end of the day and still smiling; I salute you all!
If you admired our fine new club shirts then you need to contact Debs at Saddle Goose Designs.  She provided a fabulous service and coped with all of our strange requests.  Without doubt the best shirts we have ever had - highly recommended!  https://www.saddle-goose-designs.co.uk

So a final big thank you to all of these hobby heroes who keep me entertained, inspired and playing wargames.

Until next time.