Showing posts with label Hussars. Show all posts

Sunday, 16 January 2022

Even More Husaria!

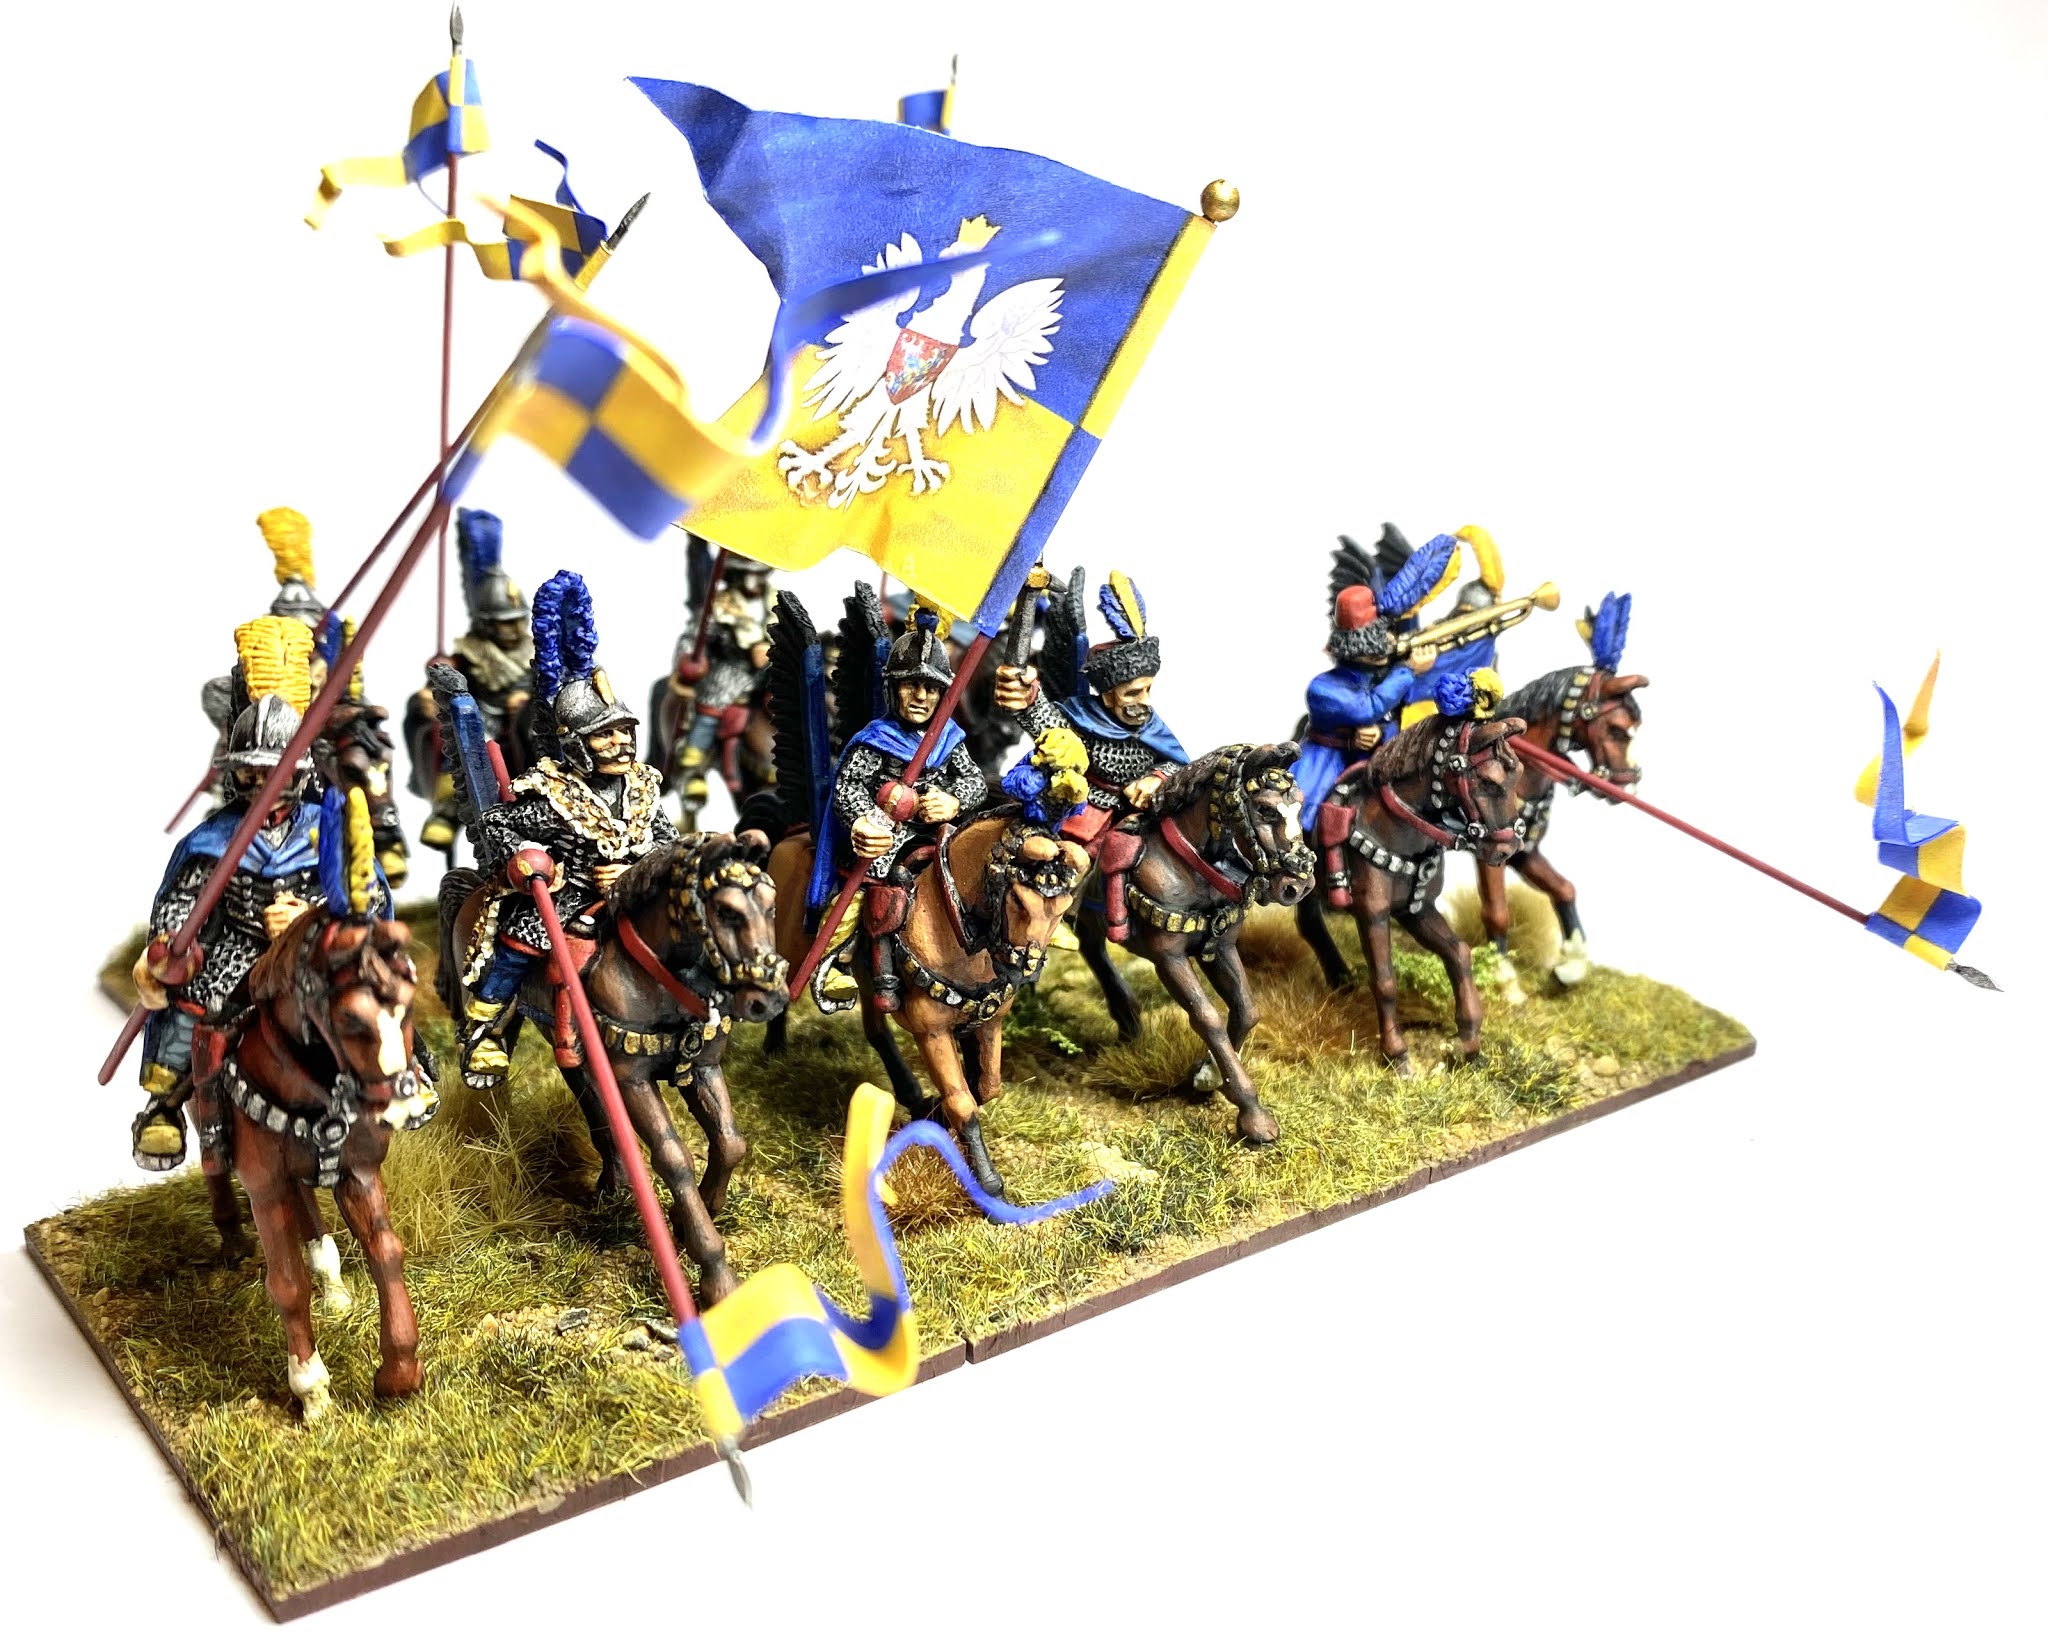
This blog post looks at my latest unit of miniature Husaria.

Polish Hussars from Warlord Games, 28mm

Long term readers of the blog may remember that when I started the Hussars for my Polish-Lithuanian Commonwealth army I looked at three different manufacturers (see https://theviaregia.blogspot.com/2020/05/husaria.html). I decided at this point that the Warlord figures looked a bit later than 1620s period that I was aiming for, and were perhaps more suitable for the 1670s onwards. The units I’ve used so far have been from Foundry and TAG. Well, the thought of that box of Warlord Hussars sitting in my lead mountain had been a niggle in the back of my mind. Then the box was inexplicably joined by another! (Thanks, Phil!) This was too much to bear, and so I decided that I had to paint up a unit with the Warlord figures.

So here is a quick run down of the Warlord Games, Polish Winged Hussars box set. You get eight metal riders and eight metal horse figures in a box. As I form my cavalry in units of 12 figures I needed two boxes to make a unit, and of course three boxes will allow me to make two units! 

As I noted before, the Warlord figures are in very dynamic poses. There are four different horses, all in different states of galloping forward. One of the horse poses looks a little odd to me, but once ranked up with the others it is fine. The horses all have nice ‘fancy’ horse furniture, befitting these noble units, and have pistol holsters and the long koncerz type sword  on the left side of the saddle. 

There are six poses of hussars with lance, two at the charge, and the rest in various more ‘lance upright’ poses. There is also an officer figure, with two options for his right hand; either a sabre or a bulawa (a ceremonial mace). Finally there is a trumpeter. One of the lancer models can be used a standard bearer. 

The figures come with a nice selection of separate wings, also in metal. There are three different designs, all of which are probably of the later types of design in which they curve forward. The hussar figures have been sculpted to allow one or two wings to be added either to the riders back, or to rear of the saddle. Wings attached to the rider’s back seem to be later and final design for carrying wings. I chose to use the wings mounted to the rear of the saddles, that are moulded as part of the riders. I avoided using the most curved wings, and also used some shorter, straighter wings that I had in my stash for a bit of variety. By using the less curved wings, and by saddle mounting them, I was in my mind at least, giving the hussars an earlier look. The hussars armour still gives them a look that suggests to me, later than the 1620s. 

Warlord provided nice brass 80mm long spears for the lances. Hussar lances included a ball shaped hand guard. To represent this Warlord provide some small metal ball shaped hand grips in the set. These come with holes drilled through them which allow them to be mounted on the brass spears. This is a lovely touch and I have used this approach for all of my previous units of hussars. 

With the variety of horses and riders, all in dynamic poses, fitting everything together took a bit of time. This allowed for some experimentation and a small bit of filing and filling to get riders and mounts to fit neatly, with wings added to the saddles. As I wasn’t using the back mounting points for the wings these needed to be filled with some green stuff. I also made sure that the riders who would be carrying lances had their right hands drilled out, although I would fit the lances later after painting. 

Despite having the riders and mounts matched, I painted them separately. This requires a numbering system on the paint ‘handles’ to help match the correct riders to the correct mounts after painting. The figures were really nice to paint with lots of crisp detail. The horse tack is suitably fancy, and the hussars’ armour is also covered in a lot of detail. My humble skills could only go so far with this, but there is plenty of detail there to satisfy a really keen painter.

My attempts at tiger and leopard pelts.

There are loads of details to paint on the horses and riders.

An extra exotic snow-leopard.

I glued the riders to the horses after they were painted. Before adding the lances I painted the lances and added the lance pennants. These are from Flags of War and the cavalry standard is from a set of free downloads on Jose Manuel Chasco’s site (see here https://www.anotherminiaturespainter.com/wargames/28mm-polish-renaissance-cossack-flags/). Warlord provide pennants and a flag as part of the information leaflet in the box, but I had already used the design they provide on a previous unit and I wanted these to look different.  With the lances on the figures it was time for my regular basing. (See https://theviaregia.blogspot.com/2021/04/husaria-from-ground-up.html.)


I am really pleased with the finished unit. Despite the button-counter part of me knowing these look a little late for my 1620s army, they may sneak on to the tabletop to join their earlier comrades; they’re just too nice not to use! 

The finished unit placed into its Really Useful Box for storage.

Until next time!

Andy @ The Friends of General Haig (FOGH). 


Wednesday, 28 April 2021

Husaria From The Ground Up

In this blog post I’ll be showing my latest units of 1620s Polish Hussars, and covering how I complete the bases for my figures. 

The latest banner of Hussars gallop from the paining table - TAG and Foundry 28mm

When I share pictures of my completed figures there are often positive comments about the basing and so I thought some people might be interested to see my basing method.  Even if you have a well practiced basing approach already, hopefully there will be some tidbit of interesting / useful information in the seven steps described below. 

Step 1.

I paint figures separately and, once they are painted and varnished, add them to the final base.  Normally this is 2mm MDF from Warbases.  I typically use Bostick adhesive, or something similar, as it is relatively cheap and readily available.

My cavalry are normally on 60mm deep by 50mm wide bases for two figures. 

Step 2.

Once the figures are on the base, and the glue is dry, the next step is to try and disguise the metal or plastic base the figure is cast with. For this I use filler / spackle.  I add a few drops pop water to make the stuff easier to apply, but don’t add too much as the filler will lose its ‘shape’ and will not hide the metal/plastic base.  I have found a couple of tools that make this easier.  One is from a collection of artist’s plastic palette knives, readily available on Amazon/eBay.  I also have the GW basing tool to help me get in to  smaller gaps around the figures’ feet (but you can easily use an old brush if you want to).  These tools have a bit of flex and are great for applying thick or textured stuff like filler.
I like these handy tubes of filler as they allow you to use just a small amount of material.

This is a rough and ready stage.  The key thing is to go around the metal / plastic based that the figure is on.  No need to  cover the whole base as that will be done in a later stage.  The more bumps and splodges the better as this helps add an uneven surface to the overall base.

You can see here how I plaster on the filler.

 
A fairly rough end result is fine.

(If you accidentally get some filler on the figure then a brush with water on can be used to wash it off.) When the bases have had the filler applied then it is best to give them some time to dry before the next step. An hour or so should do (it doesn’t need to be fully cured, just mostly dry). 

PVA and paint mixed with a small amount of water.

Step 3.

With the filler on, the next step is add more texture, this time over the whole base, with sand.  To fix the sand I use a mixture of PVA, acrylic paint and water.  You need to add enough paint so that the PVA ‘whiteness’ has taken on almost the complete colour of the paint.  Then add a small amount of water, enough to make the PVA+paint easy enough to apply thickly with a brush, but not too much to over dilute the PVA so it will not hold the sand.  My preference for paint colour is Humbrol Matt 29, Dark Earth.  Nothing else is quite the same, but it is just a personal preference so you can use what you like. (I have found the Dark Earth works well with the sand I use in the next step.)  The PVA and paint mixture is then painted over the whole base quite thickly.  I tend to use old brushes for this job.  I use a small brush first to go around the figures’ feet, and then a bigger brush to fill in the rest.

Base with PVA and paint mixture thickly applied.

Step 4. 

On top of this PVA and paint mixture, while it is still wet,  I apply sand.  I bought a 5Kg (roughly 10lbs) bag of builders’ sharp sand 30+ years ago and I suspect I will never need to buy any more! I sieve the sand (using the kitchen sieve - don’t tell the chief!) to separate it in to a fine sand and bigger bits (see picture below).

The sieved sharp sand; big bits and fine sand.

On top of the wet PVA + paint mixture I apply one or two small (one pinch) sprinkles of the larger bits of sand.  This gives a bit of variety to the overall texture of the base.

A small sprinkle of the bigger bits from the sharp sand - just need one or two of these per base.

With one or two patches of the larger bits added, I then cover the rest of the base in the finer sand.  I tend to sprinkle this on by hand, fairly thickly, and then turn the base over and gently tap off any excess sand, which is reclaimed for further basing. 

Whole base covered with the finer sand.

Step 5.

The figures’ cast on bases should now be disguised / hidden, and the whole base should have a nice rough, realistic texture.  The sand provides a subtle variety in colour that works as an accent to the earth / mud coloured paint underneath. The base now needs a good amount of time to dry and I typically leave them overnight to make sure everything is really dry and firm.

Although I like the earth + sand colour, it needs a highlight to add contrast, and also to tie all of the colours together.  I have found a single, light dry brush with Vallejo 917 Beige works well. 

Old brushes and kitchen towel to wipe off excess before dry brushing.

Dry brushing sand is very tough work for a brush and they do not last long in this job.  As the sand has provided a colour change from the base earth colour I think a single highlight is fine at this stage.

Dry brushed base.

Whole unit with dry brushed, sand covered bases. 

Step 6.

The final step is my favourite of the basing process, and is when the base comes ‘alive’ with the adding of static grass and tufts. I like to see this as the gardening phase!  I use two different colour tones of static grass as a base.  One mid-tone, with dull mid-greens, and some lighter browns, and the second a dark-tone with dark greens and dark brown, both using 2mm static grass.  I buy small bags of static grass, from all sorts of suppliers, and mix them up myself for the mid colour.  I find mixes described as ‘Autumn’ work quite well as they have more muted colours. My mid-tone grass evolves slowly over time as new lumps of static grass are mixed in to the mid-tone container.  The dark-tone is more straightforward as I use straight Army Painter Steppe Grass which has a nice variety of colours straight out of the box.

My overall approach for the grass and tufts is variety.  Before the use of pasture improvers, such as nitrogen post WW2, natural grass land was incredibly diverse.  In the UK it is actually very difficult to find examples of what original, native grassland would have looked like.  The mono-culture, bright green fields we are used to seeing nowadays are not representative of what a battlefield would have looked like 100+ years ago.  I am therefore aiming for a variety of natural colours and textures in the greenery on the base, but without taking too much from the figures themselves.

The variety of green stuff for basing - static grass and tufts.

I also tend to vary the tufts I use.  I keep finding new suppliers with interesting colours etc.  I use 4mm, 6mm and 10mm tufts.  Currently I’m using tufts from:
  • Warpainter (available on Amazon)
  • World War Scenincs (WWS)
  • Green Stuff World
  • Tajima 
To apply the green stuff I use slightly watered down PVA, added to the sandy base with an old brush.

PVA and handy large plastic tweezers for applying static grass and tufts.

First I add the mid tone static grass which will be the largest volume of green cover.  I have a careful look at the base first, looking for any areas where the sand mixture doesn’t look so good, or perhaps the figure base is more obvious.  I make sure these areas are covered in static grass to cover up any imperfections.  I apply random patches of the thinned PVA and then add the mid tone static grass.  I add the static grass on thickly and press it in to the PVA with tweezers.  I make sure I leave around four nice flat areas to accommodate tufts later.  After pressing on the static grass I invert the base and tap firmly with the tweezers on the bottom of the base until the excess is off.  This also helps the grass stand-up a bit.  (Probably not as much as an electrical static grass applicator would, but I find the tapping method easier.)

Random patches of PVA for the mid-tone static grass.

With the mid tone static grass applied I then repeat the process to add a few, smaller patches of the darker tone of static grass next to mid-tone.

Mid-tone and darker-tone static grasses added.

There should now be a few spots left without static grass and to some of these I add tufts.  I will use a variety of three or four types of tuft for a single unit, with one or maybe two of each type per base.  Although the tufts come with sticky bases, I add some PVA to the sandy area before pressing on the tufts with tweezers.

Base with static grass and tufts added.

I leave some patches of the highlighted sand showing, including the areas of the larger bits of sand, as this adds to the variety and interest on the base.  

Some patches of sand left showing through the greenery.

Step 7.

I leave the base for an hour or so for the PVA to start holding the green stuff.  I then prune any tufts or static grass that are hanging over the base edges with small scissors.  This helps prevent problems with getting bases to sit tidily next to one another.

The final job is to tidy the base edges.  These have often become messy with the application of filler, PVA and sand.  I like a nice dark brown finish for the base edge and a fast way I have found to do this is Posca paint pens (available in some Hobbycraft stores in the UK or try Amazon).

A messy base edge and the easy answer!

Painted base edge.

The based unit is now ready to take its place in the growing miniature army.  I use this approach for 15mm (perhaps using smaller tufts) as well as 28mm.  It is not the quickest method, but I like the end result, and I have honed down the steps over the years to make it is as efficient as possible. (The paint in the PVA was a major step forward!)

Some Pictures

Well done if you have got this far!  You will now be rewarded with some pictures of the latest figures for my Polish army, all based up.  First is the unit of Polish ‘Winged’ Hussars.  These are 28mm with riders from The Assault Group (TAG) and Wargames Foundry.  The horses are all TAG.  Flag and lance pennons from Battle Flag.


Here is another commend base for my ‘Foreign Infantry’.  These are from 1898 Miniatures’ Tercio range, except the drummer who is from Horcata Miniatures.  Flags are from Flags of War.


Until next time!

Andy @ The Friends of General Haig (FoGH)

Sunday, 7 February 2021

More Husaria!

This blog post covers the second unit of Hussars for my 1620s Polish-Lithuanian Commonwealth army.

The second unit of hussars charges in to action!

In two previous posts I went through the research and building of the first unit of hussars - you can see them here and here.

This latest unit is made up of a mixture of The Assault Group (TAG) and Foundry riders, as before, but this time on TAG horses.  The TAG horses are nice clean sculpts and most have some fancy feathers etc. which are very suitable for the noble Hussars, who liked an ostentatious display. They also have a single pistol holstered on the right side of the saddle.  This is a nice touch as firearms were becoming popular with the Hussars in this period.  I’m not so sure about carrying only one pistol, but I expect someone out there knows if this is right?

Riderless horses ready for varnishing

I’ve added wings in twos, or singles, to most of the figures, but left some without.  In this unit the wings are attached directly to the horse, rather to the equivalent position on the rider figure.  As covered in the previous posts, I have decided to have wings ‘saddle mounted’ (rather than fixed on the rider’ backs) in ones or twos as limited to the richer / more showy individuals in the unit. The wings are a mixture of the TAG wings and the Foundry wings modified to be the straighter, earlier type.  The TAG horses have a slot modelled at the back of the saddle to take wings.  The Foundry riders needed some chipping and filing to make them fit in the TAG saddles and I had to keep riders and horses matched during the painting process so I could be sure of them fitting together at the end.

Although not always strictly historical, I like to have a colour theme for my units.  For this unit I had chosen a blue and yellow flag, with matched pennons, from Battle Flag.  I therefore decided to carry on this blue and yellow theme to the horse trappings, and also the Hussars’ cloaks and helmet feathers.  I chose to use a few different hues of blue to add some variety while keeping within the overall theme.  I used Vallejo’s Prussian Blue, Ultramarine, and Pale Dark Blue, and then shaded / highlighted each of these.  I also wanted to include red on the hussars as this was a popular colour with wealthy Polish nobles in this period.  

Riders ready for varnishing

I’ve not really found a yellow, to use over a black undercoat, that I’m super happy with in the Vallejo or Army Painter ranges.  I’ve tried using Vallejo Ochre Brown, as a base for yellow, and built up from that. This is ok, but I wondered if I should look at some other ranges.  I have been slowly getting more into the GW Citadel range of paints.  I already really like the various shades such as Agrax Earthshade, and have been really pleased with some of the red base + layer combinations.  They is a handy app called ‘Citadel Colour’ which helps translate from actual colours to sets of base, layers and shades from the (strangely named!) Citadel range.  From the app I found Averland Sunset as a base, with Cassandra Yellow as a shade, and then Yriel Yellow as a layer.  I bought this set of paints and I have found they work really well.  I also tried some of the Citadel metallics.  I must say that, despite the bottle’s pot design (rather than being in dropper bottles), the paints that I’ve tried so far have been really nice to use and I’ve become a bit of a convert!

Flags and lance pennons for the unit from Battle Flag

After painting the figures I brushed on a gloss varnish as a protective layer for the riders, horses, and the lances.  As mentioned the lances were getting a set of Battle Flag pennons.  The main unit standard is blue and yellow, split horizontally, with a white eagle in the centre.  I decided to repeat this on the trumpeter’s trumpet banner, that is cast on the figure.  The two colours was fairly straightforward, but the white eagle would be tricky.  A Google search threw up some potential transfers that looked like they could work from Vene Vidi Veci.  VVV do sets of 15mm and 28mm ‘medieval’ heraldry symbols that can be ordered in a variety of colours. I ordered sets of 15mm and 28mm from Magister Militum (link) in white, black and red. I ordered both sizes as I wasn’t sure how big they would be and wanted to make sure that they would fit on the trumpet banner.

Trumpeter varnished and ready for transfers.

Once I had the transfers I decided that the 15mm size transfer would work best on the trumpet banner. I haven’t used transfers for a long time and decided to give this fancy Micro SEL and Micro SOL stuff, made by Microscale, a try.  The figure was already gloss varnished, which is apparently the best base to start transfers from.  I cut out a small, white, single-headed eagle transfer from the VVV set and, using a pair of tweezers, dipped it in water for a few seconds. While the water was soaking in to the transfer, I painted a small amount of Micro SEL (from the blue bottle) on to the trumpet flag where I wanted the transfer.  The transfer was now loose after its short soaking and so I slid the transfer off its backing and positioned it on the banner with the same brush I used for the Micro SEL. The Micro SEL allowed me to move adjust the position of the transfer with the brush tip. When it was in the right spot I smoothed it down with a small amount more of Micro SEL.  After repeating this for the back of the trumpet banner, I set the the figure aside to dry.

Equipment for applying the transfers to the trumpet banner.

Once the transfer was dry I painted a small amount of Micro SOL on top.  As the banner was a fairly flat surface this last stage, meant to mould the transfer on to curved / uneven surfaces, was perhaps not necessary, but I wanted to try out the full process.  I left the figure to dry once again.  The flag design that I was copying for the trumpet banner has a small red shield over the eagle’s breast, and a yellow crown on the eagle.  At this scale, two blobs of colour, were good enough approximation of this design for me!  I‘m sure many people would have managed with some white paint to approximate the eagle, but the transfer was a neat way of getting a consistent result on both sides.

Trumpet transfer applied and dots of paint added.

With this last little job done, it was then time to glue riders on to the horses and finish the basing.  Once again, I used 50mm wide by 60mm deep and 2mm thick MDF bases from Warbases.  (Each base takes two horses.)  The basing technique was the same as on the previous unit here. So, here is the second unit finished.  (The eagle eyed will have spotted that there is a base of two figures missing due to a miscalculation in figure purchases. This has been rectified!)


With two units done I have had to restock my lead mountain with more hussars.  Next on the painting bench will be some command bases (and the missing base of two for this unit).  

Until next time!
Andy @ FoGH