Showing posts with label Imperial. Show all posts

Sunday, 26 May 2024

Clowns to the left of me. Jokers to the right.

This post looks at a new unit of Harquebusiers for my Imperial Thirty Years War and Polish-Lithuanian armies.

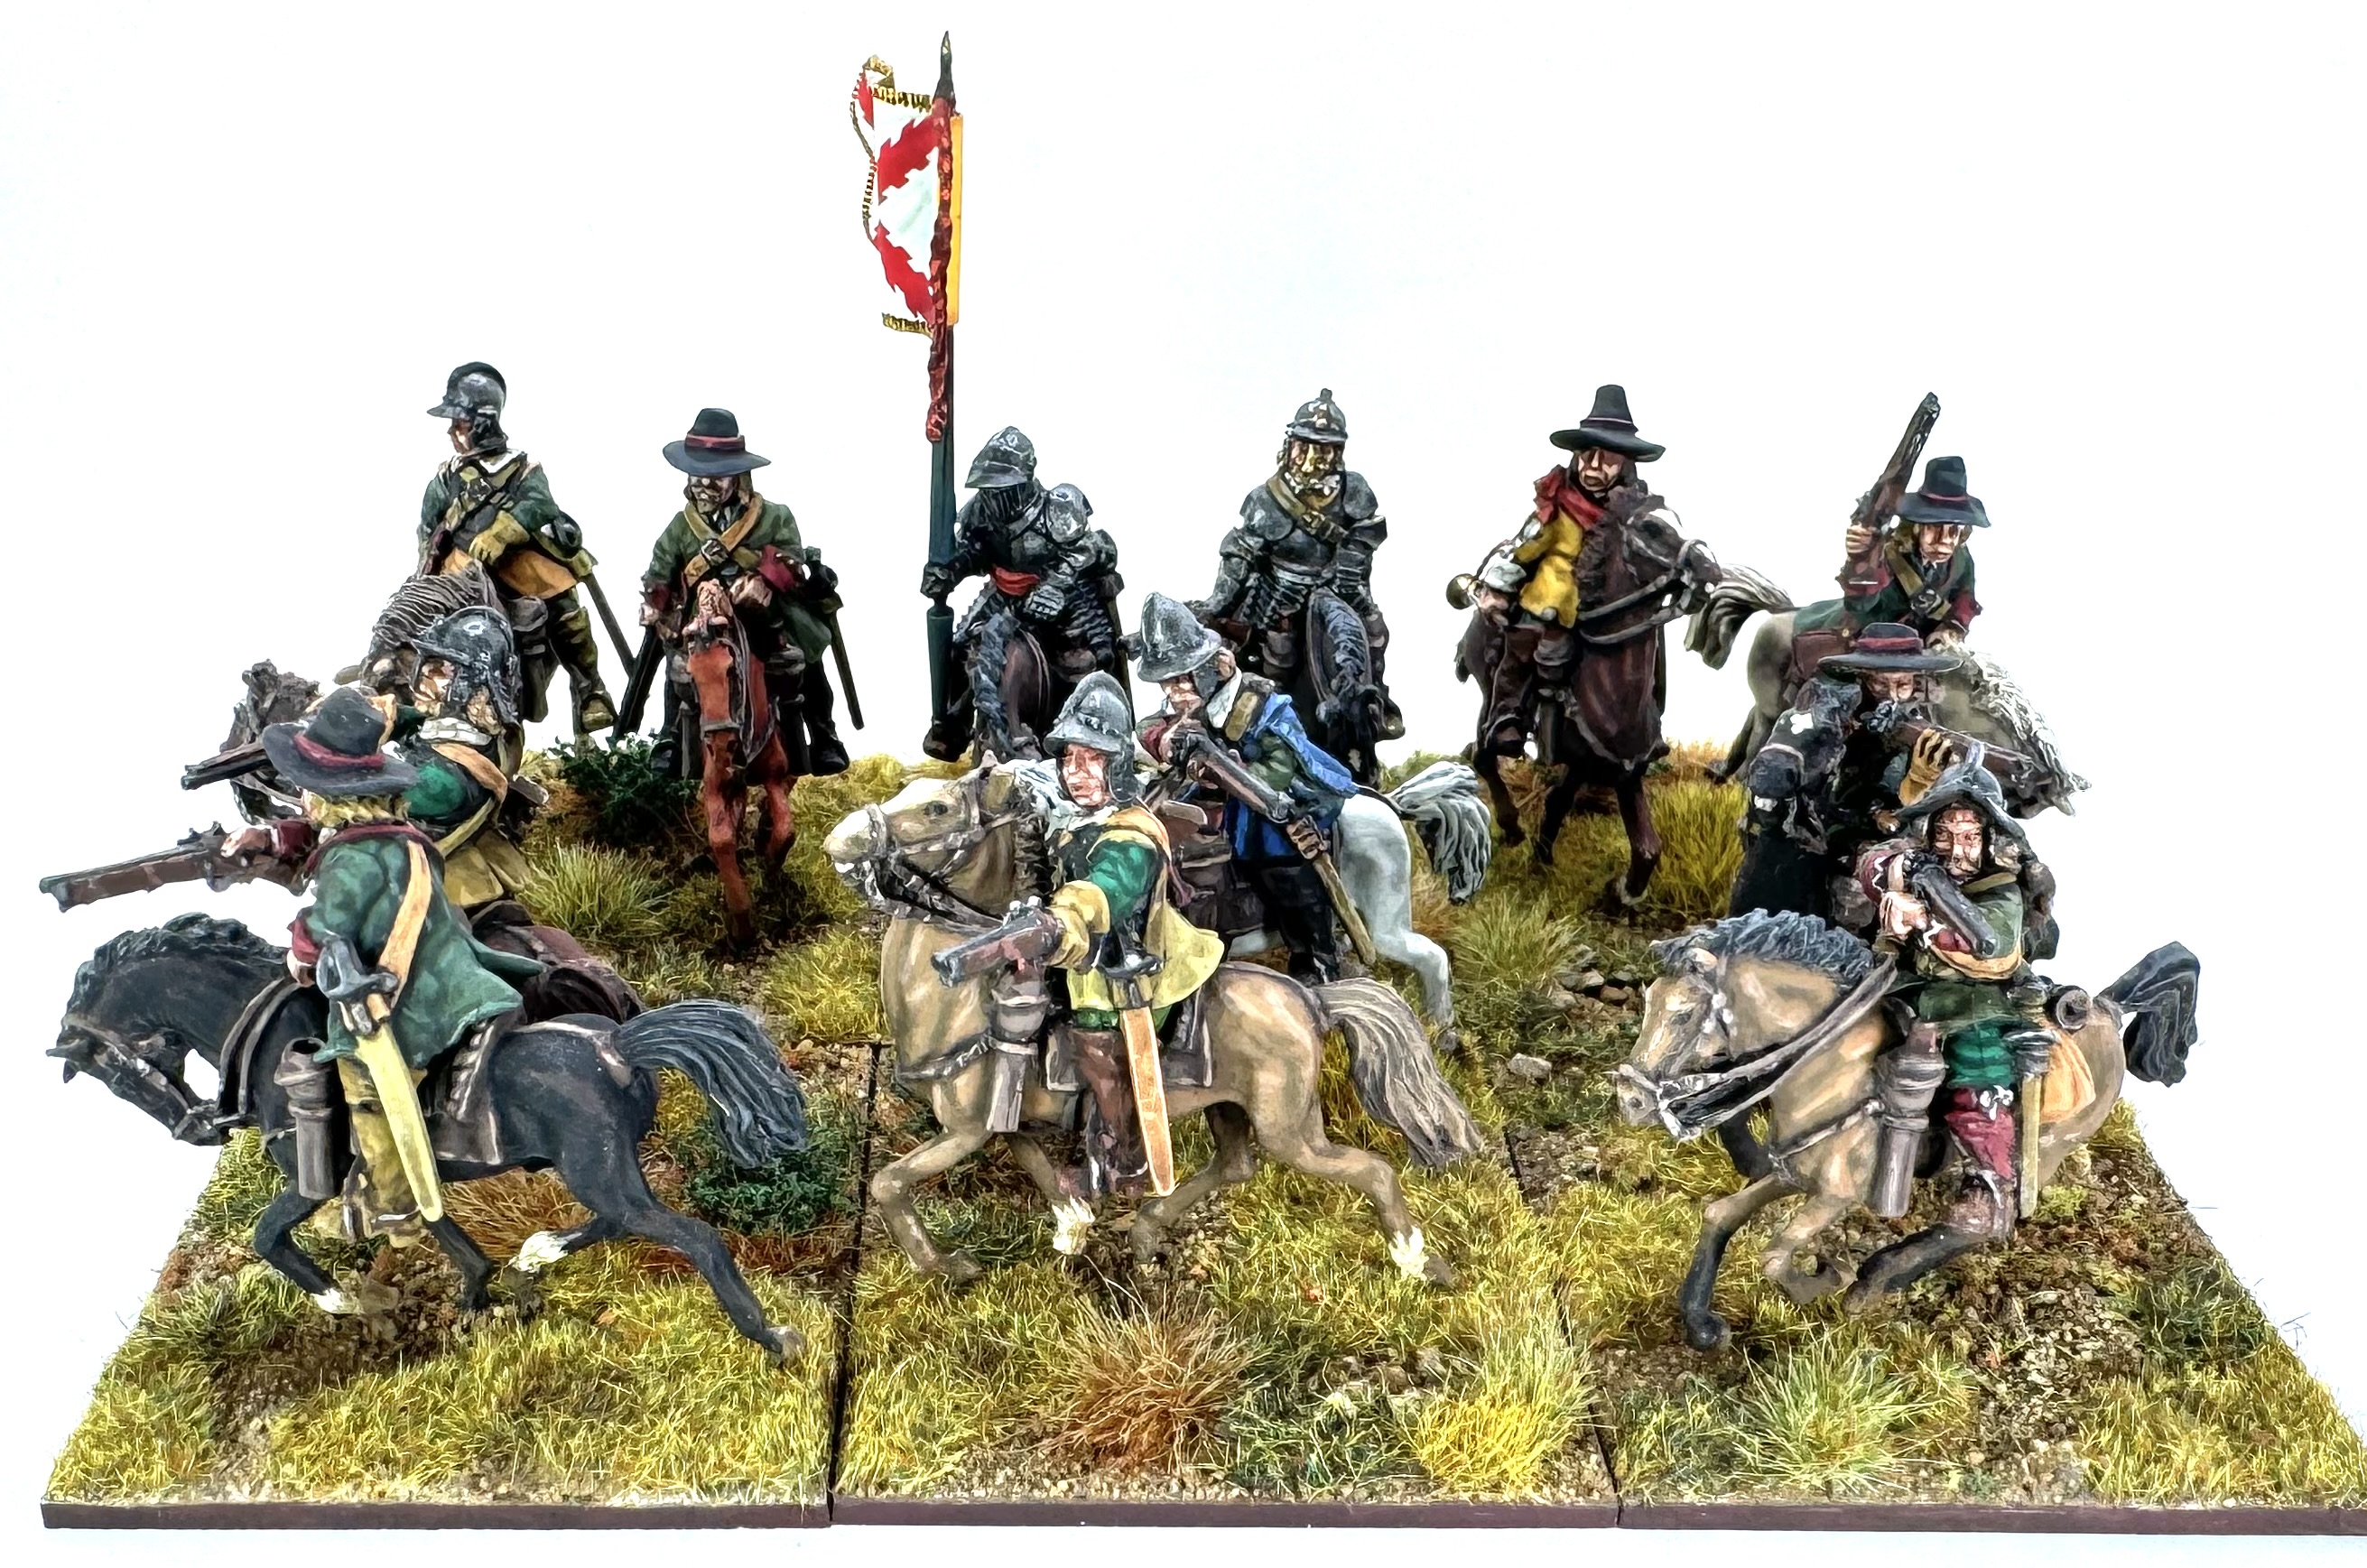
28mm Harquebusiers, mainly from from Bloody Miniatures, with a couple of Warlord and TAG, perform a ride-by shooting manoeuvre. 

This unit started around an idea I had to try and use figures in a pose that I have always found challenging to use; the "shoot the guy next to me" pose.

28mm Harquebusier from Warlord Games in the dreaded 'shoot the guy next to me' pose.

The Pose

Figures in this pose exist in many periods, and from many manufacturers.  I have never been clear how sculptors have expected gamers to use these figures.  In the 'olden days' of figure ranges having maybe only one or two figures for a troop type, then this pose could be hideously limiting.  Imagine a whole unit, ranked up, of figures in the pose above; not a good look!  Even nowadays, with broader ranges of figures, the one or two figures in a pack that are shooting to the side have been left at the bottom of my 'pile of potential'. 

In a recent trawl through my collection of riders I came across the rather sad collection, right at the bottom of a box, of all these 'shoot the guy next to me' rejects.  I was considering that these would be a great entry to Wargamers' Room 101 (see Yarkshire Gamer's podacst for more details on Wargamers' Room 101) when a thought struck me; "What if I made up a unit of just these figures and used the pose as a feature?".  If I based the figures so it looked like they were riding by the enemy, while shooting at them, it might just work.  

Shooting From Horseback

So, how did horsemen shoot from horseback in the 17th century?  You don't have to look through too many contemporary battle pictures to see mounted horsemen shooting every which way. I had a look through the 'Militarie Instructions for the Cavall'rie' by John Cruso, first published in 1632, and thought to be the manual used most readily by inexperienced officers in the British Civil Wars who were trying to read-in to their new roles as war broke out.  Despite Cruso providing almost excessive details on how to load pistols while mounted, he provides little details on how to fire them.  

Picture from John Cruso's Militarie Instructions for the Cavall'rie

His only digram showing how to 'give fire' shows the classic posture for firing a pistol forward.  Cruso later mentions that horsemen should be able to fire to the left or right.  He also mentions that some other manuals recommend being able to fire to the rear, but rather dismisses the idea as not being terribly useful (perhaps thinking it is better to focus solely on getting away from trouble!). Perhaps there is something behind figure manufacturers continuing to turn out figures in poses shooting to the side after all.

Illustration by Graham Turner in Osprey Warrior series 'Ironsides - English Cavalry 1588-1688' by John Tincey.

Graham Turner's fabulous picture of a horseman giving fire to his left, whilst resting his carbine on top of his bridle arm (the arm with which he holds the horse's reins), shows a classic pose described in Robert Ward's 1639 book 'Animadversions of Warre'. Ward advise that Harquebusiers should strive to have their enemies on their left so they can use this posture to give fire with their carbines. 

The Caracole

If an individual horsemen could be expected to give fire to any quarter then how did this work for formed bodies of horsemen. Just about every book about warfare in this period tells us that cavalry were trained to fire rank by rank in something called a Caracole. The first rank would fire their carbines or pistols forward at the enemy, and then retire to the rear of their formation to reload, while the next rank came forward and repeated the process.  Once this constant fire had broken the enemy's resolve then the horsemen would draw their swords and charge home to complete their victory. However it is not clear if the rank by rank fire by horseman is what the term Caracole refers to.  

More pictures from Cruso. This is the start of the 'Carracoll'
where the defenders have split to allow the chargers to pass between their two bodies.

Second of the Cruso 'Carrocall' pictures in which the chargers have been thrown into confusion and are now trapped, at the mercy of the two bodies of horse. 

Back to Cruso who describes the "Carrocall" as a completely different manoeuvre in which charging enemy cavalry are defeated by the defenders splitting in two, to the left and right of the chargers' direction of travel. As the hapless chargers career through the gap, they are fired on from both flanks, and then charged in the flanks/rear.  This all sounds terribly tricky to execute, but doesn't sound anything like rank by rank firing. 

Cruso and Ward both mention firing by rank, then wheeling to the left or right to retire to the rear, but do not refer to it as a Caracole.  It is interesting that Cruso advises against this rank by rank fire if you are likely to be charged as he says you will be thrown in to confusion through the rearward motion of some of your own troops. The left wing of the Parliament cavalry at Edgehill obviously did not take this advice! 

Caracole is meant to derive from the Spanish word for 'snail' that is caracol.  I don't see a connection between rank by rank fire and snails (especially as this same rank by rank fire on foot is not described as a Caracole). 

The Battle of Fleurus 1622 by Peter Snayers - Rijksmuseum

Peter Snayers' famous painting, now thought to be of the Battle of Fleurus in 1622, in the middle distance shows a large Protestant cavalry formations, riding across the front of enemy Spanish infantry, exchanging fire, in what looks very like the curl of a snail's shell.  Is this a Caracole?  Snayers' painting also shows in the left foreground a shell-like 'circle' of Spanish horse pouring fire into another formation of Protestant horse that are falling in to disorder while Spanish infantry and artillery also add to their discomfort.  

The exact meaning of cavalry performing a Caracole remains unclear to me. What does seem clear is that 'ride-by shooting' (to mix in modern terminology!) was seen as a typical cavalry function, and this could take multiple forms on the battlefield. 

Forming The Unit

With all of this information and uncertainty swirling around my mind (rather like a cloud of confused horsemen in a Peter Snayers' painting!) I started to hatch a plan for using the previously rejected figures in a unit.

Trial set-up of the figures - front rank in ride-by shooting pose (Caracole?), second rank ready to support.

I put together some of 'shoot to the left' figures, together with their horses, and started to experiment with some potential formations that I could use to show the unit in the act of firing on the enemy while riding across their front.  I finally landed on a single rank in the ride-by shooting pose, backed up by a rank in normal poses, which to me looked like they were ready to start their own shooting once the front rank had retired to the rear.  I had been prepared to adopt a wider than normal unit frontage but as it turned out my standard 25mm per horseman frontage seemed to work ok if I accepted a rather haphazard and perhaps unsafe looking formation.  (Anyone who feels this looks far too chaotic should take a close look at the Snayers painting - there is a fabulously detailed version available of Wikipedia link.)

A whole lot of shooting going on!

This approach to forming a unit had the added benefit in that it allowed me to use many of the Bloody Miniatures recent mounted release in a unit, with a sprinkling of Warlord (and I think TAG) figures from the reject box. Some small conversions were required, such as to get a suitable Cornet and Trumpeter figure, as well as making the Warlord/TAG figures fit neatly on the Bloody horses. As with all of the Bloody Miniatures I have had so far, these were a joy to paint. 

Front rank blazing away while the second rank advance,  ready to add their own firepower, or perhaps charge home if the enemy seem to be wavering.

The resulting unit works for me, although I'm sure it will confuse people as to which way the bases are meant to face when being moved about on the table. It was exciting to read in a recent Bloody Miniatures newsletter that there are more mounted figures coming soon.  I am now almost hoping for more 'shoot the guy next to me' figures to be included in the release!

Flag from Flags of War Thirty Years War range.

The Captain and Cornet have invested in 3/4 armour.

Warlord riders on Bloody Miniatures horses. One in the Robert Ward pose, and one not.  

Bloody Miniatures, with the addition of the ever useful trumpet-hand from the Warlord plastic Pike & Shotte cavalry sprue

A Bloody Miniature and TAG riders on Bloody Miniature horses.

Bloody Miniatures doing some shooting.
The rear shot. 

I hope that my journey through old military manuals and paintings will help inspire anyone else out there with a sad collection of neglected figures who are in tricky poses.  Try some alternative basing to get those figures where they belong - on to the table.  They will almost certainly be quickly ridden down by hard charging Royalists, Swedes, Poles etc. but at least they will look a bit different. Better than being stuck in a formation with clowns to left, and jokers to the right, both shooting at you! 

Maybe the new unit will not have to use its casualty marker first time out, but I doubt it very much.
Casualty figure from Bicorne Miniatures, and counter base from Warbases. 


Until next time.

Andy @ The Friends of General Haig.

Friday, 16 February 2024

“Mighty fair description of men without horses …”

(A quote from MacIntosh, played by Burt Lancaster, in ‘Ulzana’s Raid’. The quote has no relevance other than describing mounted warriors being on foot!)

28mm figures from Bloody Miniatures

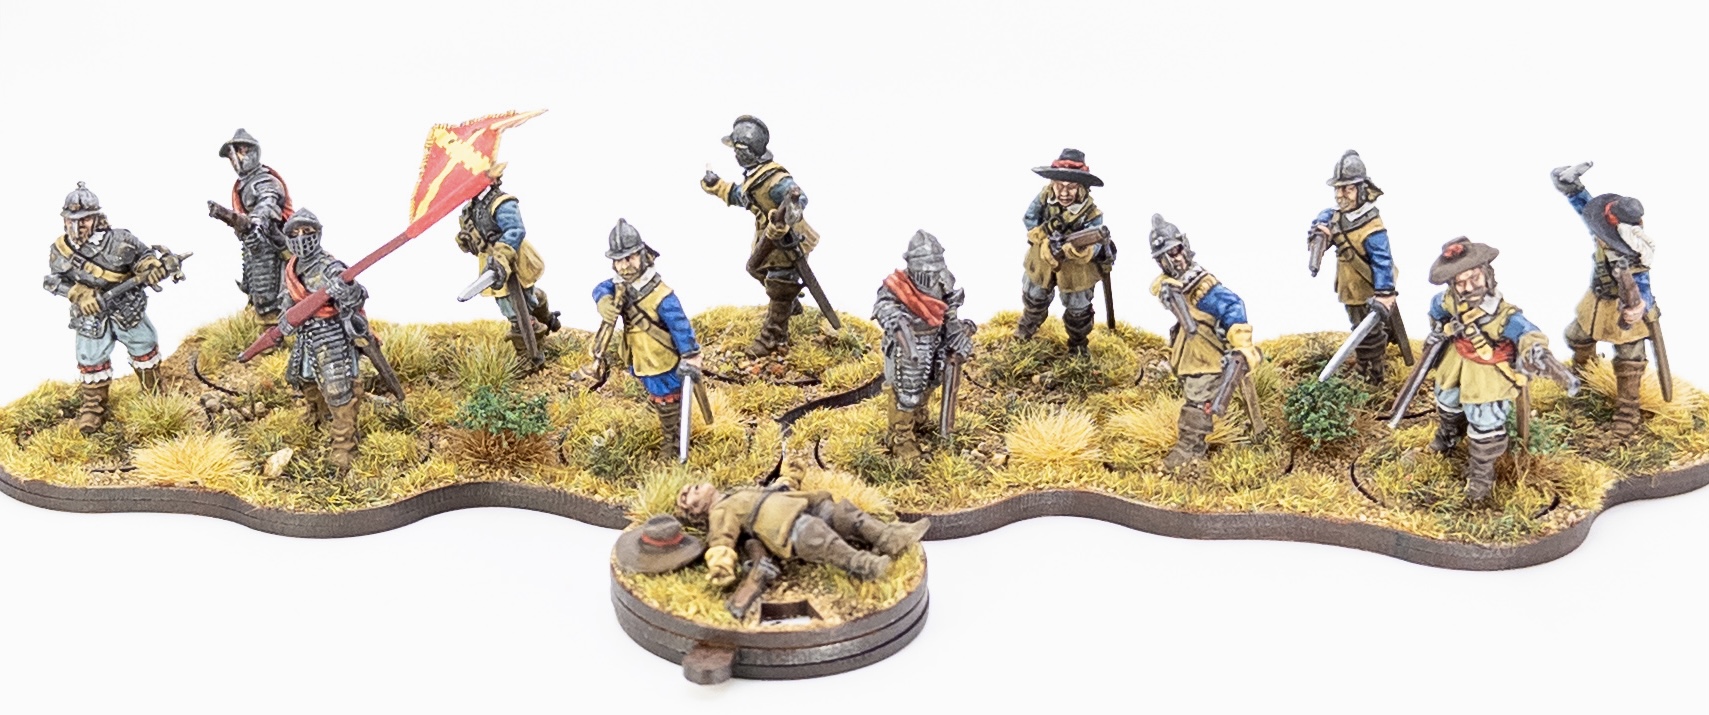
This post looks at the latest unit coming from my painting table; a unit of dismounted Polish Rajtar (Reiter) for the Khotyn 1621 campaign.

Inspiration 

The inspiration for this unit was two-fold. Firstly I was looking for a reason to paint another batch of the stunning Bloody Miniatures that have been accumulating in the pile-of-opportunity.  They really are a joy to paint.  Secondly I was inspired by reading about the actions at Khotyn in September 1621.  As the month went on the assaults and sallys that took place became more and more desperate.  Much of the fighting involved the storming and counter-storming of the Polish defensive earthworks. Every available soldier was required in these actions and this led to both sides dismounting their horsemen to add to the fighting strength.

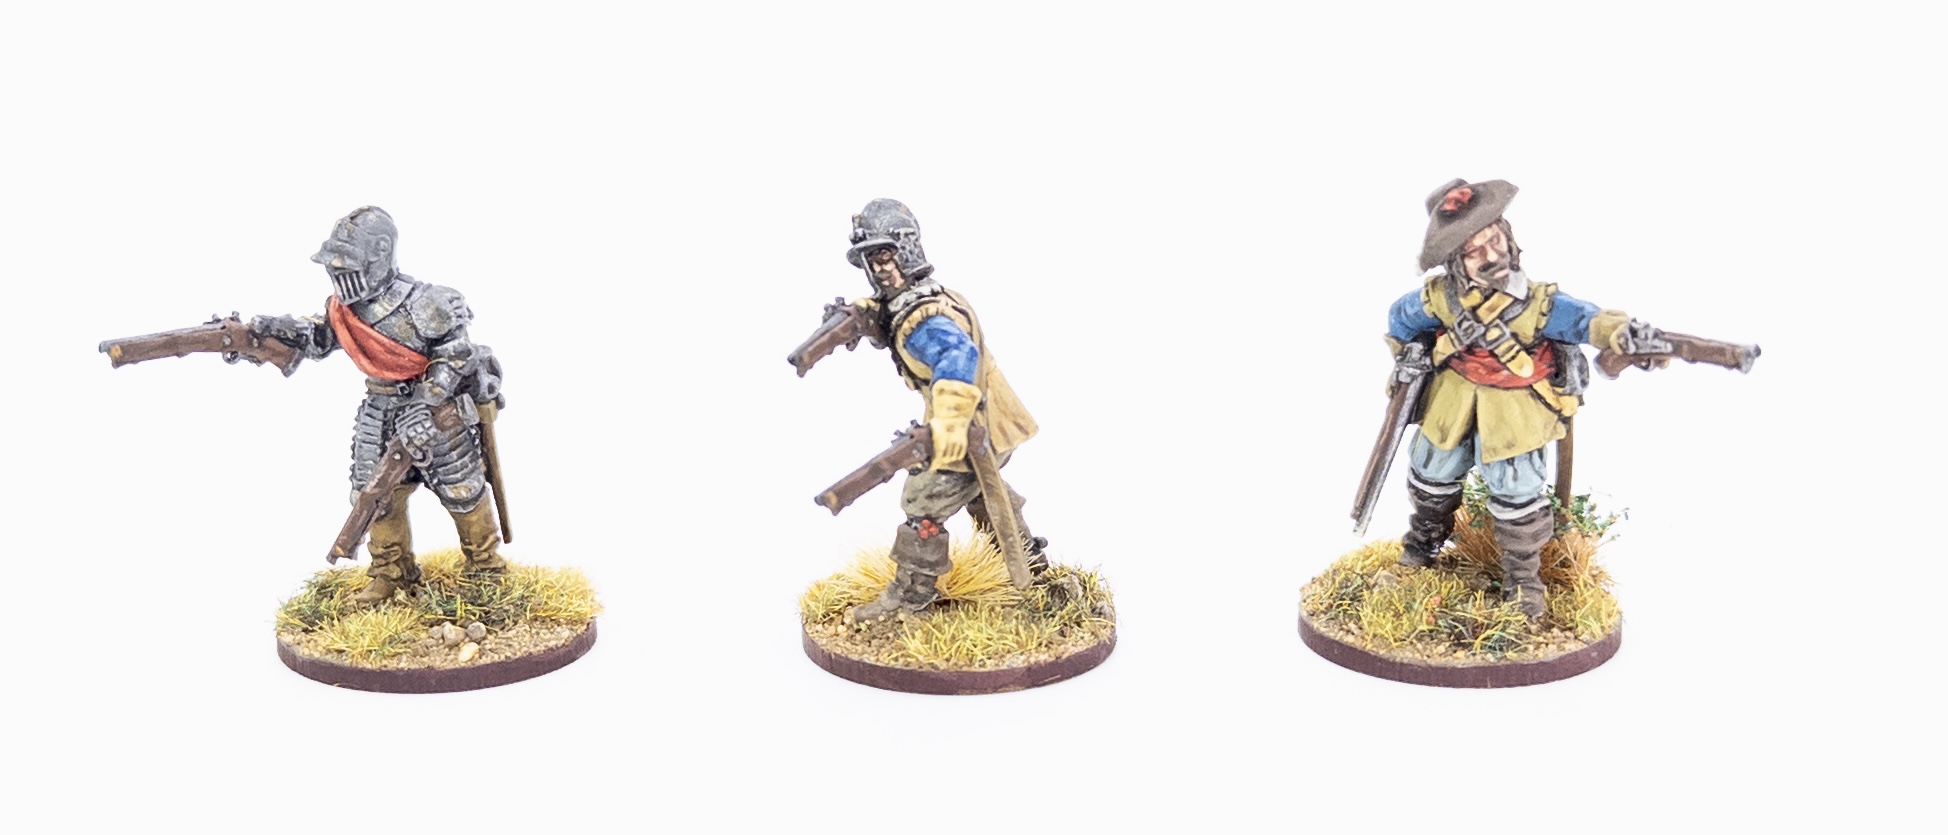
The command party with officer, cornet and trumpeter.


Horsemen, but on foot

The dismounting of cavalry to storm, or defend, fortifications in this period  was fairly common. Their armour, firearms, and more elite status no doubt added to their effectiveness in the role. I have used a mixture of Bloody Miniature figures to form this unit, including figures in three-quarters (or cuirassier) armour, back and breast plates with buff coats, or just buff coats.  To add to the dismounted horseman feel I also chose figures in the long bucket-top boots, a definite period indicator of a rider. (If dismounted troops had the choice then this form of footwear would not have the been the best choice for clambering over earthworks, or to aid agility, but let’s say they had not brought spare shoes with them!) 

Some handy options for fighting in fortifications: armour, extra powder and grenades!


Building the unit

The Rajtar units in the Polish-Lithuanian Commonwealth armies were typically recruited from Germany.  They probably wore a mixture of armour, based on what they could afford and personal choice.  I also avoided three barred ‘English Pot’ helmets to keep the continental feel.  The only light conversions needed were to make a trumpeter and a cornet to carry the troop’s colour. These were fairly straightforward.  The trumpet came from a Warlord plastic cavalry sprue. (I’m not sure that dismounted troopers would have bothered with a trumpet and their cornet/colour in this more brutal and disorganised fighting ‘in the breech’. However, it was fun to show these types dismounted as well.)

Making the most of cavalry short range firepower


Painting

I painted the troopers in fairly neutral colours, with a vague blue theme based on nothing more than personal choice.  I have shown the buff coat wearers in sleeveless buff-coats, for this earlier 17th century period, by painting coloured coat sleeves.  Scarves (sashes) and other clothing accents were painted red / scarlet to help tie in with an Imperial theme, in case I want to use the unit in my Wallenstein Imperial army for Thirty Years War battles. Red is also nice colour accent against the dark, greyish armour and blue, grey clothing. The cornet/colour is from the Flags of War Imperial Thirty Years War range, with some battle damage added.

With carbine, swords and pistols.


Basing

The figures are based individually on 2 pence piece size bases and I have made up some sabot bases as well (all from Warbases).  This gives a suitably pell-mell feel to a unit that will be required to carry out some desperate actions in difficult circumstances, as well as in difficult terrain. I included a casualty marker on a Warbases 40mm counter base. The casualty is from the Bicorne ECW range. His discarded pistol is from the Bloody Minis spare equipment packs, and his lost hat is from the ‘spare bits’ box. 

Casualty from Bicorne Miniatures, on a Warbases counter base.

Khotyn 1621 Project Update

In other Khotyn 1621 project news, I have been researching the Ottoman army and buying a few figures to investigate options and possibilities. Thank you to everybody who has made recommendations.  So far I have selections of figures from Warlord Games, Warfare Miniatures, The Assault Group (TAG), Perry Miniatures, and Fireforge Games, as well as some 3D prints from various designers all printed by the super-helpful Paul at Sabotag3D Wargames Accessories.

The whole outfit - in their sabot bases (also from Warbases).

Book Competition Winner

Regular readers will remember that in the previous post (here) I offered a copy of Michal Paradowski’s Khotyn 1621 book from Helion as a prize to a commenter on the post (on any of the social media channels in which it appeared).  The commenters were added to a spreadsheet and a winner was chosen at random.  Many congratulations to Danny Buck who commented on Twitter.  You can see Danny enjoying his book below, and you can follow him on Twitter / X here: @DannyBuckUEA  

Many thanks to Michal for providing the book as a prize, and also many thanks to all of the commenters who took part across X, Facebook, TMP, LAF and here on Blogger.

Dr. Danny Buck with his prize! 

The next unit on the painting table should be Ottoman, and I look forward to discussing my initial choices in figures and paint schemes in the next post.


Until next time,
Andy @ The Friends of General Haig. 


Tuesday, 18 July 2023

Rodeleros or Shield-Bearers

This post covers a new unit of pikemen for my Thirty Years War forces and includes a brief discussion of shield-bearers also known as Rodeleros, or sometimes as sword and buckler men.

28mm Imperial pikemen by 1898 Miniatures and Avanpost Miniatures.

I've been on a bit of painting hiatus since the preparations for Salute back in April. Most of my recent hobby time has been spent in research for potential new projects, but I have tried to keep some painting going as well. My Imperial forces are missing a few pikemen and so I have painted up a few bases using pikemen from the 1898 Miniatures and Avanpost Miniatures Thirty Years War ranges. 

Also in my pile-of-potential were some Avanpost 'sword and buckler' men that I have been looking for an excuse to use.

Background


The Spanish "Rodeleros", translating to "shield-bearers", seem to have started as a component of the Spanish infantry Tercios in the late 15th / early16th century.  The term "sword and buckler men" also seems a popular way to describe them. A small proportion of the Tercio would be armed with swords and small metal shields to try and break deadlocks when pike formations met.  They seem to have fallen out of fashion, perhaps due to their vulnerability to mounted opponents, and to have been replaced by halberdiers.  

A stylised picture of early 16th century infantry combat with rodeleros fighting through a pike formation in the centre.

By the Thirty Years War I'm not sure of evidence for separate formations of infantry with sword and shield. There seems to have been some discussion in the period of their use in support of pikemen, and of having the equipment to hand in the baggage to use when troops were called on to storm breeches etc.  It was also suggested that larger metal shields would be able to protect pikemen from the shooting of musketeers, but I'm not sure of any evidence that this was tried. 

Detail from The Battle of Kirchholm (1605) by Snayers - officers with shields at the front perhaps?

The wonderful Kadrinazi blog by Michal Paradwoski (here) points out some figures in the Battle of Kircholm by Snayers that are carrying shields.  The unit represented is part of the Swedish army and Michal wonders if Snayers may have been using his knowledge of Imperial infantry for inspiration here. 
 

Shield Bearers


Sword and shield armed soldiers also appear in 17th century contemporary art in association with the colour parties of infantry formations.  I assume that their role was to defend the colours.  This was probably partly ceremonial as well as functional.  

Shield bearers lead the formation of the Cracow Militia on the Stockholm Roll

Two shield bearers are typically shown with their swords drawn so that they are always ready for any danger that threatens their formation's colours.  

The Night Watch by Rembrandt.  Can you spot the two Shield-Bearers?

Detail from The Night Watch of one shield bearer.

Detail from The Night Watch of the other shield bearer.

Even one of my favourite 17th century pictures includes these shield bearers!  Perhaps not at first obvious but the two shield-bearers are in the picture, carrying their shields, and with their swords drawn as expected with the company's colour on show and therefore in need of protection.

Forming The Unit


At least two 28mm Thirty Years War ranges include shield-bearers or 'sword and buckler' men: Warlord and Avanpost.  When Avanpost released their figures I had ordered some due to the very nice sculpts.  As I was selecting figures for the pike unit I was reminded of these figures and so decided to add them in as 'interest'.  It is also worth noting that Avanpost and 1898 scuplkts fit together very nicely.

Pike with command group - command group 28mm Avanpost.

When the pike unit has a command stand placed in the front it looks like the shield-bearers are there ready to defend the ensigns carrying the colours. 

Pike unit with included shield-bearers.

Without the command stand the shield bearers provide some added colour.  

Close up of the shield bearer.

The other shield bearer in a nice burgonet with shoulder armour in addition to the back and breast plates.

I like the 1898 Miniatures pikemen sculpts in the rest of the unit as they are in a really nice variety of slightly relaxed poses; here looking like they are 'catching their breath', adjusting their equipment, as they prepare for the next assault.   


I would be very interested to hear what other people think about Rodeleros, or shield-bearers, in the Thirty Years War period. 

Until next time!

Andy @ The Friends of General Haig.

Wednesday, 12 June 2019

We march for plunder!

"God save us from famine, plague and the Croats!"
German prayer during the Thirty Years War

This blog post describes the latest unit for my Thirty Years War collection, based on the armies at Lutzen, 1632; the Croats.

Surely the most colourful troops that fought during the Thirty Years War were the Imperial Croat cavalry.  These light horse men were recruited from the Imperial lands that bordered on the Ottoman Turkish empire. Originally made up of Croatians, as time went on their ranks were filled from many ethnic groups from the South East of the Empire, such as Hungarians, Wallachians, and even Cossacks.  All experienced in the frequent minor border clashes with the Turks.  What ever their origin, they became collectively know as the Croat horsemen, and became feared wherever the Imperial armies campaigned.

A Croat horseman
On the battlefield they were perhaps no match for heavier horse in a straight fight, but in scouting, plundering, and the general 'beating up of quarters' there were none better.  They had a fearsome reputation for plundering and were feared by the civilian population on both sides.  The Croats became the 'bogey men' of which parents warned their children, and contemporary pamphleteers horrified their readers


The Croats were classic light cavalry.  Unarmoured, and riding hardy but nimble ponies, they would skirmish with their carbines and pistols, before closing with their sabres when they had found an advantage, or sufficiently weakened an enemy.  They were famed for their canny ability to lay or avoid ambushes, after many years learning from the wily Turks and their Tartar allies.   Even rivers were no obstacle, as they were able to cross bodies of water thanks to their strong swimming mounts.


I have been looking forward to collecting and painting the Croats since I started this period.  They are something quite exotic compared to the more regular pistol armed horsemen of Central and Northern Europe.  Warlord Games make Croats for the Thirty Years War (here), and The Assault Group (TAG)  also have Croats (here) as well as covering Poles, Cossacks and Tartars that can be used for Croats.  Wargames Foundry have a set of Cossacks (here) in their Severn Years War range, including mounted Cossacks that I think also can work as Croats. They are riding really characterful ponies, and have a great range of poses.


This unit is made up of the Wargames Foundry figures, with the addition of a TAG Croat trumpeter.  They carry a banner of a shape peculiar to the Croats, made by Flags of War (here).  The figures reflect the typical clothing and equipment of the Croats; brighter shades of red, blue and green, the long eastern style of coat, sometimes worn as a cloak, often braided, knee boots, fur trimmed hats, curved sabres, pistols and carbines.  I think they look like a fearsome bunch, and my Swedish baggage train had better look out!

All of these figures were a real joy to paint.  This range from Foundry have real character, with each pack and figure named.  It was easy to imagine a story building around the unit and its piratical members as I painted the figures.  I can't wait to get them on to the battlefield so that they can start bringing some of those stories to life.

Until next time!

Andy @ FOGH.

Thursday, 4 April 2019

Order, order!

An Imperial unit of Cuirassiers thunder in to action.
Once we had decided on the battle we were going to recreate, one of the the first things we had to do was to sort out the order of battle so we knew what figures and units we needed.  We used the Osprey Campaign book on Lutzen , as well as Dr. Schürger’s thesis, as the main sources of information (see the Blog link sections for more details).

There are many ways to turn the actual order of battle (OOB) in to wargames forces, so this is just this our approach for this battle.  First of all each army was broken down in to broad divisions, left wing, centre and right wing.  Then the number of actual men and the number of units was worked out, separating infantry from cavalry.  This gave us a breakdown of the actual numbers involved in the battle.

Next we analysed the infantry in more detail. Both sides infantry were organised into a number of main battalia or brigades. This was done to amalgamate or split regiments of varying sizes into more standardised sized units for this major battle. For the Swedish force this organisation was into eight infantry brigades, and for the Imperials this was intoseven major bodies or battalia.  For both forces these were roughly a 1000-1200 men each.

We already had an idea on what unit sizes in terms of figures we wanted to aim for based on existing collections.  Our regular pike and shot units are about 40 figures. A ratio of wargames figures to actual men of 1:30 would therefore give us a starting point to work with.  So this would mean that we’d have something like 8 x 40 figure blocks for the Swedes and 7 x 40 figure blocks for the Imperial forces as the main infantry forces in the centre.

The cavalry was a bit trickier. For the actual battle these were formed from regiments and troops in to battlefield squadrons of around 200 men. Using our infantry ratio of 1:30 this would give 6 figure squadrons. This would be a bit fiddly. We therefore decided, based purely on aesthetics, to adjust to our normal 12 figure cavalry units by halving the number of squadrons.  Using the actual orders of battle we calculated the number of wargame cavalry units required.

With this initial rough plan of figures required we sat down to consider our plan.  Two issues. We needed to prepare an awful lot of figures in a smallish time frame, and the forces would need a giant table. We decided to ‘cut our coat to fit our cloth’.  We took the number of wargames units we had worked out and applied a scaling factor of 75%, e.g. 8 Swedish brigades become 6.  A quick bit of recalculation and we decided we had an achievable lead mountain to climb, and could squeeze the game on to 10’ by 6’ table.

These were the resulting wargame orders of battle.  These are set out for Warlord Games’ Pike and Shotte, but easily converted in to other games systems.

If this sounds complicated then these two PDFs will show ourworking, so to speak.

Swedish OOB PDF

Imperial OOB PDF

Here is a simpler breakdown of the two armies.

Imperial Army

Imperial Right Wing


  • Commander - Generalissimo Albrecht Wallenstein (also Commander in Chief)
  • 1 Croat Light  Cavalry
  • 1 Cuirassier
  • 3 Arquebusier (1 is Large)
  • 1 Commanded Shot (defending the town)

Imperial Centre


  • Commander - Generalwachtmeister Rudolf Colloredo
  • 4 Pike and Shot battalia (1 is Large)
  • 1 Cuirassier
  • 2 Arquebusier
  • 3 Heavy and 2 Medium guns split in to 2 batteries
  • 1 Light Gun

     Reserve


  • 1 Pike and Shot battalia
  • 2 Commanded Shot

Imperial Left Wing


  • Commander - Feldmarschall-Leutnant Heinrich Holk 
  • 2 Croat Light Cavalry 
  • 1 Cuirassier 
  • 2 Arquebusier 
  • (1 Pike and Shot battalia - this is a ‘dummy’ unit made up of camp followers)

Imperial Reinforcements (marching to the sound of the guns)


  • Commander - Feldmarschall Gottfried Pappenheim 
  • 1 Croat Light Cavalry
  • 1 Cuirassier 
  • 2 Arquebusier 

Swedish Army with Protestant German Allies

Swedish Right Wing


  • Commander - Gustav II Adolf (also commander in chief)
  • 2 ‘Swedish’ Harquebusier
  • 1 Finnish Harquebusier
  • 2 Commanded Shot with Light Guns

    Reserve 


  • 2 German Harquebusier 
  • 1 Finnish Harquebusier

Swedish Centre


  • Commander -  Generalmajor Dodo  Knyphausen
  • 3 ‘Swedish’ Pike and Shot Brigades
  • 2 Heavy Guns in a single battery

    Reserve


  • 3 German Pike and Shot Brigades
  • 1 ‘Swedish’ Harquebusier

Swedish Left Wing


  • Commander - General-leutnant Bernhard von Weimar
  • 3 German Harquebusier
  • 2 Commanded Shot with Light Guns

    Reserve 


  • 3 German Harquebusier 

Notes on the OOB.

The command structures of both armies have been simplified.  In the actual battle the Swedish army was split into three commands: left, centre and right.   Each of these was also divided in to a forward command and a reserve.  How the higher command functioned in the actual battle is not clear.   We simply broke the Swedish army in to three commands: left, centre and right.

In the actual battle the Imperial Army was also split into three commands: left, centre and right.  Pappenheim was probably expected to take command of the left wing when he arrived.  The Command structure within the centre is not clear.  We broke the Imperial army in to four commands: left, centre, right and Pappenheim's reinforcements.

The cavalry unit classifications of Cuirassier, Harquebusier, Arquebusiers and Croat are used to differentiate the various types of cavalry in the battle.  These are broad categories and the actual units probably varied a great deal and probably wouldn’t have fitted in to such neat wargamer’s troop types, but this was a compromise we decide to make in terms of easy playability.

Cuirassiers are well armoured and mounted troops armed with sword and pistols.  These are the heaviest cavalry.

Arquebusiers are less well armoured and mounted armed with carbines, some pistols and swords.  They favour firepower over combat.

Harquebusiers fall in between Curaissiers and Arquebusiers.  They are less well armoured than cuirassiers, but more prepared to fight in hand to hand than Arquebusiers.   They represent Cuirassiers that have lessened their armour, and Arquebusiers who have increased their armour and altered their tactics to become more melee focused.

This split may be a bit of a Swedes v. Imperial stereo-type, but having this asymmetry between forces does provide an interesting game challenge.

Finnish Harquebusiers are lighter, and faster cavalry, but still melee focused.

Croats are skirmishing light horse who are an annoyance rather than a real threat to formed and order troops.

The ‘Swedish’ designated pike and shot units represent Gustav’s veteran infantry units (actually a mixture of Swedes and Germans) and have suitably improved factors.

There are restrictions on the use of the reserve forces in both armies.

Unless specified units are regular sized units in Pike and Shotte.  The ‘battalia’ are units of mixed pike and shot (2 muskets to 1 pike is the assumed ratio).  In the Imperial army these comprise a single pike block and two units of shot.

In the Swedish army the brigades are made up to represent the Swedish ‘three squadron’ formation.  They each have a forward squadron of a pike block and a forward shot unit.  There are two flank squadrons left and right.  These can each be made up of pike and shot units, or combined units.  It would have been easy to come up with a standard formation for the Swedish brigades, but the sources we had broke each brigade in to regiments and provided a precise breakdown of pikemen and musketeers.  This was too tempting!  It was possible to therefore form the Swedish brigades in to their squadrons, and using separate pike and shot units, form the famous Swedish (infantry) squadrons.  This provided another nice asymmetry between the Swedish and Imperial forces.

In future posts I will share the Pike and Shotte factors we will be using for the various units, and also the Swedish brigade squadron breakdown we have constructed.

Until next time!