Saturday 31 October 2020

Turning the Tables

 In this blog post I explain how I have tried to ‘turn-the-tables’ on 2020 and bring wargaming home!

The very thing that I have been missing - classic 28mm action on the table top.

Needing to ‘social distance during the pandemic must have affected every wargamer’s hobbying by now.  For me it has curtailed regular club gaming.  Actually playing the games may only be a small proportion of my overall hobby time but it is a pretty critical part.  I think a lot of my motivation to paint etc. comes from the thought of getting the miniatures on to the tabletop and playing games.  I have been missing tabletop action more and more as the months have gone by.  

I started thinking about the possibility of setting up a wargames table at home. My ideal would be a 8’ x 6’ surface.  I worked out that I could fit something of this size in our garage, previously used for rather disorganised storage.  Following agreement with the family, the garage was duly tidied up (including many trips to the council recycling centre!) and two workbench style tables purchased.  The tables I found are from Arbor Garden Solutions that I discovered while googling for tables.  

The delivered, flat pack, components.

Their extendable workbench (https://arborgardensolutions.co.uk/wooden-mdf-top-extendable.html) looked like it would provide the right combination of sturdiness, space, and adaptability.  I had no experience of this company, but the online reviews I could find looked promising, and so I jumped in and ordered two 8’ x 2’ work benches (with 1’ extending wings, and wheels).  They arrived in about a week (despite their website’s warning of potential Covid related delays) in their flat pack form.

All screws provided, but you’ll need something to screw them in with!

Arbor have some super useful videos showing how their products are put together. With these, and my very basic DIY skills, I was able to build the two workbenches in an hour or so.  (These are sturdy items and so I did need a hand to turn the finished tables the right way up!). With the extendable sections collapsed, there is still plenty of room to move around the tables.  The storage underneath the worktop surface was very helpful, and the wheels make the tables easy to move about if need be (as well as making the tables a bit taller, and therefor easier on the old back!).  
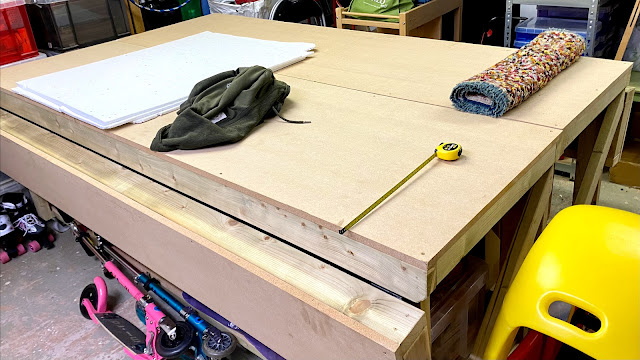
Table surrounded with the inevitable family ‘stuff’ that needed to be allowed for.

With the extendable sections up, and the two workbenches together, there is a very useful 2400mm x 2000mm flat surface. (Note that although advertised using Imperial ‘feet’, the workbenches are, I suppose, made from metric materials and therefore end up a bit bigger.)  The family all approve, and they are now all thinking of lots of other hobby related activities that they can also use this large table space for. All good, as it helps realise the final ‘business case’!

The extended surface.
Wings down, still a useful 8’ x 4’ 6” surface.

Half-term holiday at home provided the ideal opportunity to try out some games on the new ‘table’.  I have had my 28mm TYW Swedish and Imperial armies out, and played a couple of very enjoyable games, both solo and with the family. Being able to leave a game out and return to it at a later time is a great advantage.  I am also looking forward to being able to try out some other pike and shot rules systems, on my own, using full size armies.  This sort of activity is never a good use of time at the club, but will suit a home games table very well.  I may even be able to photograph a couple of battle reports for the blog.

Terrain and figures getting some use at home!

So, while I still look forward to returning to the fun of club gaming, I now have another outlet for tabletop gaming.


Until next time!

Andy @ FoGH.

Saturday 10 October 2020

The Guardsmen of the Amsterdam Kloveniersgilde (Nightwatch) - Part 4

In this blog post I give an update on my Nightwatch project.  (Part 1 is here link, Part 2 is here link, and Part 3 is here link.)  In this project I am paying homage to Rembrandt’s master piece, The Nightwatch, by converting and painting wargames figures to represent the characters portrayed in the painting.  The painting shows members of the militia company that protected Amsterdam District II, commanded by Captain Frans Banninck Cocq.


Basing


As well as getting the next batch of the militia ready for painting I have also come up with my planned basing approach for the figures.  I did consider building a single diorama model of the whole scene, but I still wanted to be able to use the miniatures for games - if I have to paint a figure then I want to play with it!  My preferred basing approach for single 28mm figures is the UK two pence piece (2p). These are a good size, are made of a material that attaches to magnetic sheets for easy storage, and is in fairly ready supply, judging by the “piggy banks” in my house, at least.  Normally I glue the figure to the 2p and then add sand and static grass to match my other multi based figures, representing troops out in the field.

An extract from the painting showing the paved ground.

For my Amsterdam militia I wanted bases that would match the painting.  In the painting the militia are show on a paved area, and this has a warm, ochre colour.  I tried a couple of ways of having a fairly flat basing area in to which I could then scribe the suggestion of paving slabs.  First was using green stuff.  This worked ok but was a lot slower than the second method which was just to use ordinary filler (spakle).  When the bases were dry / cured I then used a modelling saw and a craft blade to cut some lines on to each base the represent the joins in the paving slabs. You can see the two methods I tried in the picture below.

Craft blade and model saw are ideal tools to carve pavement slabs in to the filled bases.

Next step was to paint the textured bases.  I used Humbrol Dark Earth (Matt 29) as a base coat, with a wash of GW Agrax Earth Shade over that.  When the wash was dry I then dry brushed with the Dark Earth again, and then a further dry brush of Vallejo Ochre Brown.

Ordinary filler / spackle on the righthand two figures.

The photo above shows the finish on the two basing methods.  I prefer the finish of the ordinary filler / spackle own the right.  Its slightly rougher texture picks up the dry brushing better.  Successful basing test complete :) .

More Militia


I have also made some further conversions for the militiamen, with priming completed, and an initial dry brush, ready for painting. 

Elbert Willemsen

The next militiaman to be tackled is Elbert Willemsen. Elbert was from a long line of fishmongers and merchants, and continued the family tradition.  Despite his modest position in the picture Elbert must have  been successful in his chosen career as the city records suggest he amassed a small fortune by the time of his death in 1644.


No need for conversion this time as I have been able to use a Warlord figure from their Pike and Shotte range (in metal); in the Musketeer Marching pack. Elbert is shown with his musket shouldered and it looks like he’s holding his musket-rest as well, so this figures works out nicely.

Jan Pietersen Bronckhorst

Jan had worked his way up from humble beginnings, as a sheep-shearer, to being a wealthy merchant.  He appears to be another shield-bearer in the militia.  His role as shield-bearer was to guard the ensign, and he is shown with his sword drawn, carrying his shield.


The base for this conversion was an 1898 Miniatures armoured pikemen from their Thirty Years War range. He has had his right hand swapped for a hand from the spares box that is carrying a sword.  I have found shields from The Assault Group that are the right size and shape, and one of these will be added to the figure after painting. 

An Unknown Musketeer

The final figure this time in an unknown musketeer.  We can see his face, partly obscured, and he appears to have his musket shouldered. 


A marching musketeer from the Warlord plastic Pike and Shotte set seems to work well here.  I have modified the hat to match the figure in the picture, with a narrow-ish brim and a tall feather.

Next update on this project will hopefully have some more figures painted.

Until next time!

Andy @ FOGH

Saturday 3 October 2020

Croats and Cossacks

This blog post takes a look at my latest Thirty Years War Imperial units; Croat light horse.

My latest unit of Croats 

It is over a year since I finished my first unit of Croats (see here).  My latest units are a mixture of Warlord and The Assault Group (TAG) figures.  On this first unit the horses are all TAG and the rider are a mixture.  The flag is from Flags of War.

I now have three units of these light horse and so I've got enough Croat light horse for my Imperial force. These units will also see service as part of the new Polish army I am building for the war in Prussia during the 1620s.  The Polish 'Cossack' light cavalry had a very similar dress to the Imperial Croat light cavalry; not only were they all influenced by the Turkish and Hungarian models of dress favoured in Eastern Europe, but the term 'Croat' was used for all Imperial light horse whether their origin was Croatia, Hungary, Walachia, or Poland.  Indeed, some of the 'Croat' light horse at Lutzen were recorded as being Polish Cossacks.

The term Polish Cossack can be confusing in itself.  The Polish-Lithuanian Commonwealth referred to its own light cavalry as 'Cossacks', while 'Cossack' was also the term for the semi-independent people living in what is now the Ukraine and South Western Russia, who in this period typically fought on foot.  My Polish Cossacks will need a different cavalry standard, and also one or two men in mail armour and/or carrying a shield, just to add some Polish character to the units.


I've painted my Croat units with a mixture of colours representing their irregular nature and lack of uniform.  Based purely on wargamer’s fancy each unit has one predominate colour, that also matches the unit’s flag; in this case it is red.

The Croats are based on Warbases 2mm MDF 50mm by 60mm bases with a selection of static grasses on top of a mixture of sand, paint and PVA.


Here is the view of the Croats that a lot of my Swedish cavalry will be seeing - the sight of evading light horse, dashing out of harms way.


Here is a further unit of Croats that I finished a while ago.  These are themed in blue, and hopefully you can see the subtle shift in colours from the previous unit, while still presenting an irregular appearance. 


Another Flags of War cavalry cornet (cavalry unit flag) mounted on the ‘lance’ from the Warlord Pike and Shotte plastic cavalry box set.


These were fun units to paint.  I like painting cavalry, although doing the horses do slow me down. I like the poses of the riders with their variety of weapons and costumes.   They will be expected to do a fair amount of skirmishing and so I’ve made sure to have some of the figures with carbines. The spare carbines in the plastic Warlord Pike and Shotte cavalry box come in very handy here where the figure doesn’t come moulded with a carbine. 

I look forward to getting these new units on to the wargames table with my other Croats, and I’m sure my Swedish baggage is now extremely worried!  

My previous post on Croats for Lützen is here link.

Until next time!

Andy @ FoGH.