Sunday, 10 May 2020

The Guardsmen of the Amsterdam Kloveniersgilde (Nightwatch) - Part 2

In this blog post I give an update on my Nightwatch project.  (Part 1 is here link.)   In this project I am paying homage to Rembrandt’s master piece, The Nightwatch, by converting and painting wargames figures to represent the characters portrayed in the painting.

The original picture, just in case you have forgotten what it looks like!

Progress has been slow but I have finally got the first eight figures painted, and also got another batch modelled and undercoated.  Rather than my normal wargames unit, batch paint approach, I have been painting these one figure at a time.  This is quite fun (even therapeutic!) as there isn’t the same pressure to bang on to finish a colour / process as there is when going through a batch.  The downside is that it is a pretty slow approach, and I’m already known at my club for being the slowest painter!

The first eight figures painted, and placed in their relative positions in the original painting.

I have enjoyed the process of studying the figures on the painting and trying to work out how I will paint my model as a representation. At the start this was a bit daunting.  Master painters, like Rembrandt, earned large sums because they were  brilliant at what they do.  A lead or plastic figure and my meagre skills are obviously not going to get close to the same wow factor as the actual painting.  Luckily I am doing this ‘just for fun’ so as long as I can vaguely recognise my painted figure against the picture then I am happy.

Studying the picture very closely has been fascinating.  I have an ever increasing respect for the genius of these master painters.  How they dealt with light, and how they represent perspective is amazing.  As I mentioned in Part 1, it has been very useful to be able to download a high resolution version of the picture from the Rijks Museum site (link).  This allowed me to use photo editing software to increase the ‘exposure’ and see in to some of the dark corners of what is quite a dark picture.  I also came across a very interesting lecture on “The Night Watch: Rembrandt, Group Portraiture, and Dutch History” from Yale University, available on YouTube (link).  In this video it shows a copy of the picture made soon after it was first displayed (supposedly by one Gerrit Lundens).  The great thing about this copy is that it includes the pieces removed from the edge of the original when it was cropped (the horror!) to fit in to a new venue later in the picture’s life.

Copy of the original showing where the original is now cropped. Image has been 'enhanced' to see in to the shadowy background, which inevitably 'blows-out' the highlights.

I have taken an image from the YouTube video of this copy and also ‘lightened’ it.  You can see this brings out some interesting details of the setting of the picture. For example, I hadn’t noticed before that the sergeant on the extreme left of the picture is actually sitting on a low wall or balustrade.  I’ve got him standing at the moment.  Will have to think about that.

Here is a walk through of each of the eight figures painted so far.  (More details of the actual characters portrayed are in Part 1 here link). The figures are in the order in which I decided to paint them.  Unless otherwise noted I undercoated all the figures in black, and then gave them a very heavy dry brush of Vallejo Beige Brown (a technique copied from Matt at Glenbrook Games).

Jacob Jorisz, tambour (drummer)


I decide to go for the drummer first as I wanted to get the drum out of the way, and as there isn’t much of Jacob in the original painting I had more of a free rein for the figure.  The first challenge was that in the original he is wearing what looks like an iridescent silk or satin doublet.  Rembrandt manages this faultlessly, but I had to accept a ‘flat’ approximation of the turquoise / green colour, and then highlighted with a greener hue.  I was pleased that the drum was nice and plain as I find these very fiddly to do normally.  Just a dry brush with some highlights here.  The Avanpost figure was a joy to paint overall with nice crisp detail all over; something I would come to miss in some of the other figures.

Sergeant Reijnier Engelen


Next I moved on to Sergeant Reijnier. In the original he is a very dark figure. As noted above, it seems this figure is seated in the picture, but for now I only have a standing figure.  I tried to show black clothing, with some different highlighting in green, grey and red to show some different blacks. With his armour I tried to give the impression of blackened armour that has then been burnished and polished over many years.

Unknown Man, musketeer


Next is the Unknown Man.  I had a sense of grey with a hint of purple from this figure on the painting, and so this is how I approached the figure.   The original has a very fancy design to the bandolier strap which I didn’t attempt.  The most fun on this figure was the oak leaf sprig on the helmet.  I have written a separate blog post on how I did this here link.  (I suppose I ought to look at a way of showing that the musket is in the process of being discharged in the original.  This is one for the back burner.)

Running Boy, Powder Monkey


I have to admit to just going a bit ‘rogue’ with the running boy figure.  The figure that I had converted appears to be in a scruffy shirt and so I have painted a very scruffy linen type of shirt.  It is not clear exactly what the original is wearing but it is in a darker colour.

Jan Claesen Leijdeckers, musketeer


Although Jan is behind, and in the shadow of the Lieutenant, he is a bit more brightly attired than some.  He is described as a married man and so shouldn’t be too brightly dressed. (It appears that in mid 17th century Amsterdam that young bachelors were expected to dress very brightly, until they married, when they would dress more soberly as befitted men of maturity.)

Jan van der Heede, musketeer


Next, one of the bachelors (i.e. brightly attired!). As he is dressed almost entirely in red I went for a lighter undercoat of GW Wraithbone, and then a wash of GW Agrax Earthshade. The base of the red was a GW Contrast Paint, Blood Angels Red. I then highlighted this up with Vallejo Orange Red.   (I like this red contrast paint and also used it on my British Napoleonic red coats. It does need to go on a light undercoat though.)

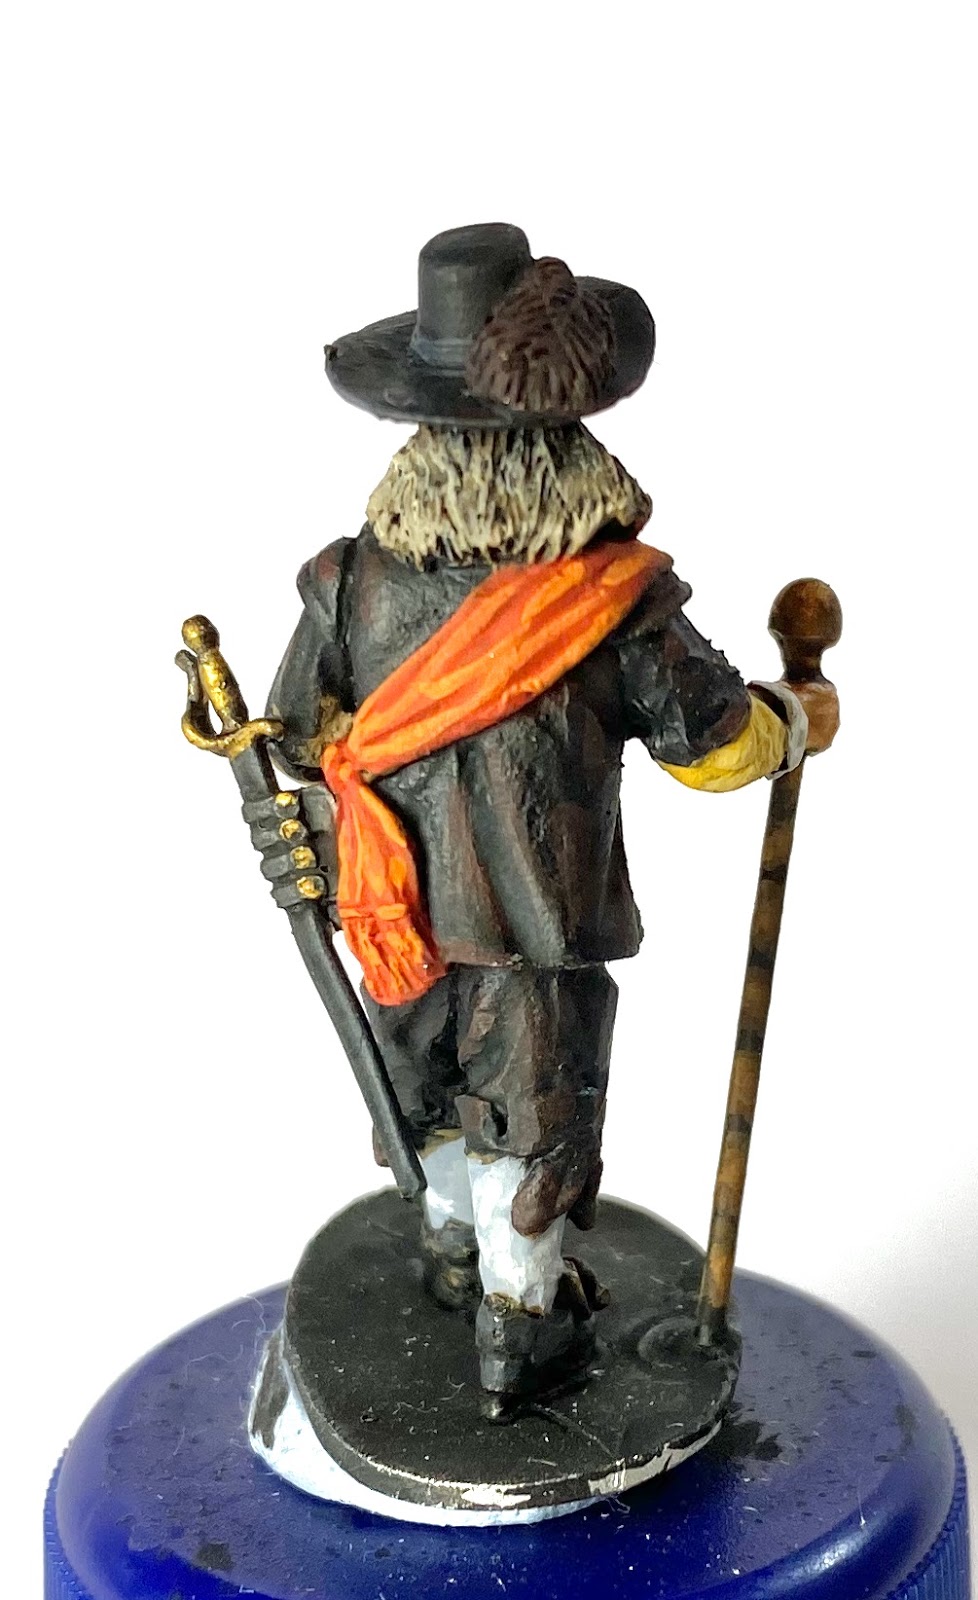
Captain Frans Banninck Cocq


On to one of the big stars of the picture.  I left the two officers to last to build up my confidence.  These two figures are very much centre stage in the original picture, and so I know they are the first things people will see.  I’m not sure my conversion is really doing the good Captain justice.  Once I’d mashed the figure about with Stanley knife, pliers and files I think that I’d lost some of the original figure's details.  The paint job helps a bit.  I’m not 100% happy with my final figure, but without another suitable candidate for the base figure this is it for now.

Lieutenant Willem Van Ruytenburch, Lord of Vlaardingen and Vlaardingen-Ambacht


Finally, the snappily dressed lieutenant.  I undercoated again in GW Wraithbone for this very light coloured figure, and followed up with a wash of GW Seraphim Sepia.  I haven’t managed to give the impression of the rich and detailed fabric of the original, but I am happy with the overall impression. The final figure certainly stands out from the crowd, just like he does in the original picture.


So these are the first eight.  I need to work on basing them next and I'm still considering the best way to do this as I want to represent a paved area.   There are then probably another 20 or so figures more to be painted.

Here are links to the  websites of the manufacturers used for the miniature figures (so far!):

* Warlord Games - https://store.warlordgames.com/collections/pike-shotte
* The Assault Group (TAG) - https://theassaultgroup.co.uk/renaissance/
* Empress Miniatures - https://www.empressminiatures.com/english-civil-war-3-c.asp
* Avanpost Miniatures - https://www.mezzersminis.co.uk/avanpost-1
* 1898 Miniatures - https://www.1898miniaturas.com/shop/en/48-spanish-tercios-28mm-miniatures
* Colonel Bills - Depot Battalions - http://shop.colonelbills-store.co.uk/epages/4f27da57-42ee-48c0-9cb8-22c9dd921a68.sf/en_GB/?ObjectPath=/Shops/4f27da57-42ee-48c0-9cb8-22c9dd921a68/Categories/86/44

Until next time!

Andy @ FOGH

***

Sunday, 3 May 2020

Want to see my etchings?

In this post I describe how I learnt about, and used, a modelling product; brass etched parts.

Fresh in the mail form, Scale Link Fretcetera

As more of a wargamer than a modeller I am probably ignorant of many, many clever techniques and products that scale modellers probably take for granted.  One of these was brass etched parts.  I was vaguely aware that some elaborate model kits had additions of tiny brass parts, but I never imagined I’d need or want any of them for my tiny fighting men.  Then recently I was reading the marvellous blog of Sir Sidney Roundwood (link, he of Too Fat Lardies fame) when I saw a reference to brass etched oak leaves.  It just so happened that I had been wondering how to model a sprig of oak leaves for one of the figures in my Nightwatch project (see Part 1 here link).  There is a figure in the centre of the picture with a sprig of oak leaves on his helmet and I had been wondering how to model this.  My initial thought was to add a piece of clump foliage as an approximation.  Sir Sidney’s mention of brass etched parts included a reference to Scale Link, a UK supplier, so I went off to their website to investigate.

Included instructions on using the parts.
Scale Link’s site (https://www.scalelink.co.uk) has many many fascinating things on it.  It seems that the brass etched parts have been moved off to as ‘sister’ site Scale Link Fretcetera (https://www.scalelinkfretcetera.co.uk).  I soon found brass etched oak leaves in several scales.  I went for pack SLF042 – Leaves-Oak. They cover many different scales for different model railway gauges. This pack seemed bigger than the N gauge pack, that was too small, and smaller than 1:32 which seemed too big (the site is perhaps a bit obscure on scales!).  I also ordered some reeds and other plants which I’ll experiment with later.

A sprig with the required tools; scissors and tweezers, with penny for scale
The actual ‘sprues’ lived up to the pictures on the site, and the tiny branches and twigs looked amazing. They are super thin and easy to cut with scissors. They come with some simple instructions, but it’s a fairly straightforward process.

Sprig added to figure

I cut out of the frame a suitably sized piece for the helmet. I then super glued one end of the ‘twig’ to the helmet and let that set. I then bent the twig over the helmet and glued it in that position.

Sprig bent and glued to back of helmet.


Once that was set I then used a small pair of tweezers to bend and shape the twig and leaves into a realistic shape. The figure was already painted and this probably worked best as it would be tricky to get to the helmet through the twig and leaves later. Now that it was set in place I gave the brass an undercoat of black, then painted with Vallejo Yellow Olive and highlighted with Vallejo Olive Green.

The sprig painted.

I am very pleased with the result. I think doing a whole tree with this stuff would be very fiddly, but it seems to be the perfect thing for a sprig in a helmet.

I heartily recommend a look around both Scale Link sites. There is some amazing stuff available when you know where to look!

Until next time.

Andy @ FOGH

The Unknown Man from Rembrandt's picture 

NB. My model figure is a representation of the ‘unknown man’ in the Nightwatch, who is a bit of a mystery. He is turned away from the viewer, partly hidden behind another figure, and is wearing slightly anachronistic dress of the late 1500s. With the sprig of oak leaves in his helmet he is believed by some to represent the glories and victories of the militia in the past, as oak leaves were apparently a symbol of victory. More details on the Rijks Museum site here.

***

Saturday, 11 April 2020

New Tricks - Peninsula 28mm

In this blog post I provide an update on my Peninsula 1811, Sharp Practice (SP), project.

My first unit of Carabiniers ready for basing. 

In my last post on this project (here) I had built my first box of Perry’s 28mm plastic French and started painting. Since then I have made steady, if not stunning, progress. I have completed four small units, three French and one British. Based on this I have established a painting method that I’m happy with and that’s what I’m going to go through in this post.

I have been continuing with GW Wraithbone (‘beige’) primer followed by a GW Agrax Earthshade (‘dark brown’) wash. On this foundation I have been adding a base colour and a single highlight for some colours, and in some cases used GW Contrast or further washes.

Carabiniers almost finished, with heads and packs still on the sprues.

Here is a summary for the French:
(Base colour followed by highlight or other process as appropriate)

VMC - Vallejo Model Colour
AP - Army Painter
GW - Games Workshop (Citadel)

  • Blue uniforms - VMC Dark Prussian Blue, VMC Prussian Blue
  • Red facings and details - VMC Flat Red, VMC Orange Red
  • Yellow facing and details - AP Desert Yellow, VMC Depp Yellow
  • Green facings and details - VMC Yellow Olive, VMC Olive Green
  • Muskets - VMC Flat Brown for wood parts, VMC Gun Metal, then another GW Agrax Earthshade wash, followed by VMC Saddle Brown highlight on wood. 
  • Backpacks and canteens - VMC Saddle Brown, VMC Red Leather 
  • Shoes, gaiters, bearskins, shakos, bayonet and sword sheaths - GW Contrast Black? Maybe a highlight of VMC Dark Grey but hardly needs it. 
  • Sword hilts and other brass fittings - VMC Brass followed by GW Reiksland Fleshshade. (Shades, dulls and warms the brass bits)
  • Belts and webbing - the prime and first wash does most of the work. A highlight of GW Wraithbone and second highlight of VMC Ivory gives me the dirty white appearance I am after. 
  • Flesh - GW Contrast Guilliman Flesh, VMC Flat Flesh
  • Hair - various browns, including the GW contrast browns which are are a nice and quick single coat. 

I have continued with painting up the heads and backpacks on the sprues, separately from the rest of the figures. Once painting is complete the heads and backpacks are carefully snipped of the sprues and the figures glued together. This require a few tiny touch ups but I have been surprised how quick and easy this has been.

New, finer, snips for getting painted pieces off the sprues.

I did buy some new, finer, snips for this post-painting snipping process so I could be as careful and accurate at this stage as possible. These Tamiya jobs are very nice and do the job.

Here are some of the finished figures.


After varnishing it’s on to basing. I asked the Twitter community on suggested basing for Sharp Practice.  Using UK one pence pieces, and sabot group bases seemed popular, so I’ve gone with this approach.  Once the figure is glued on to the penny, a filler, PVA and Humbrol Dark Earth mixture is thickly painted to the cover the base, and sharp sand sprinkled on to the mixture.  That’s left to dry overnight and a dry brush of VMC Beige added.  (Final touch will be flock and grass tufts but I haven’t decided on colours for the Peninsula yet. )

Carabiniers based up but missing tufts.


Voltiguers based up.


Overall I’m pleased with the final result. Still room for improvement, but these will get me going.

As well as the French I’ve also done a practice unit of British. These are from the 43rd Monmouthshire Light Infantry.  The 43rd were the opponents of the 2em Légère at Sabugal and so they will make up my two SP forces.  The 43rd are Perry 28mm metals.

43rd Monmouthshire Light Infantry - first unit for SP.

Next for this project will be trying to complete the two basic SP forces. I’ve also acquired some plastic Perry British Light Dragoons and some Perry metal Portuguese Cacadores.

Expansion of my forces!


Until next time!

Andy @ FOGH

Friday, 21 February 2020

The Guardsmen of the Amsterdam Kloveniersgilde (Part 1)

This post is about another new project I am starting for 2020.  This one is based back in the 17th Century.

The Nightwatch by Rembrandt van Rijn

I am sure this is a picture that most people are familiar with.  It is supposedly one of the most recognisable paintings in the world today.  Completed by Rembrandt van Rijn in 1642, it is now commonly called the ‘Nachtwacht’ or ‘Nightwatch’.  It depicts the Amsterdam Militia Company of District II, under the Command of Captain Frans Banninck Cocq.

As I am interested in 17th century military history, any contemporary pictures of soldiers and battles are great for providing a direct window back to the times, showing the dress and equipment in fabulous detail.  In the internet age many of these pictures are readily available to browse and study.  With the Nighwatch also being a very famous picture, it is one that I have often come across while searching for paintings on the web.  There is something about the picture that always attracts my attention.

Firstly, it is undoubtably a stunning picture.  The detail is incredible and the picture has that amazing Reuben ‘light’.  As well as the actual ‘look’ of the picture there is also the title, ‘Nightwatch’.  It provides an instant air of mystery for me; what and why are they watching, and who are they guarding against?  Then there is the way the characters are portrayed.  Many similar paintings from this period have the soldiers portrayed more like a slightly casual school photograph, with all of the subjects in static poses and probably looking out at the viewer.  In the Nightwatch, in contrast, there is a definite sense of movement; something is happening, but the different characters are each wrapped up in their own activity, or preparations.

I suspect that I am like many other wargamers and modellers in that an attractive military themed picture is one of the major ways in which I get drawn in to collecting and painting things. You see the picture and think “Oow - they’d look great in miniature on the tabletop, I’d like some!”.  So, how could I scratch this itch for the Nightwatch?

I could collect some general mid 17th century figures and paint them as Dutch militia. Mmm. No, that’s not going to do it. Ok, what if I tried to recreate each individual figure from the painting using available 28mm figures, and arranged them as in the picture?  Now that’s getting somewhere!

I mulled this idea for some time, in the background, while getting on with more tangible wargaming activity. Then I saw a flash mob video on YouTube (https://youtu.be/a6W2ZMpsxhg). It was made to advertise the restoration work being carried out on the painting. The final frames rekindled my desire to create the painting, but with miniatures.

With the start of a new year, and wanting some new projects to keep me going in 2020, I decided to start my Nightwatch project.  This project is all about recreating the figures from the painting in miniature, so the first task was a detailed review of available figures.  I know most about the 28mm ranges for this period, and I was pretty sure that this size of figures would give me the most choice.  There are a lot of figure ranges for this mid 17th century period in western Europe.  It includes the British Civil Wars and the Thirty Years War which results in a great selection of ranges from many manufacturers.  The tricky part was trying to identify wargames figures that match, relatively closely, the figures in the painting.  I didn’t expect to find exact matches, and so I was prepared for some minor conversion work; the odd head swap, adding some green stuff details, things like that. I also needed a nice version of the picture to look at.

The Nightwatch - artificially lightened to help see in to the shadows!

Luckily the Rijks Museum in Amsterdam, which exhibits the painting, has a fabulous website, and includes a whole section on the painting, including the ability to download detailed versions of it for personal use (https://www.rijksmuseum.nl/en/rijksstudio/artists/rembrandt-van-rijn/objects#/SK-C-5,0).  This allowed me to get a really good, zoomed in, view of each figure in the painting, and I also discovered a lot of background information about the picture and the individuals portrayed in it. I printed out a copy of the picture so I could makes notes on it as I discovered figures that might fit as a representation.

Here is a list of manufacturers used for the miniature figures (so far!):


(Many more were considered!)

I now had a list of 28mm figure ranges, and a copy of the picture.  There followed some hours of pouring over web catalogues of figures.  Not an unpleasant experience; what wargamer doesn’t like looking at figures!  There were a surprising number of things to consider.  Not only the pose of the figure, but all of the items of dress. Sashes over the wrong shoulder and riding boots were two examples of things that often scuppered a likely figure.  After a couple of evenings’ ‘work’ I ended up with a list of candidates, and then orders were placed.  I knew there would be a certain amount of ‘wastage’ (e.g. figures not used as they came in a pack with the required figure), but this wasn’t a problem as I’m sure these will get used in my ongoing Thirty Years War collection.

Reviewing the figures to see which would make the cut.

Once delivered I could start reviewing figures in detail.  Sometime things in real life aren’t quite as you’d expected, and a figure would turn out to be unsuitable after all, but some of the ‘wastage’ turned out to be suitable alternatives.  I have had to live with some compromises.  Getting figures leading with the same leg as in the picture has been tricky, and some poses in the painting are so unusual that no figure manufacturer would possibly make a figure in that pose.

Conversions started.

To finish this first part instalment for my Nightwatch project, here is a description of the first few figures that I have converted so far.

Captain Frans Banninck Cocq

Of course I had to start with the leader of the militia company, the Captain himself.  A position in the militia was highly sought after by the wealthy and influential merchants of Amsterdam in the 17th century. Therefore to be the Captain of your district’s company was a real achievement.  The Captain takes centre stage in the painting and he must have needed to contribute a significant amount to the 1600 guilders (a small fortune at the time) paid the Ruebens on completion of the picture.   Cocq must have liked the end result as he had a copy made to hang in his home. 
The figure is an Empress Miniatures officer. The right arm needed major surgery and the walking staff was scratch built from a piece of wire and a blob of green stuff. The left army was bent a bit. The frilly collar was added with more green stuff, and the riding boots were filed down to shoes. Shoe and breech adornments were added with more green stuff.  A fair approximation I hope.

Lieutenant Willem Van Ruytenburch, Lord of Vlaardingen and Vlaardingen-Ambacht

Lieutenant Willem Van Ruytenburch is definitely the most fancily dressed of the militia figures. When you look closely at his clothes you can see they are made of very expensive looking materials with lots of brocades and embroidery. He is also the most brightly dressed, and lit, so he really stands out.  This fits well with his ‘new money’, and ‘out to impress’ background.  (Too Fat Ladies fans will, no doubt, be tickled to find such a famous historical chatter named Lord of Vlaardingen!)
I’ve used another Empress officer for this figure. The figure comes with separate arms so was straightforward to pose. The officer pack comes with separate partisans so I will add one of these after the figure is painted. Willem has a very large and ornate gorget which has been added with green stuff along with some slight modifications to his boots.

Jacob Jorisz, tambour (drummer)

Jacob Jorisz is the only figure to appear as a main character in the picture who didn’t have to contribute to the cost of the picture. It is assumed that the drummer was important to include even if not able to afford the cost.
There are lots of drummer figures available, but I wanted to try and get one with the left arm in the same position as in the painting.  I went for an Avanpost drummer figure which had the right pose, but not the right head gear.  I made a head swap with a Wargames Foundry Scots pikeman in my spares box, which had the right looking sort of ‘bonnet’ headgear.

Sergeant Reijnier Engelen

Reijnier Engelen was an older member of the militia, and therefore had probably earned his position as sergeant through long service.  He seems to have had a shady past with fines recorded for selling undersize cloth.  Perhaps the ‘Arthur Daley’ of the militia?
For Reijnier I have used an armoured pikeman from the new 1898 TYW range.  He had his head removed and replaced to give a more sideward glance, and he’ll have a halberd from the Empress ECW sergeant’s pack.

Jan van der Heede, musketeer

Jan van der Heede was a fairly successful grocer and therefore able to earn a position in the militia and afford to appear prominently in the painting.  He is shown tipping a charge of powder from his bandolier in to his musket as part of the loading procedure.  He looks very dapper in his red outfit, and such bright clothing was apparently expected of a bachelor in Amsterdam at this time.  Interestingly he was married soon after the painting was completed, so perhaps his appearance in the painting turned some eligible ladies’ heads! (As a side note, once married you were expected to dress in more sober, dark or black clothing.)

I had to search hard to find a loading musketeer figure in this exact position, also with his musket cast about on his left hand side.  Empress Miniatures once again provided an almost perfect figure, which just needed a frilly collar adding in Green Stuff, and a plastic Warlord feather adding to the hat.

Jan Claesen Leijdeckers, musketeer

Jan Claesen Leijdeckers, stands just behind the flashy Lieutenant, and is in the act of blowing clear the ‘pan’ on his musket after having fired. Jan’s appearance in the picture was posthumous; he died two years before the picture was completed, but as he had paid for his appearance in it, Rembrandt must have based the figure on another model to represent the deceased Jan.

Although I’ve not used Empress much in my wargaming units up to now, they seemed to come up trumps time and again in my Nightwatch figure search.   Jan is based on another Empress loading musketeer figure.  I have added a musket rest to the figure to match the painting, and swapped the soft hat for a helmet, both extras from the bits box.

Running Boy, Powder Monkey

Almost hidden in the shadows on the left of the painting is a figure of what looks to be a young boy, wearing a helmet, and running with a powder horn.  I haven’t found out much about this figure yet and I assume that Rembrandt was adding a little humorous flourish to fit in the foreground at this point.

I remembered that Warlord had a similar looking boy in their Pike and Shotte Clubmen Militia range.  I changed his posture slightly (the original is in the midst of throwing a stone) and added a green stuff powder horn to the figure.  Not an exact representation, but he’ll do.

Unknown Man, musketeer

My last figure for this post, standing behind the Captain, is unknown which, due to his old fashioned attire, has led to a belief that his represents the history of the militia, with oak leaves on his helmet, representing victory.

It was difficult to find a suitable figure for the unknown man.  He is in a very strange pose, and to me seems to be firing his musket left handed.  I went to TAGs late 16th century Spanish range to find a suitable figure with the high, puffed breeches, and a helmet.  The figure is firing the more normal, right handed way. so I will compromise on this unless I ever find something more suitable.  I will add a sprig of something after painting to represent the oak leaves.

The initial set of figures, roughly in their relative positions.

Next step will be to get some paint on these first few figures, and to start building the next set of the Nightwatch.  If you have any ideas for 28mm figures to represent the figures in the painting then I’d love to hear from you.  Also, I’m always interested in any information you have the painting itself.

Until next time!

Andy @ FOGH.

Sunday, 26 January 2020

New Year and New Projects

This blog post introduces a new project that I’m starting in 2020.

I haven’t made a blog post in a while but I have started the New Year with a flourish of new hobby projects.   In the past couple of years I have restricted myself to one project at a time.  This year I have decided to keep several things on the go to try and prevent the dreaded ‘burn-out’ due to losing interest in the project at-hand.  I’m hoping that by having a few different irons in the fire, so to speak, that if interest in one project wanes, then I can switch to another to keep going.

So what are these new projects?  The first new project that I'm covering in this post involves moving forward from the mid 17th century by about 150 years to 1811, and also moving from Central Europe to the Iberian peninsula - Napoleonic Peninsula!  A bit of a classic, but not something that I currently have any armies for.  I’ve loved this period since I first saw ‘that film’ when I was 11.  I’ve read a lot about the 100 days campaign, and also been inspired by the tales of Sharpe, Harper and friends in Portugal and Spain.  I don’t think I could stretch to another big battle game while I’m doing this for Poles and Swedes in the 1620s, and so I wanted to do something smaller scale - a skirmish.

Sharpe Practice v2 by Too Fat Lardies
About 18 months ago I came across the Too Fat Lardies rules, Sharpe Practice.  There was a very engaging play through on the Beasts Of War website (here).  I was intrigued enough to buy the rules and some command cards.  We played a couple of run throughs at the local club and found the system really interesting.  Very different to other sets of rules we’d tried, but with absolute bucket loads of period character.  The rules were promoted to the “must play again” pile, but have languished while other things took centre stage.

All it takes ...
This changed at Christmas when one of my gaming buddies, in an attempt to re-kindle my Napoleonic fervour, bought me a box of Perry’s plastic 28s Early French Elite Companies .  He also bought me a selection of Perry’s metal British Light Infantry.  As soon as I opened that box of plastics I was hooked. Gosh, those chaps are talented - even on the sprues I could see the figures were works of art.  I was starting to see a mental picture; a dusty Spanish village simmering in the summer heat, a foot-sore French column marching down the road, but what’s that in the shady olive grove, is it a section of British light infantry ready to spring an ambush?!


I find it easier to splash some paint on the figures if I have made a basic plan for the units I’m painting.  I therefore used some time over the Christmas break to do some research.  I wanted to have units from the British Light Division, in the Peninsula, and some French opposition.  I therefore started searching through different actions that the Light Division took part in.  I became intrigued by the action on the river Coa, 3rd April 1811, at Sabugal.  There is a very nice description of the battle here.   There was a great performance by the 43rd (Monmouthshires) and set against them were French Light Infantry including the 2nd Légèr.  Now, I didn’t intend to recreate the whole battle, but the orders of battle gave me some historical units on which to base my little collection, and some context for the planned tabletop actions.

Fight For The Gun at Sabugal by R Simkins
Some internet searches, and a borrowed Osprey or two, showed that I could use the Perry Elite Company box for the 2nd Légèr (who wore the longer tailed coat like the line regiments at this time).  The Carabinier (the name of the Grenadiers in the French Light Infantry) company also had bearskins, and the Voltiguers could wear the tall plumes, all provided as options in the Perry’s plastic box.  The 2nd Légèr could look terribly dashing!  After re-reading the Sharpe Practice (SP) rules I worked out that the one box of Perry’s plastics would give me a small starter force for the French, and my few boxes of Brits would be a good start of a similar sized opposing force.  I was all set!  

The French (headless!) for  Sharpe Practice
Building the Perry plastics was a bit of a chore, but the end result is worth it.  It requires a bit of thought to end up with the sets of figures you want, and the complexities of Napoleonic uniforms are a bit mind boggling.  After a couple of sessions I had 5 units of French built for Sharpe Practice with some accompanying officers and NCOs.  It was at this point that I realised that I have never painted 25 or 28mm Napoleonics!  (We were all playing 15s last time I collected Napoleonics.)  I did remember that Napoleonics have a lot of white on them, and I could see the these plastics figures had loads of detail.  I therefore decided to try a white/light undercoat.  My recent experiments with a light undercoat and GW Contrast paints had given me some ideas.

Sprayed with GW Wraithbone
I used the GW Wraithbone spay undercoat and then gave the figures a wash of GW Agrax Earthshade. I took a tip from a budy of mine who has done a lot of plastic Napoleonics and left the heads and packs on the sprues for painting.

Washed with GW Agrax Earthshade
Another really nice touch with this boxset is that it has very detailed painting guide included which would get you started if you were not worried about portraying an exact unit.  I still needed to do some extra research as some units, like the 2nd Légèr, had their own idiosyncrasies, and I enjoy going that little bit further so that I can really feel that I am bringing a particular unit back to life on the table top.

Perry Instruction Leaflet
I have started the colours with mostly Valllejos, but have used Contrasts for the odd detail here and there.  I plan to block out the base colours and then highlight up.  A fairly watered down Vallejo Dark Prussian Blue seems to work nicely for the coats and trousers, and seems to give a bit of shading over the Wraithbone/Earthshade combo.


That is it for now.  Next time I may introduce another of my new 2020 projects, I may go back to my Poles and Swedes, or may be I’ll finish off some of the 2nd Légèr.  It will be exciting to find out :-)

All the best, Andy @ FOGH.