
This blog post covers the second unit of Hussars for my 1620s Polish-Lithuanian Commonwealth army.
 |
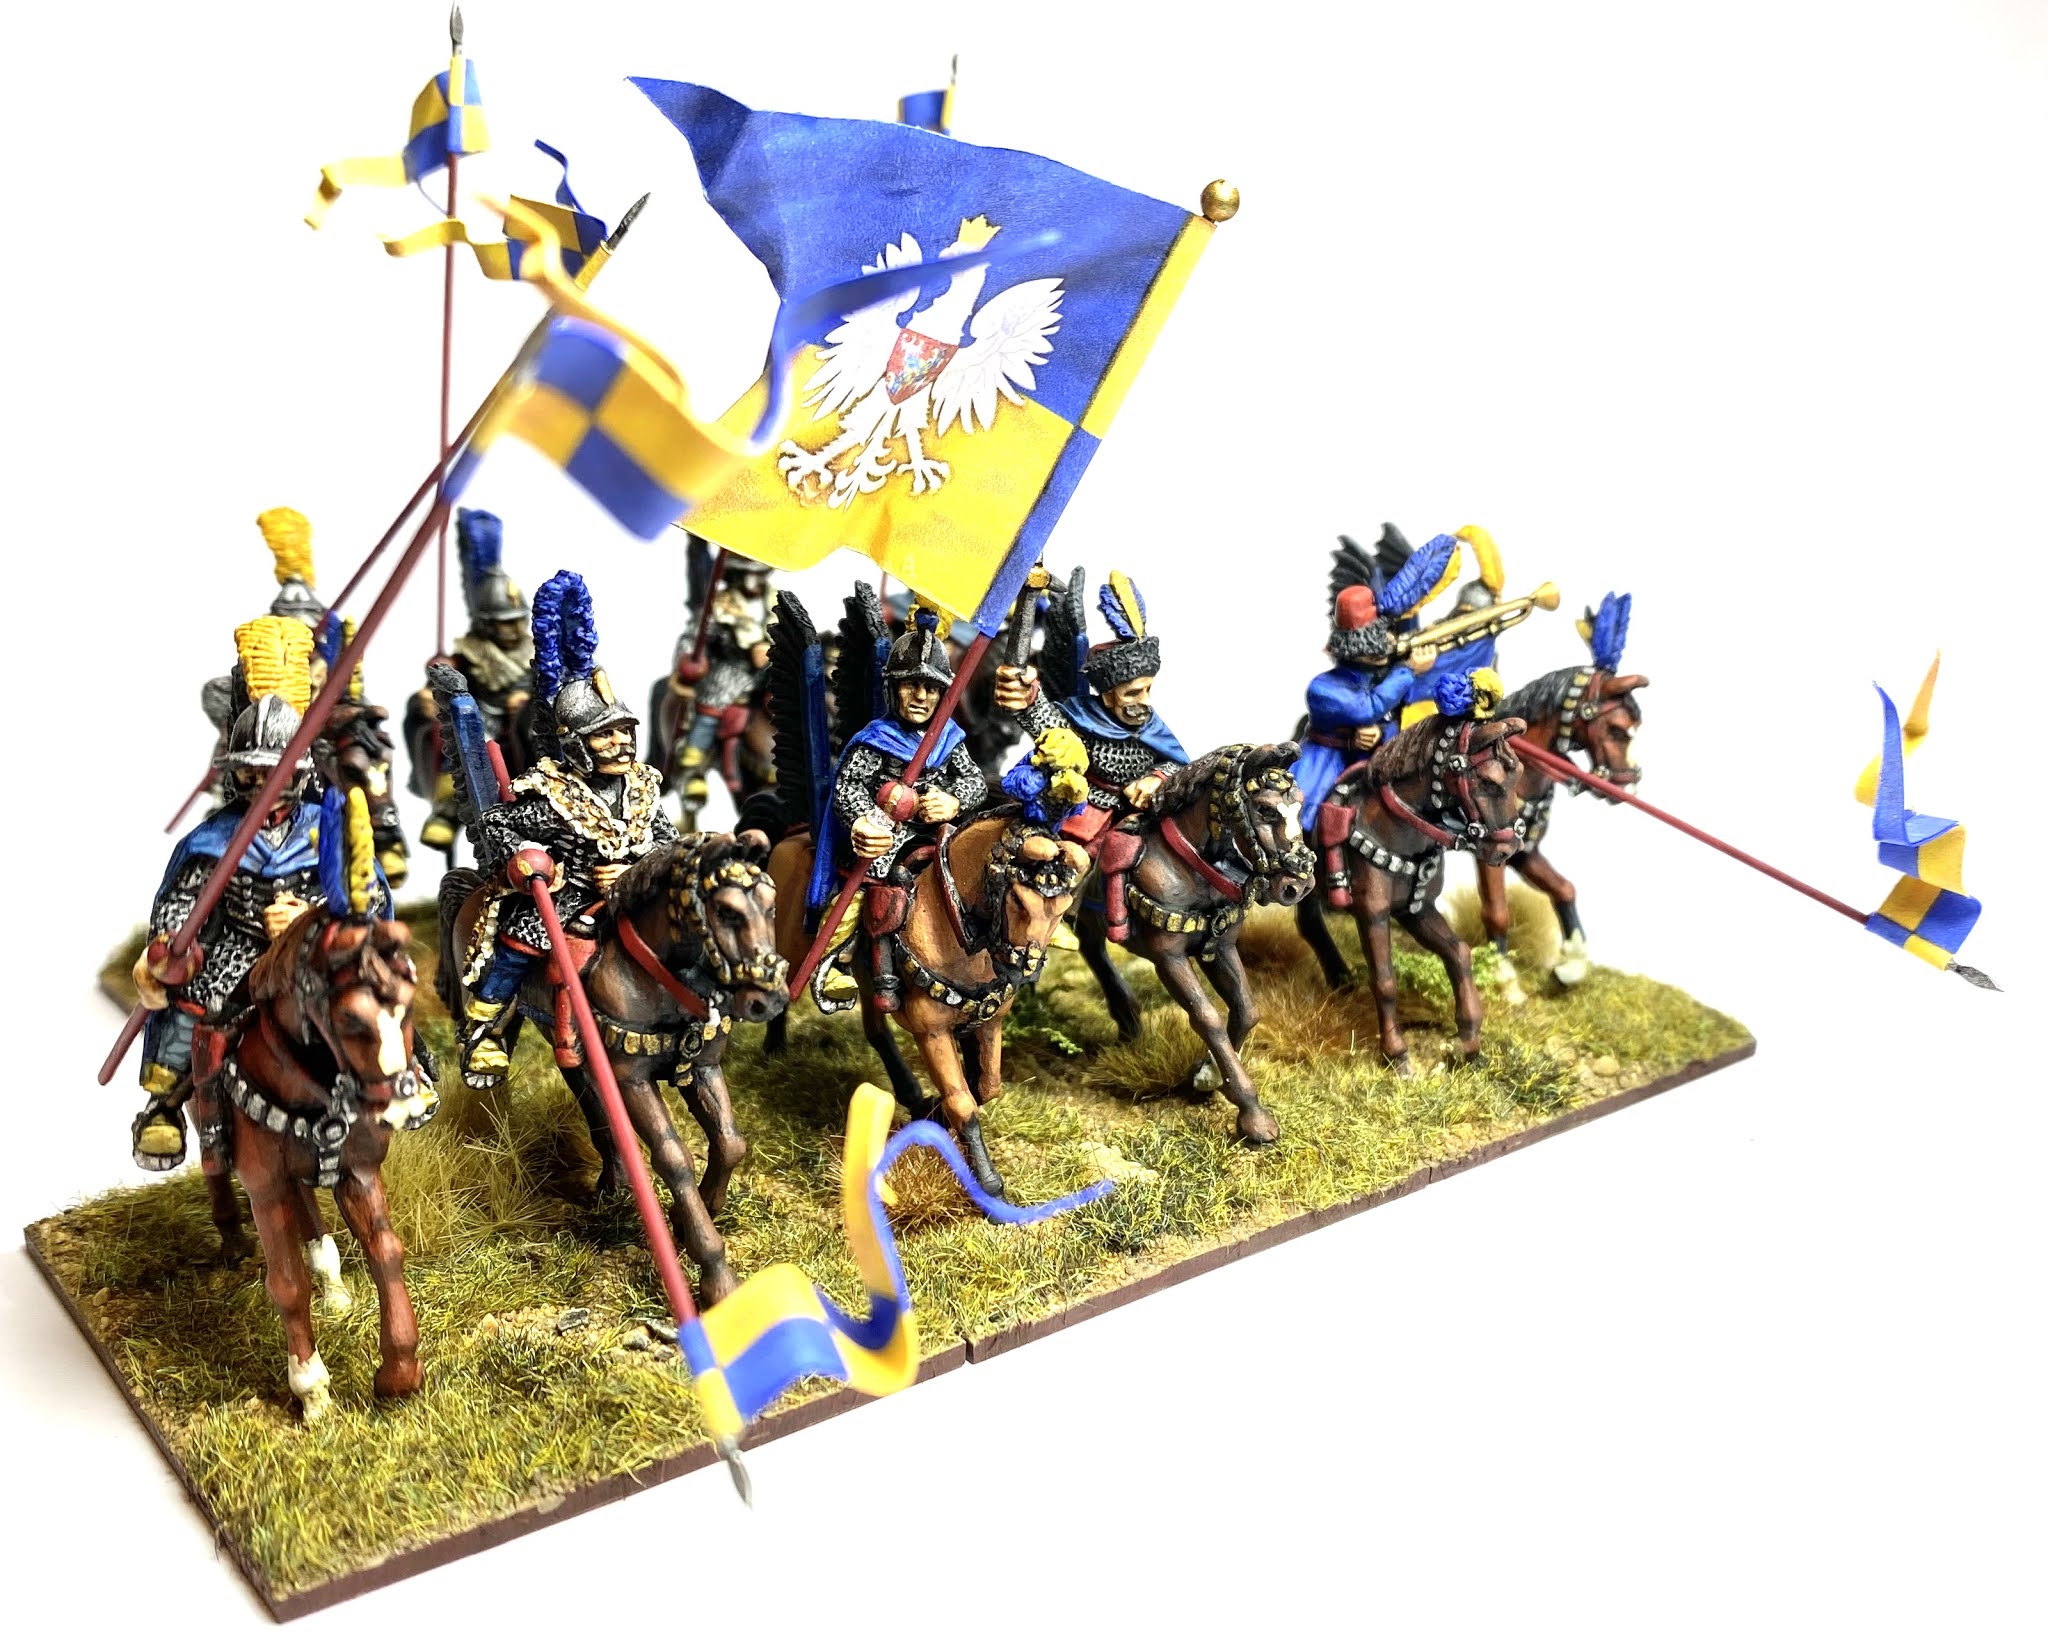
| The second unit of hussars charges in to action! |
In two previous posts I went through the research and building of the first unit of hussars - you can see them here and here.
This latest unit is made up of a mixture of The Assault Group (TAG) and Foundry riders, as before, but this time on TAG horses. The TAG horses are nice clean sculpts and most have some fancy feathers etc. which are very suitable for the noble Hussars, who liked an ostentatious display. They also have a single pistol holstered on the right side of the saddle. This is a nice touch as firearms were becoming popular with the Hussars in this period. I’m not so sure about carrying only one pistol, but I expect someone out there knows if this is right?
 |
| Riderless horses ready for varnishing |
I’ve added wings in twos, or singles, to most of the figures, but left some without. In this unit the wings are attached directly to the horse, rather to the equivalent position on the rider figure. As covered in the previous posts, I have decided to have wings ‘saddle mounted’ (rather than fixed on the rider’ backs) in ones or twos as limited to the richer / more showy individuals in the unit. The wings are a mixture of the TAG wings and the Foundry wings modified to be the straighter, earlier type. The TAG horses have a slot modelled at the back of the saddle to take wings. The Foundry riders needed some chipping and filing to make them fit in the TAG saddles and I had to keep riders and horses matched during the painting process so I could be sure of them fitting together at the end.
Although not always strictly historical, I like to have a colour theme for my units. For this unit I had chosen a blue and yellow flag, with matched pennons, from Battle Flag. I therefore decided to carry on this blue and yellow theme to the horse trappings, and also the Hussars’ cloaks and helmet feathers. I chose to use a few different hues of blue to add some variety while keeping within the overall theme. I used Vallejo’s Prussian Blue, Ultramarine, and Pale Dark Blue, and then shaded / highlighted each of these. I also wanted to include red on the hussars as this was a popular colour with wealthy Polish nobles in this period.
 |
| Riders ready for varnishing |
I’ve not really found a yellow, to use over a black undercoat, that I’m super happy with in the Vallejo or Army Painter ranges. I’ve tried using Vallejo Ochre Brown, as a base for yellow, and built up from that. This is ok, but I wondered if I should look at some other ranges. I have been slowly getting more into the GW Citadel range of paints. I already really like the various shades such as Agrax Earthshade, and have been really pleased with some of the red base + layer combinations. They is a handy app called ‘Citadel Colour’ which helps translate from actual colours to sets of base, layers and shades from the (strangely named!) Citadel range. From the app I found Averland Sunset as a base, with Cassandra Yellow as a shade, and then Yriel Yellow as a layer. I bought this set of paints and I have found they work really well. I also tried some of the Citadel metallics. I must say that, despite the bottle’s pot design (rather than being in dropper bottles), the paints that I’ve tried so far have been really nice to use and I’ve become a bit of a convert!
 |
| Flags and lance pennons for the unit from Battle Flag |
After painting the figures I brushed on a gloss varnish as a protective layer for the riders, horses, and the lances. As mentioned the lances were getting a set of Battle Flag pennons. The main unit standard is blue and yellow, split horizontally, with a white eagle in the centre. I decided to repeat this on the trumpeter’s trumpet banner, that is cast on the figure. The two colours was fairly straightforward, but the white eagle would be tricky. A Google search threw up some potential transfers that looked like they could work from Vene Vidi Veci. VVV do sets of 15mm and 28mm ‘medieval’ heraldry symbols that can be ordered in a variety of colours. I ordered sets of 15mm and 28mm from Magister Militum (link) in white, black and red. I ordered both sizes as I wasn’t sure how big they would be and wanted to make sure that they would fit on the trumpet banner.
 |
| Trumpeter varnished and ready for transfers. |
Once I had the transfers I decided that the 15mm size transfer would work best on the trumpet banner. I haven’t used transfers for a long time and decided to give this fancy Micro SEL and Micro SOL stuff, made by Microscale, a try. The figure was already gloss varnished, which is apparently the best base to start transfers from. I cut out a small, white, single-headed eagle transfer from the VVV set and, using a pair of tweezers, dipped it in water for a few seconds. While the water was soaking in to the transfer, I painted a small amount of Micro SEL (from the blue bottle) on to the trumpet flag where I wanted the transfer. The transfer was now loose after its short soaking and so I slid the transfer off its backing and positioned it on the banner with the same brush I used for the Micro SEL. The Micro SEL allowed me to move adjust the position of the transfer with the brush tip. When it was in the right spot I smoothed it down with a small amount more of Micro SEL. After repeating this for the back of the trumpet banner, I set the the figure aside to dry.
 |
| Equipment for applying the transfers to the trumpet banner. |
Once the transfer was dry I painted a small amount of Micro SOL on top. As the banner was a fairly flat surface this last stage, meant to mould the transfer on to curved / uneven surfaces, was perhaps not necessary, but I wanted to try out the full process. I left the figure to dry once again. The flag design that I was copying for the trumpet banner has a small red shield over the eagle’s breast, and a yellow crown on the eagle. At this scale, two blobs of colour, were good enough approximation of this design for me! I‘m sure many people would have managed with some white paint to approximate the eagle, but the transfer was a neat way of getting a consistent result on both sides.
 |
| Trumpet transfer applied and dots of paint added. |
With this last little job done, it was then time to glue riders on to the horses and finish the basing. Once again, I used 50mm wide by 60mm deep and 2mm thick MDF bases from Warbases. (Each base takes two horses.) The basing technique was the same as on the previous unit here. So, here is the second unit finished. (The eagle eyed will have spotted that there is a base of two figures missing due to a miscalculation in figure purchases. This has been rectified!)


These look excellent
ReplyDeleteHussars with two pistols brings back memories of the games of WRG 2nd Ed of my youth :)
My go-to basecoat for yellow is Vallejo Model Colour Golden Brown.
Thanks, Paul - much appreciated!
DeleteI also remember many hours spent studying the Polish WRG list and working out ‘if only’ armies. It has taken me a long time to get around to it - but nice to almost be there :)
I will take a look at Golden Brown - thanks for the tip.
More gorgeous hussars! The fake leopard skins are once more splendid, you continue to tempt me as I have been looking at Polish and Ottomans by various manufacturers, oh my!
ReplyDeleteBest Iain
Thanks, Iain :-)
DeleteI think Ottomans will be a future army for me too.
Wonderful work- possibly even better than the last batch. As mentioned above, your leopard skins are splendid.
ReplyDeleteThanks, Codsticker!
DeleteI may need to work up to a tiger skin, and I also need to try more wolf skins. The Hussars are certainly throwing up some new challenges!
Just wonderful, Andy. You've brought this unit of the dreaded Hussars to life in a brilliant way. Well done on matching the TAG and the Foundry figures - and that transfer on the trumpeter's flag is perfect! 10 out of 10, Sir!
ReplyDeleteMany thanks, Sir Sidney! My Swedes are already looking worried 😆
Delete