Sunday, 27 February 2022

Thirty Years War cavalry from 1898 Miniatures

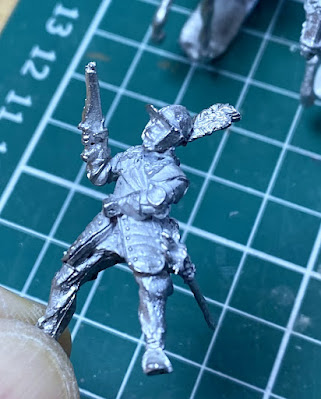
In this blog post I look at the latest Thirty Years War (TYW) release from 1898 Miniatures; the Cavalry.  

Thirty Years Wars Cavalry from 1898 Miniatures - 28mm

The post is broadly split in to three parts: a description of the figures, how I found preparing and painting them, and finally the first unit that I have built using the figures. 

The Figures. 

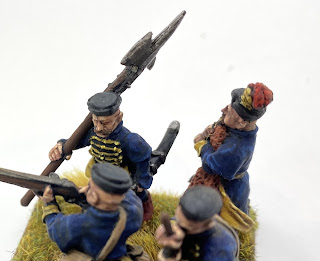
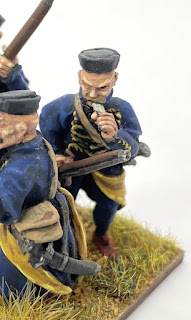
1898 released these cavalry at the end of 2021, adding to their existing range of infantry and generals for the period. There are nine packs in this release that include armoured and un-armoured riders, wearing helmets or broad brimmed, soft hats, holding pistols or swords, as well as a command pack. Each pack contains three different rider figures which means that you have a lot of variety available. There are three different horse sculpts across the rank and file packs, and the horses in the packs with pistol armed riders have one pistol missing from the saddle holsters which is a really nice touch. 

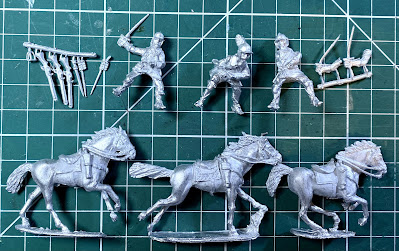
Contents of a typical cavalry pack

The command pack contains an officer, a trumpeter and a cornet / standard bearer. There are head options for the officer and cornet, and arm options for the officer as well.

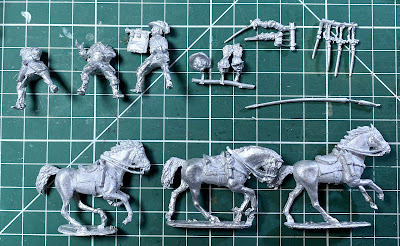
Contents of the command pack

Each pack includes separate scabbards and carbines to be glued on to the figures. For figures holding their sword the scabbards are empty, and for figures holding a pistol the scabbards have the sword sheathed. Another nice touch.

The riders fit on to the horses very easily with the saddle sculpted on to the horse rather than the rider. The horses themselves are well proportioned with the bridle and other tack nicely detailed on the models. The horses are in active poses either cantering or galloping. In addition to the riders’ animation, this will give a great impression of attacking cavalry.

The resulting figures represent the classic early to mid 17th century harquebusier type cavalry. The rider’s armour is mainly limited to back and breast plates, with the occasional figure having some arm protection as well. Helmets are either of the burgonet or single-barred Dutch pot variety although the helmeted packs include a tiny three-barred face plate that you could add to one of the figures to turn the helmet into a three-barred English pot.

They are modelled wearing a buff-coat although this could sleeved or sleeveless depending on how you paint them.  You could of course paint them as wearing riding coats and not buff coats if you choose. Many, but not all, have a scarf/sash, so necessary in a period when cavalrymen of this type looked very similar in all armies.

Figures wear leather gauntlets and have their swords suspended either from a cross belt or waist belt.  All of the figures have a cross belt on their right to which you attach the carbines. The figures have powder flasks hanging from this cross belt as well.

The figures retain the sculpting style of the infantry. Nicely sculpted, with lots of detail, and every figure has bags of character. I think they really look the part of figures for this period, and with the variety of different rider figures available, you can make a very varied looking mounted force.

Building and Painting

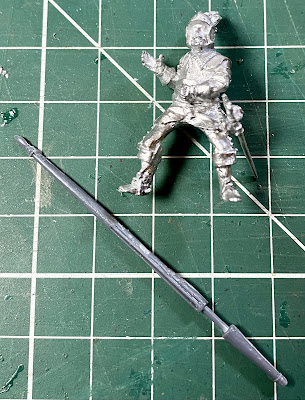
The figures come with minimal chipping and filing required. There are some tiny burrs from the casting process, and minor mould lines to be filed.  The metal is the softer style of white metal rather than the stiffer more brittle style of some manufacturers.  Some of the horses have only two contact points with the base and so are at risk of bending at the ankles if roughly handled. I haven’t had any accidents with horses actually breaking off the base, which I think is thanks to the more forgiving, bendy metal.  Where riders’ right arms were not positioned quite to my liking I was able to gently bend the arms in to slightly different poses. 

With at the very least a separate scabbard required to be added to every figure, there is some assembly required.  The scabbards can be a little fiddly and so super glue with a spay can activator is definitely your friend at this point. Some figures have a separate right arm that helps add further variety to units and these glue on quite easily.
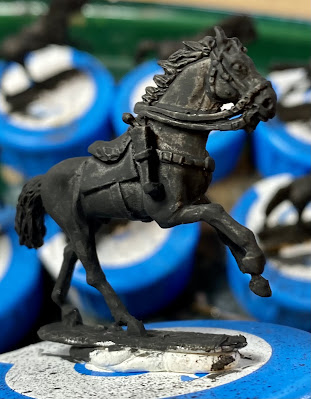
Primed horse figure

Once primed the figures are a joy to paint.  The detail is perhaps not as prominent as say a Bircorne or Bloody Miniature figure, but I didn’t have any trouble using my normal methods including washing and dry brushing.

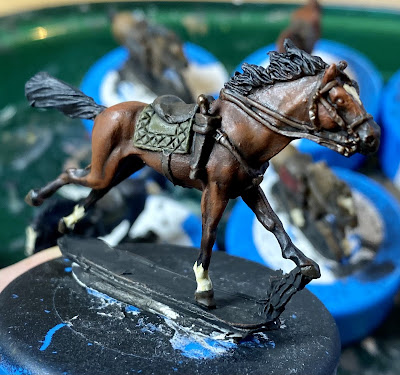
Horse following base coat, dry brush highlights, tack etc. painted, overall wash, and blaze/socks added.
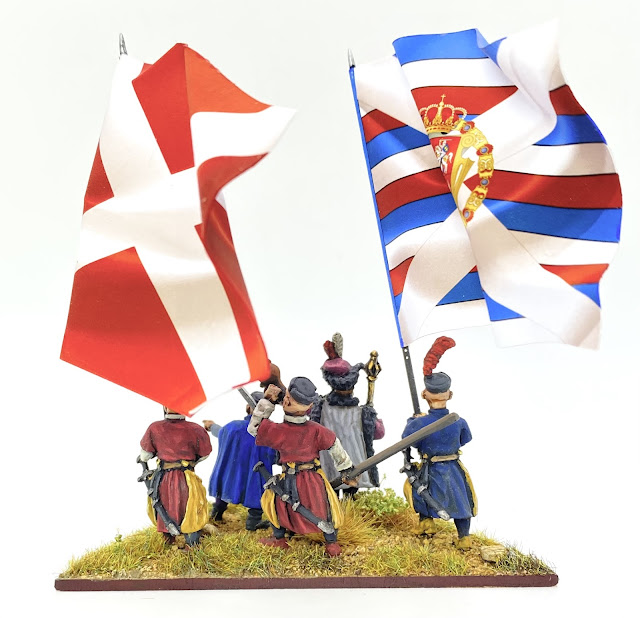
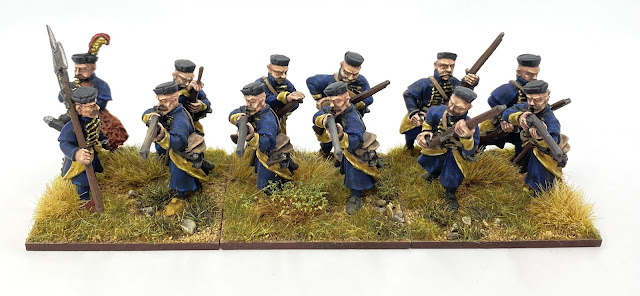
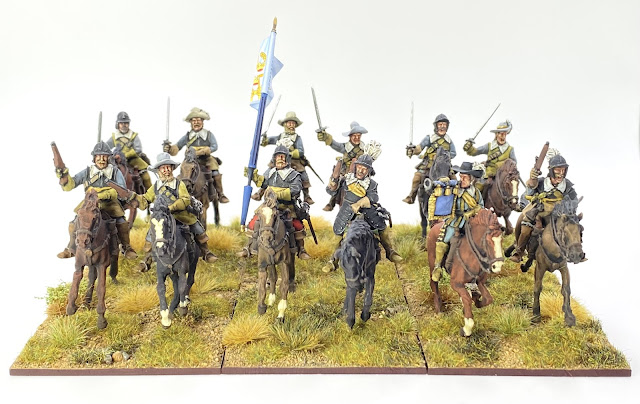
My First Unit

With the style of the figures being quite animated and, to me aggressive looking, I thought they would  work really well as Gustav Adolph’s Swedish Cavalry.  From the late 1620s the Swedish cavalry were adopting a doctrine of being more aggressive and saving firepower to use in close quarter fighting.  Gustav Adolph issued orders that the first rank of cavalry should attack with pistols, that were to be fired just before impact, and the second and subsequent ranks were to attack with swords drawn.  

With the variety of pistol and sword armed figures available, I decided to have a front rank with pistols and a rear rank with swords. Swedish cavalry were often short of armour and so I had the front rank all armoured, and the rear rank mostly unarmoured.  

Officer with right arm, head and scabbarded sword glued in place.

As part of reducing his horseman’s reliance on firepower, Gustav Adolph also took carbines away from his cavalry units. This would mean I didn’t get to use the nice separate carbines provided for the figures, and also means that the right hand cross belts on the figures are unnecessary. However I can live with this slight oddity that I suspect the majority of people will never notice! 

Cornet / standard bearer with Warlord plastic ‘lance’.

The cornet / standard bearer is provided with a white metal ‘fluted lance’ to carry a flag. I can never get on with white metal pole arms as I find them difficult to keep straight.  I therefore replaced this with a Warlord plastic fluted lance.  (There is one on every Warlord cavalry plastic sprue and so I have lots of spares!)

I painted the horsemen mostly in sleeveless buff coats and gave them varieties of  grey for coats and breeches. Sashes / scarves were painted yellow.  There doesn’t seem to be a clear sash colour for the Swedes at this time and so the choice was as much aesthetic as historical. Armour was painted black, and broad brimmed hats were mainly lighter greys that seem to have been favoured by the Swedes. 

The unit was finished with a cornet / flag from Mikhail Betski at MB Creation, a supplier I’ve only recently come across, who provides some really nice flags for this period. I used the colour of the flag to influence the colours for the trumpeter’s clothing as unit’s musicians were often expensively dressed by the unit’s officer as part of the military fashion of the time.  

In conclusion, I think the new 1898 TYW cavalry figures are a great addition to their range, and a great resource for all those collecting 28mm armies in this period. All of the 1898 figures have a particular style, but will still work well with other manufacturers. I’m really pleased with the unit I’ve built with them and I will be adding a few more in due course. 

The next figures on the table will be some Polish civilians and another general stand for the Poles. 

Until next time!

Andy @ The Friends of General Haig 

Wednesday, 23 February 2022

Haiduk Command

 In this latest blog post I tackle some command bases for my Polish early 17th century Haiduks.

Haiduk Command Bases with Foundry and TAG 28mm figures

Units of Haiduks, known as ‘Banners’ were led by a Rotmistrz and included ensigns, musicians and NCOs known as tenth men. I thought that representing these on a base would add some colour to my Polish infantry. 

Both Foundry and The Assault Group (TAG) have Haiduk command figures and I’ve mixed these two manufacturers to form two bases. 

The Rotmistrz was allowed a servant ‘boy’ on the Banner payroll as an assistant, and servants are frequently shown carrying weapons for officers. Both Foundry and TAG have a boy carrying weapons in their command packs, following the illustration in the Osprey Men-at-Arms on the Poles. The Rotmistrz and his boy were dressed and equipped at the Rotmistrz’s whim and expensive. As a noble we can expect rich clothing, featuring furs for the Rotmistrz himself.  The ceremonial mace or Bulwa was a symbol of rank, and a large two handed sword seems to have also been a popular weapon. In one of my command groups the Rotmistrz has the sword and his boy is carrying the his Bulwa. This is reversed in the other group. 

As discussed in my blog post on the rank and file Haiduks they were, unusually for the time, uniformed. The ensigns and tenth-men may have had a fancier version of the uniform but I’ve decided to keep with the same colours as the rank and file. 

For the flags I have used those distributed for free on a blog here: https://www.anotherminiaturespainter.com/wargames/28mm-polish-renaissance-cossack-flags/ . The blog includes a set that work well for Haiduk units and are inspired by the Stockholm Roll (https://commons.wikimedia.org/wiki/Category:Stockholm_Roll).  These are large flags, but match the size of those shown on the Stockholm Roll. The Poles did use flags larger than used in Western Europe, but even if these may be oversized, they will certainly look spectacular on the table!

TAG Haiduk Casualty on a Warbases Counter Base


Wargamer 1666 Character ‘Octavia’ on a Warbases Counter Base

To go with the command bases I also painted a couple of figures to go on Warbases casualty counter bases. The first is an out of action Haiduk, and the second is a slight whim of fancy. I saw this figure for the 1666 game from Wargamer (https://www.wargameruk.com/shop/anno-domini-1666/2) and thought it would be fun to paint. I’m also short of casualty makers for my cavalry units and so an unhorsed cuirassier figure should be just the thing.


Some ‘Dutch Courage’ for this Tenth-Man.

The next unit on the painting bench is going to be from the new 1898 Thirty Years War cavalry range. I’m looking forward to it.

Until next time,

Andy @ The Friends of General Haig 


Sunday, 30 January 2022

More Haiduks

This blog post looks at the latest unit for my Polish Lithuanian Commonwealth army; another unit of Polish Haiduks. 

Polish Haiduks from Wargames Foundry and TAG in 28mm

In this earlier post (https://theviaregia.blogspot.com/2021/11/polish-haiduks.html) I described the background to these native Polish infantry. This unit is more of the same, with the figures also being from Wargames Foundry and The Assault Group (TAG) in 28mm.  

Extract from the contemporary ‘Stockholm Roll’ showing Haiduks

I chose a different paint scheme this time, with this unit being based on a unit of Haiduks in the Stockholm Scroll. This amazing 15m long work of art depicts the ceremonial entry of the wedding procession of King Sigismund III and Archduchess Constance of Austria into Kraków on 4th December 1605. The picture includes many military units, including Haiduks. This needs to be used with caution of course as this is a ceremonial procession and not a battlefield. It is nevertheless very useful. There is a great Wikimedia page with details of many parts of the scroll here: https://commons.m.wikimedia.org/wiki/Category:Stockholm_Roll

This unit of Haiduks on the scroll have a nice dark blue uniform with a yellow lining on the outer coat. The figures in the scroll don’t seem to have braiding on their coats but as my model soldiers do, I have given them braiding in the same contrasting yellow. 

A ‘tenth man’ and musician.

Biting open a cartridge.


Casualty Marker from Warbases

I painted the figures using the same approach as described in the previous post above. I think they’ve come out alright. I’ve added a casualty marker for the unit as well, using one of the handy counter bases from Warbases. 


The scroll shows further Haiduk uniforms and so I will be trying these in the future. Next up, my Haiduks need some commanders.

Until next time

Andy @ The Friends of General Haig. 

Sunday, 16 January 2022

Even More Husaria!

This blog post looks at my latest unit of miniature Husaria.

Polish Hussars from Warlord Games, 28mm

Long term readers of the blog may remember that when I started the Hussars for my Polish-Lithuanian Commonwealth army I looked at three different manufacturers (see https://theviaregia.blogspot.com/2020/05/husaria.html). I decided at this point that the Warlord figures looked a bit later than 1620s period that I was aiming for, and were perhaps more suitable for the 1670s onwards. The units I’ve used so far have been from Foundry and TAG. Well, the thought of that box of Warlord Hussars sitting in my lead mountain had been a niggle in the back of my mind. Then the box was inexplicably joined by another! (Thanks, Phil!) This was too much to bear, and so I decided that I had to paint up a unit with the Warlord figures.

So here is a quick run down of the Warlord Games, Polish Winged Hussars box set. You get eight metal riders and eight metal horse figures in a box. As I form my cavalry in units of 12 figures I needed two boxes to make a unit, and of course three boxes will allow me to make two units! 

As I noted before, the Warlord figures are in very dynamic poses. There are four different horses, all in different states of galloping forward. One of the horse poses looks a little odd to me, but once ranked up with the others it is fine. The horses all have nice ‘fancy’ horse furniture, befitting these noble units, and have pistol holsters and the long koncerz type sword  on the left side of the saddle. 

There are six poses of hussars with lance, two at the charge, and the rest in various more ‘lance upright’ poses. There is also an officer figure, with two options for his right hand; either a sabre or a bulawa (a ceremonial mace). Finally there is a trumpeter. One of the lancer models can be used a standard bearer. 

The figures come with a nice selection of separate wings, also in metal. There are three different designs, all of which are probably of the later types of design in which they curve forward. The hussar figures have been sculpted to allow one or two wings to be added either to the riders back, or to rear of the saddle. Wings attached to the rider’s back seem to be later and final design for carrying wings. I chose to use the wings mounted to the rear of the saddles, that are moulded as part of the riders. I avoided using the most curved wings, and also used some shorter, straighter wings that I had in my stash for a bit of variety. By using the less curved wings, and by saddle mounting them, I was in my mind at least, giving the hussars an earlier look. The hussars armour still gives them a look that suggests to me, later than the 1620s. 

Warlord provided nice brass 80mm long spears for the lances. Hussar lances included a ball shaped hand guard. To represent this Warlord provide some small metal ball shaped hand grips in the set. These come with holes drilled through them which allow them to be mounted on the brass spears. This is a lovely touch and I have used this approach for all of my previous units of hussars. 

With the variety of horses and riders, all in dynamic poses, fitting everything together took a bit of time. This allowed for some experimentation and a small bit of filing and filling to get riders and mounts to fit neatly, with wings added to the saddles. As I wasn’t using the back mounting points for the wings these needed to be filled with some green stuff. I also made sure that the riders who would be carrying lances had their right hands drilled out, although I would fit the lances later after painting. 

Despite having the riders and mounts matched, I painted them separately. This requires a numbering system on the paint ‘handles’ to help match the correct riders to the correct mounts after painting. The figures were really nice to paint with lots of crisp detail. The horse tack is suitably fancy, and the hussars’ armour is also covered in a lot of detail. My humble skills could only go so far with this, but there is plenty of detail there to satisfy a really keen painter.

My attempts at tiger and leopard pelts.

There are loads of details to paint on the horses and riders.

An extra exotic snow-leopard.

I glued the riders to the horses after they were painted. Before adding the lances I painted the lances and added the lance pennants. These are from Flags of War and the cavalry standard is from a set of free downloads on Jose Manuel Chasco’s site (see here https://www.anotherminiaturespainter.com/wargames/28mm-polish-renaissance-cossack-flags/). Warlord provide pennants and a flag as part of the information leaflet in the box, but I had already used the design they provide on a previous unit and I wanted these to look different.  With the lances on the figures it was time for my regular basing. (See https://theviaregia.blogspot.com/2021/04/husaria-from-ground-up.html.)


I am really pleased with the finished unit. Despite the button-counter part of me knowing these look a little late for my 1620s army, they may sneak on to the tabletop to join their earlier comrades; they’re just too nice not to use! 

The finished unit placed into its Really Useful Box for storage.

Until next time!

Andy @ The Friends of General Haig (FOGH). 


Tuesday, 28 December 2021

“Bring on the Empty Horses!”

This blog post looks at providing riderless horses for the dismounted dragoons that I covered in my previous post. 

Horses for my dismounted dragoons, with horse holders from Bloody miniatures - 28mm

[Note. The title of this blog post is taken from David Niven’s autobiography. During the filming of the 1936 version of The Charge of the Light Brigade, starring Errol Flynn and David Niven, the director shouted this memorable phrase when he wanted the riderless horses brought in to the scene of the charge itself.  Ever since learning about this, our club has always referred to the riderless horses, used to represent dismounted dragoons and cavalry, in this way. ]

Errol Flynn in the 1936 version of Charge of the Light Brigade

An “empty horse” from the film.

My previous post covered James Butler’s dragoons, a unit in my Polish Lithuanian Commonwealth army for the 1620s (see https://theviaregia.blogspot.com/2021/12/what-butler-recruited.html). These were foot figures and I needed something to help represent them as dragoons. While dragoons typically fought on foot, I think it looks better to have something on the table top to show that they have mounts as well. 

The most fool proof approach would be to have a mounted version of the unit, a dismounted version, and set of riderless horses.  I have done this for previous units of dragoons but I have found that swapping the mounted unit off and back on to the table, as the dragoons dismount and remount, is a complete faff.   Typically, after doing this for the first time in a game, the mounted unit gets left off the table and some other convention is used to indicate if the unit is mounted or dismounted. Adding to this, I struggle to think of a game in which my dragoons have remounted during the action.

On this basis, for Butler’s dragoons, I have decided to just provide riderless horses to indicate the unit of dragoons. These riderless horses are from Avanpost (https://www.mezzersminis.co.uk/product-page/21-081-dismounted-dragoon-horse-holder).  They are sold in packs of two horses with a dismounted horse holder.  

Contents of the Avanpost 28mm resin Dismounted Dragoon pack.

I have chosen not to use the Avanpost horse holder minis, but instead used figures from the Bloody Miniatures range; the same used for the rest of the dismounted dragoon unit. For my riderless horses I have decided to use 8 horses and 2 horse holders. This is enough to give the impression of a set of riderless horses, held ready for the dragoons to remount at a moment’s notice.

Swappable horse holders.

I gave myself two additional challenges.  First, I wanted to be able to swap out the horse holder minis, and so be able to use the riderless horses in other situations. Secondly, I wanted to model how the horses were tethered. 

The top of a Warbases 2 x 2p base ‘tray’, cut in half, and the two 8cm square bases.

I used two 8cm square bases (2mm MDF from Warbases) for the horses, with 4 on each.  On each base I added part of a top piece from a Warbases basing tray, the same dimensions as my dismounted dragoon figures’ bases (UK 2 pence piece / 2p). Using one of the Warbases’ 2p  sized MDF bases with magnet holes I marked where a matching magnet hold would need to be in the 8cm square base and drilled a 5mm hole there. I then added a magnet (checking that the polarity would match the figures’ bases, of course!) to the square base. This provides a single figure base tray / sabot for a suitable horse holder figure that is also magnetised to stop the figure accidentally falling off the base.

The top of a base tray glued to the 8cm square base.

A Warbases 2p sized base, with a 5mm magnet hole, used as a template to mark where the magnet hole needs to go in the 8cm square base.

I realise that this is an entirely unnecessary step as I could have just permanently stuck a generic horse holder figure to each base, but is was relatively straightforward to do, and it satisfied my desire to get the most use out of painted figures. 

A metal tree stump with 4 tethers attached, from the Warlord Dragoon set, used to tether four of the Avanpost horses. Note the single base tray, with magnet, ready for the horse holder.

Scratch built tree stump and tethers made with twig, plastic card and green stuff bits.

For the tethers I had two solutions. When 17th century dragoons dismounted the horses’ reins would be passed to the men designated to stay with the horses, and so the horses in all likelihood would be tethered using their reins. The Avanpost figures are modelled with their reins loose, in front of them, but these were too short for my purposes and, being very thin resin, incredibly delicate. I therefore removed them and replaced them in two ways.

The first was to use a white metal piece that comes with the Warlord Dragoon set.  This has four sets of reins, all tied to a tree stump.  I only had one of these in my spare parts box, and so for the other four horses I made the stump from a garden twig, and the reins from thin pieces of plastic packaging.   Once the stumps, with reins attached, were glued to the bases the other ends of the reins were glued to each horse’s bridle. 


Extract illustrations from Wagner’s European Weapons & Warfare 1618-1648, published by Winged Hussar Publishing. 

[Historical note. Looking at Wagner’s European Weapons & Warfare 1618-1648, it’s possible that the loose horses’ reins were looped through the next horses reins in a daisy chain effect with the last set being held by the dismounted horse holder.  Wagner notes that this made separating the horses a laborious process as each horse could only be separated one at a time. I decided this would be tricky to model and so I have used an approach with each horse’s reins tied to a handily placed tree stump.]

The completed bases with horse holders/guards and some scenic scatter added to the bases.


The final bases are now ready to follow Bulter’s dragoons on the battlefield. I shall use them facing forward to represent the dragoons mounted, and facing to the rear to represent the dragoons dismounted. I am sure the bases will also come in handy for other occasions when the cry of “Bring on the empty horses!” is heard across the miniature battlefield. 

Until next time,

Andy @ The Friends of General Haig.